Pioneer DEH-P77DH Other Manual
Pioneer DEH-P77DH - Radio / CD Player Manual
 |
UPC - 012562500638
View all Pioneer DEH-P77DH manuals
Add to My Manuals
Save this manual to your list of manuals |
Pioneer DEH-P77DH manual content summary:
- Pioneer DEH-P77DH | Other Manual - Page 1
ENGLISH INSTALLATION MANUAL FRANÇAIS DEUTSCH MANUEL D'INSTALLATION DEH-P77DH This product conforms to CEMA cord colors. Le code de couleur des câbles utilisé pour ce produit est conforme à CEMA. FRANÇAIS ITALIANO NEDERLANDS - Pioneer DEH-P77DH | Other Manual - Page 2
8 ALARM OUTPUT (Brown 10 ALARM SENSOR (White/Red 11 DOOR LOCK (White/Orange 12 STARTER CUT-OFF (Blue/Brown 13 Avoiding Trouble 14 Installation 15 GM Panel Type Installation 16 GM ('94 & Newer Vehicles) Panel Type Installation 17 GM ('95 & Newer Monte Carlo, Caprice Classic, Lumina, Cavalier - Pioneer DEH-P77DH | Other Manual - Page 3
the blue/white lead. Connect to an external power amp's system remote control or the car's Auto-antenna relay control terminal (max. 300 mA 12 V DC). If the car features a glass antenna, connect to the antenna booster power supply terminal. • When an external power amp is being used with this system - Pioneer DEH-P77DH | Other Manual - Page 4
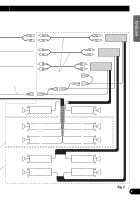
. This product Antenna jack Front output IP-BUS input (Blue) Multi-CD player (sold separately) To vehicle (metal) body. Black (ground) To lighting switch terminal. Orange To electric terminal controlled by ignition switch (12 V DC) ON/OFF. To terminal always supplied with power regardless of - Pioneer DEH-P77DH | Other Manual - Page 5
Subwoofer output or Non Fading output To system control terminal of the power amp or Auto-antenna relay control terminal (max. 300 mA 12 V DC). Blue/white Connecting cords with RCA pin plugs (sold separately) System remote control Left speaker + Front ≠ + Front ≠ + Rear ≠ White White/black - Pioneer DEH-P77DH | Other Manual - Page 6
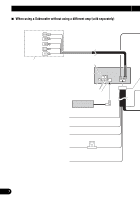
This product Antenna jack Front output IP-BUS input (Blue) Multi-CD player (sold separately) To vehicle (metal) body. Black (ground) To lighting switch terminal. Orange To electric terminal controlled by ignition switch (12 V DC) ON/OFF. To terminal always supplied with power regardless of - Pioneer DEH-P77DH | Other Manual - Page 7
the possibility that sounds may mute and memorized information could be erased. To Auto-antenna relay control terminal (max. 300 mA 12 V DC). Blue/white DEUTSCH FRANÇAIS ITALIANO to these speaker leads. Note: Change the Initial Setting of this product. (Refer to the Operation Manual.) Fig. 3 6 - Pioneer DEH-P77DH | Other Manual - Page 8
vehicle wiring systems, we recommend that your DFS Alarm be installed ONLY by a professional Pioneer installer. • Install the unit so that it can be quickly disconnected in case the engine doesn't start even if the unit operates correctly. (Refer to "STARTER CUT-OFF" and "Avoiding Trouble" sections - Pioneer DEH-P77DH | Other Manual - Page 9
ENGLISH ESPAÑOL DOOR SWITCH (White/Yellow) 7 Grounding Type Switch: GM, Chrysler, Japanese and most European vehicles Note: • Set DFS Alarm to recognize ground trigger from Alarm Menu. Set Door system to "DOOR-L :CLS". This product Blue/Brown (refer to "STARTER CUT-OFF".) White/Orange (refer to " - Pioneer DEH-P77DH | Other Manual - Page 10
DFS Alarm Installation 7 Positive (Non-grounding) Type Switch: Ford, Jaguar, Mercedes Note: • Set DFS Alarm to recognize positive trigger from Alarm Menu. Set Door System to "DOOR-H :CLS". This product Blue/ vehicle's door system type. 9 Follow the makers instructions as to installation and wiring. - Pioneer DEH-P77DH | Other Manual - Page 11
siren, horn or flash lights. 7 Recommended Wiring: 30 amp relay (sold separately) required to operate siren, horn or lights. • Connect Brown wire to one side of relay coil. • Connect ".) 30 A Fuse (sold separately) CONTROL ≠+ 30 A BATT OUTPUT GND Car battery Horn/Siren, etc. Fig. 6 10 - Pioneer DEH-P77DH | Other Manual - Page 12
is a negative triggered (Grounding) input that can be connected to various separately sold shock or glass sensors. There is no limit as to how many sensors are connected, so you can ensure total protection of your vehicle. Follow the makers instructions as to installation and wiring. Note: • If the - Pioneer DEH-P77DH | Other Manual - Page 13
remote control, your Pioneer DFS Alarm is deactivated. First, locate the two wires Pioneer Car Stereo. In the DFS Alarm menu, select the door-lock system type according to your vehicle (grounding or nongrounding). If you have difficulty wiring this connection, please consult your nearest Installation - Pioneer DEH-P77DH | Other Manual - Page 14
starter wire under dash, near steering column. • Cut starter wire and try to start vehicle to verify wire is correct. • Connect key side of cut wire to normally closed pin. • Connect starter side of cut wire to common pin. 30 A "SPDT" RELAY (sold separately) This product See the "Avoiding Trouble - Pioneer DEH-P77DH | Other Manual - Page 15
ENGLISH ESPAÑOL DEUTSCH Avoiding Trouble You may not be able to start the engine even if you operate the unit correctly. Take the following measures to deal with this problem. When installing a switch to deal with such a problem, install it where it is least conspicuous. 30 A "SPDT" RELAY (sold - Pioneer DEH-P77DH | Other Manual - Page 16
the unit, connect the wiring temporarily, making sure it is all connected up properly, and the unit and the system work properly. • Use only the parts included with the unit and supplied with the vehicle to ensure proper installation. The use of unauthorized parts can cause malfunctions. • Consult - Pioneer DEH-P77DH | Other Manual - Page 17
in the same way that it was fitted to the original car stereo. Sub dash 1 2 Quickie bolt slot Tube spacer Vehicle supplied bracket (not included) Quickie bolt Hex nut (5 mm) Vehicle supplied screw (not included) Bracket (not included) In some cases, this may not be provided on the vehicle - Pioneer DEH-P77DH | Other Manual - Page 18
to the unit in the same way that it was fitted to the original car stereo. Sub dash Bracket (L) 1 2 Quickie bolt slot Tube spacer Bracket (R) Hex nut (5 mm) Quickie bolt Vehicle supplied screw (not included) Bracket (not included) In some cases, this may not be provided on the vehicule - Pioneer DEH-P77DH | Other Manual - Page 19
, Caprice Classic, Lumina, Cavalier) Installation An example is shown in Fig. 14. Fit the bracket provided on the vehicle to the unit in the same way that it was fitted to the original car stereo. Sub dash Screw (3 × 5 mm) Bracket Vehicle supplied screw (not included) Dash panel Fig. 14 DEUTSCH - Pioneer DEH-P77DH | Other Manual - Page 20
Standard Chrysler/Dodge/Plymouth Installation An example is shown in Fig. 15. Fit the bracket provided on the vehicle to the unit in the same way that it was fitted to the original car stereo. Sub dash Bracket Screw (3 × 5 mm) Vehicle supplied screw (not included) Dash panel Fig. 15 19 - Pioneer DEH-P77DH | Other Manual - Page 21
ÑOL DEUTSCH '95 Cirrus/Stratus Installation An example is shown in Fig. 16. Fit the bracket provided on the vehicle to the unit in the same way that it was fitted to the original car stereo. Sub dash Screw (3 × 5 mm) Bracket Vehicle supplied screw (not included) Dash panel Fig. 16 FRANÇAIS - Pioneer DEH-P77DH | Other Manual - Page 22
Grand Cherokee/Sebring/Avenger Installation An example is shown in Fig. 17. Fit the bracket provided on the vehicle to the unit in the same way that it was fitted to the original car stereo. Sub dash Bracket Screw (3 × 5 mm) Vehicle supplied screw (not included) Dash panel Fig. 17 21 - Pioneer DEH-P77DH | Other Manual - Page 23
ENGLISH ESPAÑOL DEUTSCH FRANÇAIS ITALIANO NEDERLANDS 22 - Pioneer DEH-P77DH | Other Manual - Page 24
de démarreur (STARTER CUT-OFF) (Bleu/Brun) ...... 13 Pour éviter des ennuis 14 Installation 15 Installation sur un tableau type GM 16 Installation sur un tableau type GM (Véhicules '94 ou plus récents 17 Installation sur GM (Monte Carlo, Caprice Classic, Lumina, Cavalier '95 ou plus récents 18 - Pioneer DEH-P77DH | Other Manual - Page 25
aux véhicules avec une batterie de 12 V, avec pôle négatif à la masse. Avant de l'installer dans un véhicule de loisir, un camion ou un car, • Les haut-parleurs connectés à cet appareil doivent être tels qu'ils puissent supporter une puissance de 45 W, et que leur impédance soit comprise entre 4 et - Pioneer DEH-P77DH | Other Manual - Page 26
Ce produit Jack d'antenne Sortie vers l'avant Entrée IP-BUS (Bleu) Lecteur de CD à chargeur (vendu séparément) Fil de masse vers un élément en métal en sourdine audio sans aucune connexion. Dans le cas d'une installation à 2 hautparleurs, connecter aux 2 haut-parleurs à l'avant ou à l'arriére. - Pioneer DEH-P77DH | Other Manual - Page 27
ENGLISH FRANÇAIS DEUTSCH Sortie pour haut-parleur d'extrêmes graves, ou sortie sans atténuation Vers la borne de commande du système de l'amplificateur de puissance, ou vers la borne de commande de l'antenne motorisée (max. 300 mA, 12 V CC). Bleu/blanc Câbles de liaison munis de prises RCA ( - Pioneer DEH-P77DH | Other Manual - Page 28
Blanc/Orange Blanc/Rouge Brun Blanc/Jaune Reportez-vous à la section "Installation de l'alarme DFS." Sortie vers l'arrière Ce produit Jack d'antenne Sortie vers l'avant Entrée IP-BUS (Bleu) Lecteur de CD à chargeur (vendu séparément) Fil de masse vers un élément en mé - Pioneer DEH-P77DH | Other Manual - Page 29
≠ Blanc Blanc/noir Vert Vert/noir Gris Gris/noir Violet Violet/noir + Avant ≠ + Haut-parleur d'extrêmes ≠ graves Ne connectez rien à ces câbles de liaison aux haut-parleurs. Remarque: Change le réglage initial de ces appareils. (Reportez-vous - Pioneer DEH-P77DH | Other Manual - Page 30
conseillons de faire installer l'alarme DFS UNIQUEMENT par un technicien agréé par Pioneer. • Installez Fig. 4 et 5) Ce conducteur permet de mettre en service l'alarme DFS dès qu'une portière est ouverte; il commandé. Ce conducteur peut être relié aux systèmes de verrouillage des portières qui - Pioneer DEH-P77DH | Other Manual - Page 31
ENGLISH FRANÇAIS DEUTSCH Contacteur de portière (DOOR SWITCH) (Blanc/Jaune) 7 Contacteur avec mise à la masse: Véhicules Chrysler, GM ou japonais et la plupart des véhicules européens. Remarque: • Grâce au menu d'alarme, réglez l'alarme DFS de façon qu'elle puisse reconnaître le signal de masse - Pioneer DEH-P77DH | Other Manual - Page 32
Installation de l'alarme DFS 7 Contacteur sans mise à la masse (type positif): Ford, Jaguar, Mercedes Remarque: • Grâce au menu d'alarme mentaire, assurez-vous qu'il convient au système de portière dont le véhicule est équipé. Suivez les instructions du fabricant pour l'installation et le câblage. 9 - Pioneer DEH-P77DH | Other Manual - Page 33
Rouge (reportez-vous à "Détecteur d'alarme".) Brun Relais (vendu séparément) Blanc/Jaune (reportez-vous à "Contacteur de portière".) Fusible 30 A (vendu séparément) CONTROL 30 A Batterie (BATT) ≠+ Masse (GND) Batterie de véhicule Sortie (OUTPUT) Avertisseur sonore/sirène etc. Fig. 6 10 - Pioneer DEH-P77DH | Other Manual - Page 34
matière d'installation et de câblage, respectez les instructions du fabricant. Remarque: • Si le détecteur de choc est sensible aux vibrations du vé de l'alárme DFS puisse être obtenu dans les meilleures conditions voulues, Pioneer vous suggère ne n'utiliser que des câbles Blanc/Rouge et des dé - Pioneer DEH-P77DH | Other Manual - Page 35
conducteur au moyen de la télécommande, l'alarme DFS Pioneer se trouve mise hors service. Tout d'abord, recherchez les deux conducteurs du contacteur de glace est cassée et le verrouillage se trouve libéré. • Pioneer vous conseille d'installer un détecteur de choc et un détecteur de bris de glace - Pioneer DEH-P77DH | Other Manual - Page 36
Installation de l'alarme DFS Coupure de démarreur (STARTER CUT-OFF) (Bleu/Brun) Le conducteur Bleu/Brun fournit, pendant les 30 minutes qui suivent l'apparition du premier - Pioneer DEH-P77DH | Other Manual - Page 37
pas quand bien même l'appareil fonctionnerait-il correctement. En ce cas, procédez aux opérations suivantes pour résoudre le problème. Si vous installez un interrupteur pour un appareillage électrique (câbles, conducteurs, etc.) capable de supporter un ampérage supérieur à celui du relais utilisé. - Pioneer DEH-P77DH | Other Manual - Page 38
il ne gêne pas le conducteur et où il ne peut pas blesser les passagers en cas d'arrêt brusque, comme pendant un arrêt d'urgence. • L'angle de l'installation, ne doit pas dépasser 60° par rapport à l'horizontale, faute de quoi l'unité ne fournira pas ses performances optimales. (Fig. 11) 60° Fig. 11 - Pioneer DEH-P77DH | Other Manual - Page 39
sur un tableau type GM La figure 12 fournit un exemple d'installation. Fixez, à l'appareil, le support se trouvant d'origine sur le véhicule de la même manière qu'il l'était à l'autoradio d'origine. Tableau de bord secondaire Support se trouvant d'origine sur le véhicule (non comprise) Boulon - Pioneer DEH-P77DH | Other Manual - Page 40
récents) La figure 13 fournit un exemple d'installation. Fixez, à l'appareil, le support se trouvant d'origine sur le véhicule de la même manière qu'il l'était à l'autoradio d'origine. Tableau de bord secondaire Support (L) Support (R) Ecrou hexagonal (5 mm) Boulon autotaraudeur Entretoise Vis - Pioneer DEH-P77DH | Other Manual - Page 41
sur GM (Monte Carlo, Caprice Classic, Lumina, Cavalier '95 ou plus récents) La figure 14 fournit un exemple d'installation. Fixez, à l'appareil, le support se trouvant d'origine sur le véhicule de la même manière qu'il l'était à l'autoradio d'origine. Tableau de bord secondaire Vis (3 × 5 mm - Pioneer DEH-P77DH | Other Manual - Page 42
Chrysler, Dodge et Plymouth La figure 15 fournit un exemple d'installation. Fixez, à l'appareil, le support se trouvant d'origine sur le véhicule de la même manière qu'il l'était à l'autoradio d'origine. Tableau de bord secondaire Support Vis (3 × 5 mm) Vis se trouvant d'origine sur le véhicule (non - Pioneer DEH-P77DH | Other Manual - Page 43
, Stratus '95 La figure 16 fournit un exemple d'installation. Fixez, à l'appareil, le support se trouvant d'origine sur le véhicule de la même manière qu'il l'était à l'autoradio d'origine. Tableau de bord secondaire Vis (3 × 5 mm) Support Vis se trouvant d'origine sur le véhicule (non comprise - Pioneer DEH-P77DH | Other Manual - Page 44
Cherokee, Sebring, Avenger La figure 17 fournit un exemple d'installation. Fixez, à l'appareil, le support se trouvant d'origine sur le véhicule de la même manière qu'il l'était à l'autoradio d'origine. Tableau de bord secondaire Support Vis (3 × 5 mm) Vis se trouvant d'origine sur le véhicule - Pioneer DEH-P77DH | Other Manual - Page 45
ENGLISH FRANÇAIS DEUTSCH FRANÇAIS ITALIANO NEDERLANDS 22 - Pioneer DEH-P77DH | Other Manual - Page 46
- Pioneer DEH-P77DH | Other Manual - Page 47
- Pioneer DEH-P77DH | Other Manual - Page 48
Del Valle, Mexico D.F. C.P. 03100 TEL: 5-688-52-90 Published by Pioneer Corporation. Copyright © 1999 by Pioneer Corporation. All rights reserved. Publication de Pioneer Corporation. Copyright © 1999 Pioneer Corporation. Tous droits de reproduction et de traduction réservés. Printed
-
 1
1 -
 2
2 -
 3
3 -
 4
4 -
 5
5 -
 6
6 -
 7
7 -
8
-
9
-
10
-
11
-
12
-
13
-
14
-
15
-
16
-
17
-
18
-
19
-
20
-
21
-
22
-
23
-
24
-
25
-
26
-
27
-
28
-
29
-
30
-
31
-
32
-
33
-
34
-
35
-
36
-
37
-
38
-
39
-
40
-
41
-
42
-
43
-
44
-
45
-
46
-
47
-
48
 |
 |

MANUEL D’INSTALLATION
DEH-P77DH
INSTALLATION MANUAL
ENGLISH
FRANÇAIS
DEUTSCH
FRANÇAIS
ITALIANO
NEDERLANDS
This product conforms to CEMA cord colors.
Le code de couleur des câbles utilisé pour ce produit est
conforme à CEMA.