Pioneer DEQ 7600 Operation Manual
Pioneer DEQ 7600 - Equalizer / Crossover Manual
 |
UPC - 012562381916
View all Pioneer DEQ 7600 manuals
Add to My Manuals
Save this manual to your list of manuals |
Pioneer DEQ 7600 manual content summary:
- Pioneer DEQ 7600 | Operation Manual - Page 1
DSP audio processor Processeur audio DSP DEO 760 Operation Manual Mode d'emploi ,":7) rmormze_r: • Fi• R. LISP PIONEER' The Art of Entertainment - Pioneer DEQ 7600 | Operation Manual - Page 2
Using This Product Important Memory Backup Resetting the Microprocessor Precaution Using the Remote Controller Setting the Head Unit 2 Adjusting the Equalizer Curve 16 Selecting the Speakers to be Equalized 16 3 Recalling an Equalizer 26 Reproducing a Realistic Sound Field 11 Setting the - Pioneer DEQ 7600 | Operation Manual - Page 3
to prevent hearing damage or loss in the future. After all we want you listening for a lifetime. We Want You Listening For A Lifetime Used wisely, your new sound equipment will provide a lifetime of fun and enjoyment. Since hearing damage from loud noise is often undetectable until it is too late - Pioneer DEQ 7600 | Operation Manual - Page 4
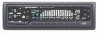
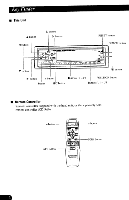
Key Finder • This Unit A button D button M button 41 button II Hit N.- er. 10.1.11 mi•Vi NammilMIS RESET button SUB.W button Pr pn ► II e" n button FR button 0. button + button Buttons F I - F5 POSITION button - button SFC button Buttons Ul - U3 • Remote Controller Remote - Pioneer DEQ 7600 | Operation Manual - Page 5
about 3 days, the settings of the position and equalizer curves, etc. are initialized. Resetting the Microprocessor The microprocessor must be reset under the following conditions: When using this product for the first time after installation. When the machine fails to operate properly. When strange - Pioneer DEQ 7600 | Operation Manual - Page 6
Before Using This Product Precaution • Keep this manual handy as a reference for operating procedures and precautions. • Always keep the volume low enough for outside sounds to be audible. • Protect the product from moisture. After-sales Service for Pioneer Products Please contact the dealer or - Pioneer DEQ 7600 | Operation Manual - Page 7
switch to the DSP position. 0 Z' • Lgc Cl) O t • ca t ■ Note: • The + and - buttons and the ATT button operate this unit directly and do not operate the head unit. (The volume level of the head unit can be adjusted with the +/- button in the head unit.) • You can recall equalizer curves with - Pioneer DEQ 7600 | Operation Manual - Page 8
Before Using This Product Setting the Head Unit You can make volume, fader and balance of the head unit to center position. Refer to the Operation Manual that accompanies the head unit. Note: • If you remove the car battery, or press the head unit's RESET button, the head unit's volume level - Pioneer DEQ 7600 | Operation Manual - Page 9
by about 90%. 1,01% AZZ WA. IWO. .1421 REV NM Repeat the preceding operation to return to previous volume. Note: • If the (+) or (-) buttons are used to cancel the Attenuator mode, the sound will resume at a lower volume than before. - Pioneer DEQ 7600 | Operation Manual - Page 10
the display in the following order: Peak Bound Display -o Peak Display -0 Simple Level Display -*Symmetric Display -o Radial Display -o Sub-woofer Display -0 Graphic Equalizer Display Note: • When sub-woofer output is set to OFF. you cannot switch to the Sub-woofer Display. • When the audio signal - Pioneer DEQ 7600 | Operation Manual - Page 11
SD IPS 'lb Ph a Pal If rral POPS ND DM WM, MII1 mr EMI 1, The sound intensity is displayed in a radial shape. Sub-woofer Display or 8 WI ME NV M. MD DM . As the music energy rises, the display speed changes. Graphic Equalizer Display WI DO PO UM DI III DP DI Ilt k L. aDUD = PDS as POLD - Pioneer DEQ 7600 | Operation Manual - Page 12
the sound from each speaker according to the seat position(s) and the number of people in the car and After choosing the position using the Position Selector function, it is possible to fine tune the sound image positioning by Equalizer mode To cancel the Fader/Balance mode, press the D button. - Pioneer DEQ 7600 | Operation Manual - Page 13
Il• NM NM UM kr 4-9', •F 25" - " R 25" is displayed as it moves from front to rear. Note: • "0" is the proper setting when 2 speakers are in use. 3. Shift the balance to the left or right speaker, respectively. r. AV nrr WI*/ nEn me wcu kirV 25" - " R 25" is displayed as it moves from - Pioneer DEQ 7600 | Operation Manual - Page 14
fields of a concert hall, stadium, etc. This function makes it possible to reproduce a realistic sound field as if you are in the concert hall, etc., in the car compartment. • Recall a sound field program. \G' PI I fml 113 no n. us no IA NM AL MY I SI" ''' 2A .11 • IN1 krz, .011 Orb OM Each - Pioneer DEQ 7600 | Operation Manual - Page 15
from the walls and reverberation. CLUB L f2to Lle CLUB Rzrpoedoupciees the soundforimage found inacsluobusn acficeoldmmodating abouta2b0s0ortpo i Suitable reproducing sound with facilitated don of reverberation and for enjoying music with a powerful beat. CONCERT HALL di ' CONCERT Reproduces - Pioneer DEQ 7600 | Operation Manual - Page 16
function. Moving the SFC fader toward the front locates you in the front part of the sound field and moving the SFC fader toward the rear locates you in its rear part. 1. Recall a sound field program. Refer to "Recalling a Sound Field Program" on page 13. 2. Enter the SFC Fader mode. Hold for - Pioneer DEQ 7600 | Operation Manual - Page 17
Curve Selecting the Speakers to be Equalized Select the speakers to which the equalizer effect is applied, from the front, rear or both. • Select the speakers to be Equalized. Each press changes the speakers ... '"lIe. a II IN N N I I I III tnIMOIN .:1 S. : , a I weN 4- -.-;Le Each - Pioneer DEQ 7600 | Operation Manual - Page 18
curve preset under that button. jrn (7'n r.7) ru-r) 05-1 o 6 EN, LN_SID nes M ae •IN SY Mk AU NrAl N,. MN NM en • Sequential Recall • Recall equalizer curves memorized in buttons Fl - F5 or Ul - U3. 'o mum Wt ME NA • N NI NI LA N LA IL nan z NI• UCeciE6) MU M.Y. •w i mn 11nro - Pioneer DEQ 7600 | Operation Manual - Page 19
nal 4 .j. 4"/ Emphasizes the portion of the voice band and minimizes the low-range to increase articulation. Use this mode to emphasize vocal signals or when listening to conversation. HIP HOP (F5 button) 10 In 14 hop music. This is the ideal equalization if you want to emphasize bass sound. - Pioneer DEQ 7600 | Operation Manual - Page 20
curve or user's curve is stored as the setting value for than curve. The next time the factory curve or user's curve is recalled, the equalizer curve after nuance control will be recalled. • After selecting the Nuance Control mode, if you do not perform an operation within about 25 seconds, the - Pioneer DEQ 7600 | Operation Manual - Page 21
mode in the following order: Fader/Balance mode -• Nuance Control mode -• Graphic Equalizer mode To cancel the Graphic Equalizer mode, press the D button. 2. Recall the equalizer curve to be adjusted. Refer to "Recalling an Equalizer Curve" on page 17. 3. Select the frequency to be adjusted. e PI - Pioneer DEQ 7600 | Operation Manual - Page 22
is recalled. If you want to retain the adjusted curve, store it in the memory of this unit. • After selecting the Graphic Equalizer mode, if you do not perform an operation within about 25 seconds, the Graphic Equalizer mode is canceled, and the display returns to spectrum analyzer indications. - Pioneer DEQ 7600 | Operation Manual - Page 23
as the user's curves in the memory under Ul - U3 buttons. • Press one of buttons Ul - U3 for 2 seconds or longer to store the desired equalizer curves. rin_f72") FG74 Cif) r1171 (117) 64,f, II M to IN Iq IN IN NI 'IN Le II • WI NI Hold for 2 seconds Note: • If an - Pioneer DEQ 7600 | Operation Manual - Page 24
Sub-woofer Setting Adjustment Sub-woofer Output This product is equipped with a sub-woofer output which can be switched ON or OFF. Initially sub-woofer output is ON. • Switch the sub-woofer output ON or OFF. a l"e O Irmo M) a.sa. M nl Mi 1? Note: • Select the OFF setting when you do not want the - Pioneer DEQ 7600 | Operation Manual - Page 25
3. Increase or decrease the output level. PI GI 10. " WI MI NM Mr M1 KM Mm You can adjust level between -6 and 6. Note: • You can select the sub-woofer setting mode only when sub-woofer output is switched ON. • After selecting the Sub-woofer setting mode, if you do not perform an operation within - Pioneer DEQ 7600 | Operation Manual - Page 26
when you switch on your vehicle's headlights. You can switch the dimmer ON/OFF. 1. Switch the head unit source OFF. Refer to the Operation Manual that accompanies the head unit. 2. While simultaneously pressing this unit's M and U2 buttons, press the head unit's SOURCE button to switch power ON - Pioneer DEQ 7600 | Operation Manual - Page 27
.5 Hz, 50 Hz. 80 Hz. 125 Hz, 200 Hz, 315 Hz. 500 Hz, 800 Hz, 1.3 kHz. 2 kHz. 3.2 kHz, 5 kHz. 8 kHz, 12.5 kHz, 20 kHz Equalization range ±12 dB Distortion 0.01% (1 kHz, 500 mV, 20 kHz LPF ) Frequency response 20 - 20,000 Hz Signal-to-noise ratio 91 dB (IHF-A network ) - Pioneer DEQ 7600 | Operation Manual - Page 28
San Lorenzo Num 1009 3er piso Desp. 302 Col. Del Valle, Mexico D.F. C.P. 03100 TEL: 5-688-52-90 Publication de Pioneer Electronic Corporation. 01997 Pioneer Electronic Corporation. Tous droits de reproduction et de traduction reserves. Printed in Japan Imprime au Japon UC - Pioneer DEQ 7600 | Operation Manual - Page 29
DEQ-7600 CD PIONEER The Art of Entertainment Printed in Japan Imprime au Japon - Pioneer DEQ 7600 | Operation Manual - Page 30
Note: • Before finally installing the unit, connect the wiring temporarily, making sure it is all connected up properly, and the unit and the system work properly. • Use only the parts included with the unit to ensure proper installation. The use of unauthorized parts can cause malfunctions - Pioneer DEQ 7600 | Operation Manual - Page 31
■ Installation with the rubber bush ■ Removing the Unit 7 11 12 0 0 10 5. Drill a 5.5 - 6.0 mm diameter hole. 6. Nut (5 mm) 7. Dashboard 8. Strap Be sure to use the strap to secure the back of the unit in place. The strap can be bend by hand to the desired anele. 9. Screw (5 X 16 mm) - Pioneer DEQ 7600 | Operation Manual - Page 32
DIN Rear-mount ■ Installation using the screw holes on the side of the unit 1. Remove the frame. screw holes of the head unit become aligned (are fitted), and tighten the screws at 2 places on each side. Use either truss screws (5 x 8 mm) or flush surface screws (5 x 9 mm), depending on the shape of - Pioneer DEQ 7600 | Operation Manual - Page 33
beginning installation. • Refer to the owner's manual for details on connecting the power amp and other units, then make connections correctly. • Secure the wiring with cable clamps or adhesive tape. To protect the wiring, wrap adhesive tape around them where they lie against metal parts. • Route - Pioneer DEQ 7600 | Operation Manual - Page 34
Connection Diagram 1. Connecting to a head unit having front and rear inputs. 3. Sub-woofer output Nwi■ Nwi • 4. External input 2. This unit i\-ii....- u +1 I • • • • 5. Front outpu I 6. Rear output • • 13. Conneetinit - Pioneer DEQ 7600 | Operation Manual - Page 35
Connection Diagram 33. Connecting to a head unit which does not have front and rear inputs 2. This unit 4. External input 3. Sub-woofer output • • 5. Front output • • 6. Rear output • • 13. Connecting cords with RCA pin plugs (sold separately) • • • • • 35. Not used in this connection. 6.Rear - Pioneer DEQ 7600 | Operation Manual - Page 36
Peery under normal use due to a nnuracturing detect when installed ano operated accordino ro the owners instructions P.M.:.0Seri me unit Will oe repairec or reolacec witn a dolt of comparable value. at le option cr PA or PUG. without cnarge to you 'or cars or actual -epair work. Parts suppled mis
-
 1
1 -
 2
2 -
 3
3 -
 4
4 -
 5
5 -
 6
6 -
 7
7 -
8
-
9
-
10
-
11
-
12
-
13
-
14
-
15
-
16
-
17
-
18
-
19
-
20
-
21
-
22
-
23
-
24
-
25
-
26
-
27
-
28
-
29
-
30
-
31
-
32
-
33
-
34
-
35
-
36
 |
 |
DSP
audio
processor
Processeur
audio
DSP
DEO
760
Operation
Manual
Mode
d'emploi
,
":
7
)
rmormze_r:
•
Fi•
R.
LISP
PIONEER'
The
Art
of
Entertainment