Pioneer DEQ 9200 Owners Manual
Pioneer DEQ 9200 - Equalizer / Crossover Manual
 |
UPC - 012562290973
View all Pioneer DEQ 9200 manuals
Add to My Manuals
Save this manual to your list of manuals |
Pioneer DEQ 9200 manual content summary:
- Pioneer DEQ 9200 | Owners Manual - Page 1
product. Before attempting operation, be sure to read this manual. Nous vous remercions d'avoir achete cet appareil PIONEER. Avant de ('utiliser, prendre soin de lire ce manuel. „ () PIONEER DSP AUDIO PROCESSOR 0(0 9:00 3X = PL, ~sx Tex as x 11,10 Ea PRP VOLUME (0 STUDIO /472CLUI CONCEPT - Pioneer DEQ 9200 | Owners Manual - Page 2
Operation Mode Connecting the Units Installation Using the Removable Front Panel Stereo/monaural Mode of Sub-woofer Basic Operations of the Unit Setting the Head Unit Adjusting the Volume Time Alignment Adjusting Network Auto-Equalizing Function Adjusting Equalizer Curve Adjusting the Listening - Pioneer DEQ 9200 | Owners Manual - Page 3
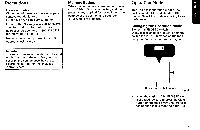
[1] [2] 13] [41 [5] ) • Fl F2•) E• F3 F4.1 IS. FS F6.) UI) [12] [111[10] [9] [8] O Ci?yo if [7] [6] Fig. 1 [15] II III [16] [171 [18] 11111 (O7 [14] Fig. 2 [22] [211 [201 [191 Fig. 3 3 - Pioneer DEQ 9200 | Owners Manual - Page 4
ZJea eadeaseet: ENnt PWo'sMAbW' •Wita Selecting fine audio equipment such as the unit you've just purchased is only the start of your musical enjoyment. Now it's time to consider how you can maximize the fun and excitement your equipment offers. This manufacturer and the Electronic Industries - Pioneer DEQ 9200 | Owners Manual - Page 5
PIONEER Service Station. In the United States please call 1-800-4211404 for product information or your nearest service center or 1-800-228-7221 for information on parts. Never remove the top case of the unit to attempt check or repairs of the position and equalizer curves, etc. are initialized - Pioneer DEQ 9200 | Owners Manual - Page 6
follows. • Network (P. 19) Adjusts the reproduced frequency ranges, level and phase of front, rear and sub-woofer speaker units. • Auto-equalizing (P. 23) Measures the acoustic property in the car compartment automatically and corrects the audio reproduce characteristics automatically based on the - Pioneer DEQ 9200 | Owners Manual - Page 7
manual for details on connecting the various cords of the power amp and other units, then make connections correctly. • Secure the wiring with cable clamps or adhesive tape. To protect the wiring, wrap adhesive tape around them where they lie against metal parts , auto-equalization cannot be carried - Pioneer DEQ 9200 | Owners Manual - Page 8
Connection Diagram PRO (Fig. 5) 1. Control unit 2. Hide-away unit When this connection is made, be sure to set the PRO/STD switch in the hide-away unit - Pioneer DEQ 9200 | Owners Manual - Page 9
Connection Diagram STD (Fig. 6) 1. Control unit 2. Hide-away unit In this connection, the PRO/STD switch in the hide-away unit remains in the STD position. 3. Sub- - Pioneer DEQ 9200 | Owners Manual - Page 10
the holes. Do not drill into the gas line, brake line, electrical wiring or other important parts. • It is extremely dangerous to allow the Control Unit lead to become wound round the steering column and shift lever. Install the Control Unit in such a way that it will not obstruct driving. • Do - Pioneer DEQ 9200 | Owners Manual - Page 11
and attach. Console, etc. Mounting base Velcro tape (Round surface) Remove the oil-paper from the back and attach. Fig. 9 Mounting Example 2: Installation of mounting bracket 1. Temporarily assemble the bracket. (Fig. 10) 0 O 0 7 O Screw O (4 x 6 mm) Fig. 10 2. Use screws (3 x 4 mm) to - Pioneer DEQ 9200 | Owners Manual - Page 12
the holder into the dashboard, then select the appropriate tabs according to the thickness of the dashboard material and bend them. Fig. 14 2. Install the mounting base and frame to the holder. (Fig. 15) Dashboard Screw (2.6 x 6 mm) Frame Pass the cord through the holder. Mounting base - Pioneer DEQ 9200 | Owners Manual - Page 13
Using the Removable Front Panel Parts Identification Fig. 1 [3] Display [121 Detach button The front panel of this unit can be removed as a theft deterrent. Detaching the Front Panel 1. Press button [12) - Pioneer DEQ 9200 | Owners Manual - Page 14
Precautions • Do not touch the contacts on the front panel or on the mounting base, since this may result in poor electrical contact. If dirt or other foreign substances get on the contacts, wipe them with a clean, dry cloth. (Fig. 22) (Fig. 23) • Do not touch the pin located above the mounting base - Pioneer DEQ 9200 | Owners Manual - Page 15
Basic Operations of the Unit Parts Identification Fig. 1 [4] Mode shift button [11] Display selector button Fig. equalizer Display When the Auto-equalizing function is performed, the obtained auto-equalizer curve is displayed. • The auto-equalizer display cannot be displayed while the auto-equalizer - Pioneer DEQ 9200 | Owners Manual - Page 16
Example 1: Nuance Control Mode "of a Example 2: 3-band Parametric Equalizer Ad.ustment Mode „.. C: Sound Field Control Mode ■ ■ • D: Network Adjustment Mode Using the Clear Button Pressing the Clear button will reset the micro-processor. Press the Clear button [14] in the following cases - Pioneer DEQ 9200 | Owners Manual - Page 17
the volume, fader and balance on the head unit, refer to the Owner's Manual that accompanies the head unit. Note: • When the head unit volume is excessive with step 2. (Fig. 25) r------ _ Adjusting range Adjusting the Volume Parts Identification Fig. 1 [11 Volume buttons Fig. 3 [17] Numeric - Pioneer DEQ 9200 | Owners Manual - Page 18
of the sounds from different speakers can be set by simply entering the distance between each speaker unit and the driver's seat. Parts Identification Fig. 1 [4] Mode shift button [5] Distance up/down buttons [6] Speaker selector buttons [7] Position selector button [10] Unit selector button [11 - Pioneer DEQ 9200 | Owners Manual - Page 19
4. Press (A) or (V) side of buttons [6] to select a speaker unit. Each time (A) or (7) side of buttons [6] is pressed, the selected speaker unit changes. HIGH-R Right high-range speaker HIGH-L Left high-range speaker MID-R Right middle/bass speaker MID-L Left middle/bass speaker LOW-R Right sub- - Pioneer DEQ 9200 | Owners Manual - Page 20
poor, try switching their phases. This may sometimes improve the sound continuity. Tips for Network Adjustment • Cutoff Frequency • In case the subwoofer are installed on the rear tray, setting a high cutoff frequency for "LOW" or "SW" results in separation of bass sound which would be heard from - Pioneer DEQ 9200 | Owners Manual - Page 21
Parts Identification Fig. 1 [4] Mode shift button [5] Frequency up/down buttons [6] Level up/down buttons [9] Function buttons (F1) Slope selector (F2) Phase selector (F3) LOW PRO (F4) - Pioneer DEQ 9200 | Owners Manual - Page 22
5. Adjust the cutoff frequencies of all filters by repeating steps 2 to 4 for each of them. 6. Press (A) or (V) side of buttons [6] to adjust the level of speaker unit (= filter). 8. Press (F1) of buttons [9] to adjust the slope of filter. Each time (F1) of buttons [9] is pressed, the selected - Pioneer DEQ 9200 | Owners Manual - Page 23
to a flat property. MILD (F3) Compensation to an acoustic property making quiet music sound clearly in the car compartment. o. Note: • The equalizer curves displayed above are only for the reference target curves. Before operate the autoequalization To avoid traffic accident • Never attempt to - Pioneer DEQ 9200 | Owners Manual - Page 24
performed if the middle/bass speaker units are not connected in PRO mode or the front speakers are not connected in STD mode. • The auto-equalization is not carried out if fine-tuning of the position (fader/ balance) (P. 33) is extremely set. Do not adjust the fine tuning of the position - Pioneer DEQ 9200 | Owners Manual - Page 25
The created auto-equalizer curve is variable depending on the microphone installation position. If desired, it is also possible to perform auto-equalization by installing the microphone on auto-equalizing. 6. Switch the power of the head unit ON. (Refer to the owner's manual of the head unit.) 25 - Pioneer DEQ 9200 | Owners Manual - Page 26
is completed, the auto-equalizer is switched on (with "AUTO EQ" lighted [19]) automatically and the compensation with the auto-equalizer curve is applied to the output sound. 15.Remove the microphone and belt from their installed position and retain them. Retain the microphone and belt carefully - Pioneer DEQ 9200 | Owners Manual - Page 27
select 4 bands (4 center frequencies) between 80 Hz and 20 kHz from 25 frequencies and adjust the level of each band. The Q factor (inclination of the equalizer curve) of each frequency band can be selected separately. Q factor Set values: 1.2 or 2.6 dB/oct. The greater the value, the sharper the - Pioneer DEQ 9200 | Owners Manual - Page 28
OFF. (When the auto-equalizer is set to ON, the "AUTO EQ" [19] lights.) • In case an auto-equalizer curve has not been created, "AUTO EQ" [19] blinks for about of the speakers mentioned on the left to 12 o'clock position. Install the supplied microphone properly. Park the car in an as quiet place - Pioneer DEQ 9200 | Owners Manual - Page 29
want to add your own compensation to the acoustic property in the car compartment corrected by the auto-equalizing function. Adjust the equalizer curve as desired. Parts Identification Fig. 1 [4] Mode shift button [5] Frequency up/down buttons [6] Nuance control up/down buttons Level up/down buttons - Pioneer DEQ 9200 | Owners Manual - Page 30
a User's Curve" on page 32.) • It is not possible to apply nuance control to the FLAT (F6) factory curve or a user's curve without equalizer curve stored in it (= flat). 2. Press (A) or (V) side of buttons [6] to apply nuance control. Pressing the (A) side increases the amount of compensation - Pioneer DEQ 9200 | Owners Manual - Page 31
is recalled. If you want to retain the adjusted curve, store it in the memory of this unit. (Refer to the following section.) Storing Equalizer Curves The equalizer curves adjusted by the user can be stored as the user's curves in the memory under 4 buttons [8]. Storing a User's Curve in Memory - Pioneer DEQ 9200 | Owners Manual - Page 32
curve lights up.) • User's curves cannot be recalled in the auto-equalization mode (P. 25). They should be recalled outside the autoequalization mode. Adjusting to obtain natural acoustic property regardless of the seat positions. Parts Identification Fig. 1 [4] Mode shift button [5] Fader control - Pioneer DEQ 9200 | Owners Manual - Page 33
Fine tuning of the position (Fader/Balance) After choosing the position using the position selector function, it is possible to fine tune the sound image positioning by adjusting the fader and balance controls. • The fader control is not possible in PRO mode. • The fine tuning can be applied - Pioneer DEQ 9200 | Owners Manual - Page 34
the sound field control function. Moving the SFC fader toward the front locates you in the front part of the sound field and moving the SFC fader toward the rear locates you in its rear part. Sound Field Programs Preset in this Unit The following 5 sound field programs are preset. STUDIO/STUDIO - Pioneer DEQ 9200 | Owners Manual - Page 35
Parts Identification Fig. 1 [4] Mode shift button [51 SFC delay time up/down buttons [6] SFC level up/down buttons SFC fader control buttons [9] Function buttons (F1) STUDIO ( - Pioneer DEQ 9200 | Owners Manual - Page 36
of this unit can be operated with the DSP button. B O LIM • Fig. 28 Parts Identification and Function [23] • VOL CO Es0__0 In the equalizer adjustment mode: Used to recall factory preset equalizer curve. Each time the button is pressed, the selected factory preset equalizer curve changes - Pioneer DEQ 9200 | Owners Manual - Page 37
mm [7-3/8 (W) x 2-1/4 (H) x 1-1/8 (D) in.] 170 (W) x 46 (H) x 37.2 (D) mm [6-3/4 (W) x 1-3/4 (H) x 1-1/2 (D) in.] 183 (W) x 28.5 (H) x 135 (D) mm [7-1/4 (W) x 1-1/8 (H) x 5-3/8 (D) in.] 1.0 kg (2.2 lbs.) DSP Equalizer (3-band parametric) Frequency 20 Hz - 20 kHz, 1/3 oct. Level +10 dB Auto - Pioneer DEQ 9200 | Owners Manual - Page 38
CP. 03730 TEL: 52-5-598-3950 Published by Pioneer Electronic Corporation. Copyright 1995 by Pioneer Electronic Corporation. All rights reserved. Publication de Pioneer Electronic Corporation. © 1995 Pioneer Electronic Corporation. Tous droits de reproduction et de traduction reserves
-
 1
1 -
 2
2 -
 3
3 -
 4
4 -
 5
5 -
 6
6 -
 7
7 -
8
-
9
-
10
-
11
-
12
-
13
-
14
-
15
-
16
-
17
-
18
-
19
-
20
-
21
-
22
-
23
-
24
-
25
-
26
-
27
-
28
-
29
-
30
-
31
-
32
-
33
-
34
-
35
-
36
-
37
-
38
 |
 |

DSP
AUDIO
PROCESSOR
PROCESSEUR
AUDIO
DSP
OWNER'S
MANUAL
MODE
WEMPL01
Thankyou
for
purchasing
this
PIONEER
product.
Before
attempting
operation,
be
sure
to
read
this
manual.
Nous
vous
remercions
d'avoir
achete
cet
appareil
PIONEER.
Avant
de
('utiliser,
prendre
soin
de
lire
ce
manuel.
()
PIONEER
DSP
AUDIO
PROCESSOR
0(0
9:00
~sx
Tex
s
a
x
2,
,
DSP
61
$
„
3X
=
PL
,
11,10
Ea
PRP
I
I
1
nl
AlCf
fit
'
VOLUME
(0
r
gra
÷
1
11
,7
STUDIO
/472CLUI
CONCEPT
STADIUM)
CIA
SEC
FAD
NT
II
F2
ri
Id
PS
16
C
-F1
-
F2±:
'F3
F4
j
F5
F6
0I
,
u2,
ti
3
04
POSITION
P.
(V)
PIONEEIT
m
to
0
The
Art
of
Entertainment