Pioneer HTD-510DV Owner's Manual
Pioneer HTD-510DV Manual
 |
View all Pioneer HTD-510DV manuals
Add to My Manuals
Save this manual to your list of manuals |
Pioneer HTD-510DV manual content summary:
- Pioneer HTD-510DV | Owner's Manual - Page 1
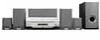
DVD RECEIVER XV-HTD510 SPEAKER SYSTEM S-HTD510 Operating Instructions - Pioneer HTD-510DV | Owner's Manual - Page 2
point within an equilateral triangle is intended to alert the user to the presence of important operating and maintenance (servicing) instructions in the literature accompanying the appliance. [FOR U.S. MODEL] CAUTION • Use of controls or adjustments or performance of procedures other than those - Pioneer HTD-510DV | Owner's Manual - Page 3
. SAFETY CHECK - Upon completion of any service or repairs to this product, ask the service technician to perform safety checks to determine that the product is in proper operating condition. WALL OR CEILING MOUNTING - The product should not be mounted to a wall or ceiling. HEAT - The product should - Pioneer HTD-510DV | Owner's Manual - Page 4
design This system is a safe level: ÷ Start your volume control at a low setting. ÷ Slowly increase the sound until you can hear it comfortably and clearly chain saw, pneumatic drill 120 Rock band concert in front of speakers, thunderclap 140 Gunshot blast, jet plane 180 Rocket launching pad - Pioneer HTD-510DV | Owner's Manual - Page 5
control 7 Using the remote control 7 Hints on installation 7 Avoiding problems with condensation 8 Moving the system 8 Discs compatible with this system 8 DVD Video regions 8 2 Connecting Up Connecting the speakers 9 Placing the speakers 10 Wall mounting the rear speaker system - Pioneer HTD-510DV | Owner's Manual - Page 6
) • Speaker cord 3m (9 ft. 10 in.) x1 (for subwoofer) Using this manual This manual is for the XV-HTD510 DVD Receiver. It is divided into several sections: system basics and connecting up (chapters 1 and 2); an explanation of the controls and displays (chapter 3); setting up for surround sound and - Pioneer HTD-510DV | Owner's Manual - Page 7
remote control Keep in mind the following when using the remote control: • Make sure that there are no obstacles between the remote control and the remote sensor appliances. ✗ Place on a window sill or other place where the system will be exposed to direct sunlight. ✗ Use in an excessively dusty or - Pioneer HTD-510DV | Owner's Manual - Page 8
of the following logos should play in this system. Other formats, including DVD-RAM, DVD-ROM, DVD-Audio, CD-ROM, SACD and Photo CD will not play. DVD Video compatibility: • Single-sided or double-sided discs DVD Video regions 1 ALL All DVD Video discs carry a region mark on the case somewhere that - Pioneer HTD-510DV | Owner's Manual - Page 9
IN VIDEO OUT 1 S-VIDEO OUT IN AUX OUT SUBWOOFER SPEAKERS CENTER ANTENNA H AM LOOP ANTENNA FM UNBAL 75Ω H AC INLET 1 Front L H H Rear R The speaker terminal tabs and supplied speaker cables are color-coded for simpler connection. 1 Use the speaker cables with the red sleeves to connect the - Pioneer HTD-510DV | Owner's Manual - Page 10
should not be placed near a TV or monitor. Wall mounting the rear speaker system Before mounting • Remember that this speaker system is heavy and that its weight may cause the wood screw to work loose or the wall to fail to support it, in which case the speaker system may fall on the floor. This is - Pioneer HTD-510DV | Owner's Manual - Page 11
to your TV FRONT REAR L DILGITAL COAX R R IN SUBWOOFER 1 SPEAKERS CENTER VIDEO OUT 1 DIGITAL IN VIDEO OUT S-VIDEO OUT COAX R TV TV/VCR IN jacks. This will enable you to hear the TV (or VCR) sound through this system. • If you want to connect both your TV and VCR, use the TV/VCR - Pioneer HTD-510DV | Owner's Manual - Page 12
a wall or other surface, perform steps 4 and 5 after first securing the stand with screws. Before fixing, make sure that the reception is satisfactory. FM wire antenna FRONT REAR ANTENNA L L L R R R H AC INLET VOLTAGE SELECTOR • Connect the FM wire antenna to the FM SUBWOOFER SPEAKERS - Pioneer HTD-510DV | Owner's Manual - Page 13
to play a digital audio component (MD player, etc.) through this system. FRONT L L R R REAR L R SUBWOOFER SPEAKERS CENTER DIGITAL COAX R L IN TV/ VCR IN VIDEO OUT S- players and satellite receivers. Check the instructions that came with your other component for more details. 13 En - Pioneer HTD-510DV | Owner's Manual - Page 14
& Displays Remote control DVD TUNER TV STANDBY /CD /BAND /AUX /ON TEST TONE SURROUND MUTE CH LEVEL MODE DSP - VOLUME + DVD SETUP SYSTEM SETUP 5 2 ENTER 3 TOP MENU MENU ∞ SOUND RETURN 7 6 - PREV e STEP/SLOW E 41 ¡ NEXT + ¢ CONDITION LAST MEMO SEARCH 1 2 3 DVD DISP - Pioneer HTD-510DV | Owner's Manual - Page 15
Controls & Displays 3 Front panel STANDBY/ON 1 1 2 DVD RECEIVER XV-HTD510 STANDBY CD ADVANCED DSP MODE THEATER VIDEO 3 45 6 1 2 3 4 5 DISC SKIP EXCHANGE 0 OPEN/CLOSE DISC 1 2 3 4 5 VOLUME DVD/CD TUNER/BAND TV/AUX CD MODE 7 3/8 4.1 ¡.¢ PHONES 18 17 16 15 14 13 12 11 10 - Pioneer HTD-510DV | Owner's Manual - Page 16
just the default settings. However, for really great surround sound, we recommend that you spend a few minutes making some settings that match this system to your listening room. Unless you change the layout of your speakers or main listening position, you only need to make most of these settings - Pioneer HTD-510DV | Owner's Manual - Page 17
no operation is performed within 20 seconds. • There are several other settings that you can make from the System Setup menu to further tailor your surround sound. See chapter 9 for more on this. • The speaker distance settings have no effect when the surround mode is set to VIR.SURR.1 or VIR.SURR - Pioneer HTD-510DV | Owner's Manual - Page 18
discs, we strongly recommend using the Setup Navigator. This makes all the basic DVD system settings for you. DVD SETUP 5 2 ENTER 3 ∞ 7 1 Make sure that the system controls: 5, ∞ - cursor up/down ENTER - select the highlighted menu option 2 - go back to the previous question The control - Pioneer HTD-510DV | Owner's Manual - Page 19
releasing the button: press 6 to resume normal playback.) On the front panel use: ¡·¢ 4 Load a disc with the label side facing up, using the disc tray guide to align the disc (if you're loading a double- sided DVD disc, load it with the side you want to play face down). ¢ If you want to load - Pioneer HTD-510DV | Owner's Manual - Page 20
subsequent press. While using the DVD playback controls, you may see the or mark displayed on-screen. means that the operation is not allowed by the system. means that the operation is not allowed by the disc. Navigating DVD disc menus Some DVD discs contain menus. Sometimes these are displayed - Pioneer HTD-510DV | Owner's Manual - Page 21
using the automatic (search) and manual (step) tuning functions. Once you are tuned to a station you can memorize the frequency for recall later-see Saving station presets on page 22 for more on how to do this. TUNER /BAND TV /AUX SYSTEM SETUP 2 ENTER 3 You can load two discs at a time in the - Pioneer HTD-510DV | Owner's Manual - Page 22
tuned) indicator lights in the display. Improving FM stereo sound If you're listening to a stereo FM broadcast, saves the effort of manually tuning in each time. This system can save up to to the tuner. If you're using the front panel controls, press TUNER/ BAND repeatedly to select the preset station - Pioneer HTD-510DV | Owner's Manual - Page 23
six settings are Advanced Theater effects. • Musical - Concert hall sound. • Drama - Classic, mid-size movie theater sound. • Action - Large, modern movie theater sound. • Virtual Surround 1 (VIR.SURR.1) - Virtual surround sound from just the main front stereo speakers and a subwoofer. Use this - Pioneer HTD-510DV | Owner's Manual - Page 24
Hall 1 - Large, wood-paneled concert hall sound. • Hall 2 - Large, stone-walled concert hall sound. • Jazz - Live jazz club sound. • Dance - Nightclub sound. • Theater 1 - Classic, mid-size movie theater sound. • Theater 2 - Large, modern movie theater sound. • Simulated Stereo - Virtual stereo for - Pioneer HTD-510DV | Owner's Manual - Page 25
Once the power is switched off or the function is changed, the Record mode automatically reverts to off. • The LFE channel is not recorded. 1 Press SOUND. 2 Use the 2 or 3 buttons to select RECORD MODE. 3 Press ENTER. The display shows RECMODE ON. 4 Press ENTER again. The Record Mode is now active - Pioneer HTD-510DV | Owner's Manual - Page 26
starts from the point specified. When playing a DVD disc recorded with dialog in two or more languages, you can switch audio language 1 Press SEARCH (SHIFT & 3) (remote only) anytime during playback. to choose between: • Title search (DVD only) • To display the current audio language - Pioneer HTD-510DV | Owner's Manual - Page 27
to the TITLE/TRACK field and enter a title or track number. Step Disc Title Track 1 1 06 2 3 4 5 6 4 ¢ Page Move Chap Program Disc 1 DVD Total 37 Title PLAY Play PROGRAM Exit For DVDs, this number will be a disc title; for Video CDs and audio CDs, a track number. For example, to - Pioneer HTD-510DV | Owner's Manual - Page 28
You can set the player to repeat individual tracks on CDs or Video-CDs, chapters or titles on DVD discs, a whole disc, or all the discs loaded in the player. It's also possible to loop a section of a disc. You can use the repeat together with the programming mode to repeat the tracks/chapters in the - Pioneer HTD-510DV | Owner's Manual - Page 29
is where in the disc tray. Bookmarking a place in a disc If you watch only part of a DVD disc with the intention of picking up later where you left off, you can bookmark the place then resume playback at a later date without having to manually search for the right place. You can use this feature - Pioneer HTD-510DV | Owner's Manual - Page 30
Time 6.30 Track Time 01 3.32 02 2.58 1/1 CD/Video CD DISPLAY Exit • To display the time remaining on a DVD disc, press and hold DVD DISP (SHIFT & CLEAR). The display shows the disc time remaining for as long as you hold the button. Release the button to revert to the previous display. 30 En - Pioneer HTD-510DV | Owner's Manual - Page 31
can use the timer as an alarm clock to wake up to the sound of a disc loaded or the radio. If you have an external component operated by you need to set a system switch off time, as well as a switch on time. 1 Select the source that you'd like to wake up to. For a disc, press DVD/CD; for the radio - Pioneer HTD-510DV | Owner's Manual - Page 32
On time • Off time • Function (DVD, etc.) • Volume Using the sleep timer The sleep timer switches the system into standby after a specified amount of time re playing a CD or Video CD in repeat mode. If you set a disc playing in repeat mode after setting the sleep timer to SLEEP AUTO, it - Pioneer HTD-510DV | Owner's Manual - Page 33
subwoofer. Dynamic Range Control The dynamic range of a source is the difference between the quietest and the loudest sounds. The dynamic is switched off completely. This may be useful late at night, for example. 1 Press SYSTEM SETUP. 2 Press the 2 or 3 button until you see D.R.C. in the display. - Pioneer HTD-510DV | Owner's Manual - Page 34
, a guitar tuition disc might have the guitar speakers, or mixed). • You can't change this setting if the Record mode is on (see page 25). 1 Press SYSTEM or more speakers for a more balanced sound. You can do this in apply to Standard and all Advanced Theater effects. • The headphone level is - Pioneer HTD-510DV | Owner's Manual - Page 35
gives you access to all the system's DVD settings. Press DVD SETUP to display/leave the menu and the cursor (25∞3) and ENTER buttons on the remote to navigate and select options. In some screens you can press RETURN to leave the screen without making any changes. The controls for each menu are shown - Pioneer HTD-510DV | Owner's Manual - Page 36
-Frame Angle Indicator -Auto Move SETUP Exit The player uses one of two processes when displaying a still frame from a DVD disc. The default Auto setting lets the system decide which to use. Field - produces a stable, generally shake-free image. Frame - produces a sharper image, but more prone to - Pioneer HTD-510DV | Owner's Manual - Page 37
also want to refer to the Language code list on page 43. You can change or switch off the subtitles on a DVD disc any time during playback using the SUBTITLE Move SETUP Exit When set to On, the system always selects the default audio language on a DVD disc (French dialog for a French movie, for - Pioneer HTD-510DV | Owner's Manual - Page 38
This setting specifies in which language the disc menus should appear. Leave on the default setting for menus to appear in the same language as your Subtitle Language-see page 37. Video Language General DVD Language List of Languages Code (0~2) ja: Japanese 1 00 1 Move +/- RETURN Return ENTER - Pioneer HTD-510DV | Owner's Manual - Page 39
control over what your children watch. The player can be set to one of eight levels. Setting the level at 1 means that any disc with any level of restriction will need the password in order to watch it, while setting it at level 8 gives unlimited access. DVD discs guide to each level-check the disc - Pioneer HTD-510DV | Owner's Manual - Page 40
10 DVD Setup Menu 3 Input a new password, then press ENTER. Video Language General Parental Lock: Password Change Enter 4-Digit Code Move +/- the color of the screen when the player is stopped (or playing an audio disc). Select Other if you want to make your own background color. Follow the - Pioneer HTD-510DV | Owner's Manual - Page 41
format. 1 Switch the system into standby. 2 Press SYSTEM SETUP. 3 Press the Disc lens cleaner The disc pickup lens should not become dirty in normal use, but if for some reason it should malfunction due to dirt or dust, consult your nearest Pioneer authorized service DVD cleaning kit to clean a disc - Pioneer HTD-510DV | Owner's Manual - Page 42
sound system developed by Digital Theater Systems as an alternative to Dolby Digital. DTS discs discs, for example. Regions (DVD only) These associate discs and players with particular areas of the world. This unit will only play discs that have compatible region codes. You can find the region code - Pioneer HTD-510DV | Owner's Manual - Page 43
tr ) Tsonga ( ts ) Tatar ( tt ) Twi ( tw ) Ukrainian ( uk ) Urdu ( ur ) Uzbek ( uz ) Vietnamese ( vi ) Volapük ( vo ) Wolof ( wo ) Xhosa ( xh ) Yoruba ( yo ) Zulu ( zu ) Code 1721 1813 1814 1815 1823 1901 1904 1907 1908 1909 1911 1912 1913 1914 1915 1917 1918 1919 1920 1921 1922 1923 2001 2005 2007 - Pioneer HTD-510DV | Owner's Manual - Page 44
trouble cannot be rectified after checking the items below, ask your nearest Pioneer authorized service center or your dealer to carry out repair work. Problem CDs, DVDs and Video CDs The disc -Vision System copy guard. Some discs include a copy prevention signal, and when this type of disc is - Pioneer HTD-510DV | Owner's Manual - Page 45
reset the unit for proper operation. If this does not correct the problem, please consult your nearest Pioneer When you first plug in this system the display shows a demo sequence. The demo will also start if the system is on in the DVD function but idle for more than 5 minutes. The demo will stop - Pioneer HTD-510DV | Owner's Manual - Page 46
the picture is presentedcheck the manual that came with the TV for details. Typical options are black bars either side, some form of stretched or zoomed presentation. 16:9 (Wide) When viewing a standard size TV or monitor Setting and appearance Screen format of disc Standard (TV programs, etc - Pioneer HTD-510DV | Owner's Manual - Page 47
(H) x 327 (D) mm 7 1/2 (W) x 14 3/16 (H) x 12 7/8 (D) in. Weight 4.8 kg (10 lbs. 9 oz.) † Antimagnetic design (EIAJ) speaker system conforms to the basic EIAJ standards. Supplied Items Remote control 1 AA/R6P dry cell batteries 2 AM loop antenna 1 FM antenna 1 Video cord (yellow 1 Power cord - Pioneer HTD-510DV | Owner's Manual - Page 48
in the U.S.A. and you wish to locate the nearest Pioneer Authorized Independent Service Company, or if you wish to purchase replacement parts, operating instructions, service manuals, or accessories, please call the number shown below. 8 0 0 - 4 2 1 - 1 4 0 4 Please do not ship your product to
-
 1
1 -
 2
2 -
 3
3 -
 4
4 -
 5
5 -
 6
6 -
 7
7 -
8
-
9
-
10
-
11
-
12
-
13
-
14
-
15
-
16
-
17
-
18
-
19
-
20
-
21
-
22
-
23
-
24
-
25
-
26
-
27
-
28
-
29
-
30
-
31
-
32
-
33
-
34
-
35
-
36
-
37
-
38
-
39
-
40
-
41
-
42
-
43
-
44
-
45
-
46
-
47
-
48
 |
 |

XV-HTD510
S-HTD510
DVD RECEIVER
SPEAKER SYSTEM
Operating Instructions