Pioneer HTP-072 Owner's Manual
Pioneer HTP-072 Manual
 |
View all Pioneer HTP-072 manuals
Add to My Manuals
Save this manual to your list of manuals |
Pioneer HTP-072 manual content summary:
- Pioneer HTP-072 | Owner's Manual - Page 1
HTP-072 Home Theater Package Ensemble de Cinéma Maison Paquete de Home Theater VSX-324-K-P AV Receiver Récepteur AV Receptor AV Register your product on http://www.pioneerelectronics.com (US) http://www.pioneerelectronics.ca (Canada) • Protect your new investment The details of your purchase will - Pioneer HTP-072 | Owner's Manual - Page 2
point within an equilateral triangle is intended to alert the user to the presence of important operating and maintenance (servicing) instructions in the literature accompanying the appliance. D3-4-2-1-1b_A1_En NOTE: This equipment has been tested and found to comply with the limits for a Class - Pioneer HTP-072 | Owner's Manual - Page 3
block any ventilation openings. Install in accordance with the manufacturer's instructions. 8) Do not install near any heat sources such as radiators unused for long periods of time. 14) Refer all servicing to qualified service personnel. Servicing is required when the apparatus has been damaged in - Pioneer HTP-072 | Owner's Manual - Page 4
options 25 05 Home menu Using the Home menu 27 Manual speaker setup 27 Speaker Setting 27 X.Over 28 Channel Level 28 Speaker Distance 29 The Input Assign menu 29 The Auto Power Down menu 29 The HDMI Setup menu 30 06 Additional information Troubleshooting 31 General 31 HDMI 32 Important - Pioneer HTP-072 | Owner's Manual - Page 5
set the video input on your TV to this receiver. Check the manual that came with the TV if you don't know how to do this. 4 The Input Assign menu (page 29) (When using connections other than the recommended connections.) The HDMI Setup menu (page 30) (When the connected TV supports the HDMI Audio - Pioneer HTP-072 | Owner's Manual - Page 6
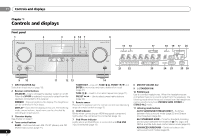
(page 21). PRESET / - Use to select preset radio stations (page 22). 5 Remote sensor Receives the signals from the remote control (see Operating range of remote control on page 9). 6 HDMI indicator Blinks when connecting an HDMI-equipped component; lights when the component is connected (page 14 - Pioneer HTP-072 | Owner's Manual - Page 7
channel. PRESET - Shows when a preset radio station is registered or called. MEM - Blinks when a radio station is registered. kHz/MHz - Lights when the character display is showing the currently received AM/FM broadcast frequency. 18 Speaker indicators Shows if the speaker system surround sound on - Pioneer HTP-072 | Owner's Manual - Page 8
to access: iPod CTRL - Switches between the iPod controls and the receiver controls (page 20). 10 TUNE /, PRESET /), ENTER Use the arrow buttons when setting up your surround sound system (page 27). Also used to control Blu-ray Disc/DVD menus/options. Use TUNE / can be used to find radio - Pioneer HTP-072 | Owner's Manual - Page 9
to change the speaker system on or off. When the SP OFF is selected, no sound is output from the speakers connected to this receiver. DIMMER - Dims or brightens the display. The brightness can be controlled in four steps. 13 SOURCE Turns on or off the power of the Pioneer DVD/DVR units when BD - Pioneer HTP-072 | Owner's Manual - Page 10
a 5.1 ch surround system can be enjoyed. To achieve the best possible surround sound, install your speakers as shown below. 5.1 channel surround system: R L C SW 't face each other. For DVD-Audio, the speakers should be more directly behind the listener than for home theater playback. • Try not to - Pioneer HTP-072 | Owner's Manual - Page 11
receiver will work with just two stereo speakers (the front speakers in the diagram) but using at least three speakers is recommended, and a complete setup is best for surround sound Subwoofer English Français Español HDMI IN IN OUT DVD SAT/CBL GAME BD IN 1 IN 1 ASSIGNABLE (CD) - Pioneer HTP-072 | Owner's Manual - Page 12
Both video and sound signals can be transmitted simultaneously with one cable. If connecting the player and the TV via this receiver, for both connections, use HDMI cables. HDMI Be careful to connect the terminal in the proper direction. Note • Set the HDMI parameter in Setting the Audio options - Pioneer HTP-072 | Owner's Manual - Page 13
video terminals. The yellow plugs distinguish them from cables for audio. Yellow VIDEO About video outputs connection This receiver is not loaded with a video converter. When you use HDMI cables for connecting to the input device, the same cables should be used for connecting to the TV. The - Pioneer HTP-072 | Owner's Manual - Page 14
audio cables (as shown). -If the TV supports the HDMI Audio Return Channel function, the sound of the TV is input to the receiver via the HDMI terminal, so there is no need to connect an audio cable. In this case, set ARC at HDMI Setup to ON (see The HDMI Setup menu on page 30). Important • If the - Pioneer HTP-072 | Owner's Manual - Page 15
terminal This diagram shows connections of a TV and DVD player (or other playback component) with no HDMI terminal to the receiver. Note • In order to listen to the audio from the TV that is connected to this receiver using a analog audio cables, set-up for analog audio input is required (see The - Pioneer HTP-072 | Owner's Manual - Page 16
improve reception and sound quality, connect receiver. Note • An iPod/iPhone can be connected to the receiver. For details on supported receiver. • For the cable connection, also refer to the operating instructions best reception. 4 Connect the FM wire antenna into the FM antenna socket. For best - Pioneer HTP-072 | Owner's Manual - Page 17
process begins. You cannot carry out any operations during this process. The HDMI indicator in the front panel display blinks during this process, and you can turn on this receiver once it has stopped blinking. When you set ARC at HDMI setup to OFF, you can skip this process. For details, see The - Pioneer HTP-072 | Owner's Manual - Page 18
03 Basic playback Chapter 3: Basic playback Playing a source Here are the basic instructions for playing a source (such as a DVD disc) with your home theater system. RECEIVER SLEEP TV SOURCE CONTROL RECEIVER INPUT SELECT BD DVD CD INPUT TUNER iPod/USB SAT/CBL CH GAME TV SIGNAL SEL AUTO/ - Pioneer HTP-072 | Owner's Manual - Page 19
. For more details, refer to the instruction manual supplied with your DVD player. Tip • In order to enjoy the picture and/or sound from devices connected to each terminal, select the input by doing the following. Video/Audio (HDMI) DVD SAT/CBL GAME BD Audio DVD CD SAT/CBL TV SIGNAL SEL C1 - Pioneer HTP-072 | Owner's Manual - Page 20
controls This receiver's remote control buttons can be used for basic playback of files stored on an iPod. • Press iPod/USB to switch the remote control to the iPod/ USB operation mode. ECO MUTE AUDIO PARAMETER TOP MENU TUNE TOOLS MENU VOLUME BASS TRE PRESET PRESET ENTER HOME MENU PTY - Pioneer HTP-072 | Owner's Manual - Page 21
other stations. Manual tuning To change the frequency one step at a time, press TUNE /. High speed tuning Press and hold TUNE / for high speed tuning. Improving FM sound If the TUNE or ST indicators don't light when tuning to an FM station because the signal is weak, set the receiver to the - Pioneer HTP-072 | Owner's Manual - Page 22
manually tuning in each time. This unit can memorize up to 30 stations. RECEIVER SLEEP TV SOURCE CONTROL AUDIO PARAMETER TOP MENU TUNE TOOLS MENU VOLUME PRESET PRESET RECEIVER INPUT SELECT BD DVD CD INPUT TUNER iPod/USB SAT/CBL CH ENTER HOME remote position is blinking on the display - Pioneer HTP-072 | Owner's Manual - Page 23
below for more on these decoding formats). Listening in surround sound ALC/ STANDARD ALC/ STANDARD SURR Using this receiver, you can listen to any source in surround sound. However, the options available will depend on your speaker setup and the type of source you're listening to. • If the - Pioneer HTP-072 | Owner's Manual - Page 24
DIRECT Sources are heard according to the settings made in the Manual SP Setup (speaker setting, channel level, speaker distance), as well as with dual mono settings. You will hear sources according to the number of channels in the signal. Phase Control, Sound Delay, Auto Delay, LFE Attenuate and - Pioneer HTP-072 | Owner's Manual - Page 25
AUDIO PARAMETER menu, it is unavailable due to the current source, settings and status of the receiver. RECEIVER SLEEP TV SOURCE CONTROL AUDIO PARAMETER TOP MENU TUNE TOOLS MENU VOLUME PRESET RECEIVER INPUT SELECT BD DVD CD INPUT ENTER HOME MENU PTY iPod CTRL TUNE BAND RETURN 1 Press - Pioneer HTP-072 | Owner's Manual - Page 26
You shouldn't have any problems using this with most SACD discs, but if the sound distorts, it is best to switch the gain setting back to 0 dB. g. This feature is only available when the connected display supports the automatic audio/video synchronizing capability ('lip-sync') for HDMI. If you find - Pioneer HTP-072 | Owner's Manual - Page 27
not during standby (see The HDMI Setup menu on page 30). Manual speaker setup This receiver allows you to make detailed settings to optimize the surround sound performance. You only need to make these settings once (unless you change the placement of your current speaker system or add new speakers - Pioneer HTP-072 | Owner's Manual - Page 28
factor when setting up a home theater system. CAUTION • The test tones used in the Channel Level settings are output at high volume. 1 Select 'Manual SP Setup' from the Home Menu. 2 Select 'Channel Level' from the Manual SP Setup menu. 1.Manual SP Setup a.Speaker Setting b.X.Over c.Channel Level - Pioneer HTP-072 | Owner's Manual - Page 29
automatically turn off the receiver after a specified time has passed (when the power has been on with no operation for several hours). • Default setting: OFF 1 Select 'Auto Power Down' from the Home Menu. Home Menu 1.Manual SP Setup 2.Input Assign 3.Auto Power Down 4.HDMI Setup 3.Auto Power Down - Pioneer HTP-072 | Owner's Manual - Page 30
from the Home Menu. Home Menu 1.Manual SP Setup 2.Input Assign 3.Auto Power Down 4.HDMI Setup 4.HDMI Setup ARC OFF Standby Through [ OFF ] Return Return 2 Choose the 'ARC' setting you want. When a TV supporting the HDMI Audio Return Channel function is connected to the receiver, the sound of - Pioneer HTP-072 | Owner's Manual - Page 31
deck away from your receiver, until the noise disappears. No sound is output or a noise is output when software with DTS is played back. Make sure the player's settings are correct and/or the DTS signal out is on. Refer to the instruction manual supplied with the DVD player. 31 En English Fran - Pioneer HTP-072 | Owner's Manual - Page 32
Speed HDMI®/™ Cable) to connect this receiver to a component or TV with the Deep Color feature. The OSD screen (Home Menu, etc.) isn't displayed. The OSD will not appear if you have connected using the HDMI output to your TV. Use composite connections when setting up the system. No sound, or sound - Pioneer HTP-072 | Owner's Manual - Page 33
appears in the display to indicate that the receiver has been reset to the factory default settings. Important • If the ARC function is ON, you may not be these will corrode the surface. Specifications Amplifier section Continuous average power output of 60 watts* per channel, min., at 8 ohms, - Pioneer HTP-072 | Owner's Manual - Page 34
• Set your volume control at a low setting. • Slowly increase the sound until you can hear it comfortably and clearly, without distortion. • Once you have established a comfortable sound level, set the is illegal in many areas. S001a_A1_En 34 En © 2013 PIONEER CORPORATION. All rights reserved. - Pioneer HTP-072 | Owner's Manual - Page 35
Additional information 06 English Français Español 35 En - Pioneer HTP-072 | Owner's Manual - Page 36
Anki XXX IMPORTANT ATTENTION DANGER D´ELECTROCUTION NE PAS OUVRIR Ce symbole de l'éclair, placé dans un triangle équilatéral, a pour but d'attirer l'attention de l'utilisateur sur la présence, à l'intérieur du coffret de l'appareil, de "tensions dangereuses" non isolées d'une grandeur suffisante - Pioneer HTP-072 | Owner's Manual - Page 37
potentiels afin d'éviter d'endommager leur isolant. D3-7-13-67*_A1_Fr Cet appareil numérique de la Classe B est conforme à la norme NMB-003 du Canada. D8-10-1-3_A1_Fr Ce produit est destiné à une utilisation domestique générale. Toute panne due à une utilisation autre qu'à des fins privées (comme - Pioneer HTP-072 | Owner's Manual - Page 38
Menu Home Utilisation du menu Home 27 Configuration manuelle des enceintes 27 Réglage des enceintes 27 X.Over 28 Niveau de canal 28 Distance des enceintes 29 Menu d'affectation d'entrée 29 Le menu Auto Power Down 29 Le menu HDMI Setup 30 06 Informations supplémentaires Guide de dépannage - Pioneer HTP-072 | Owner's Manual - Page 39
surround, vous devez raccorder le lecteur Blu-ray Disc/DVD au récepteur à l'aide d'une connexion numérique. 6 Réglage des préférences de son • Utilisation de la fonction Sound Retriever (page 24) • Un meilleur son grâce à la fonction menu HDMI Setup (page 30) (Lorsque le téléviseur connecté prend - Pioneer HTP-072 | Owner's Manual - Page 40
et affichages Panneau avant 1 2 3 4 56 7 HDMI iPod iPhone INPUT SELECTOR STANDBY /ON SPEAKERS DIMMER DISPLAY BAND TUNER EDIT AUTO SURROUND/ ALC/ STREAM DIRECT STANDARD SURR ADVANCED SURROUND TUNE PRESET ECO iPod iPhone DIRECT CONTROL ENTER PHONES 8 AV RECEIVER VSX-324 15 16 - Pioneer HTP-072 | Owner's Manual - Page 41
'un signal audio numérique est sélectionné et que l'entrée audio sélectionnée n'existe pas. HDMI - S'allume lorsqu'un signal HDMI est sélectionné. Clignote lorsqu'un signal HDMI est sélectionné et que l'entrée HDMI sélectionnée n'existe pas. 26 DIR. S'allume lorsque le mode DIRECT ou PURE DIRECT est - Pioneer HTP-072 | Owner's Manual - Page 42
(page 18). Ceci permet de commander d'autres équipements Pioneer avec la télécommande. 6 SIGNAL SEL Appuyez pour sé DVD, etc.). Appuyez d'abord sur RECEIVER pour accéder au menu : AUDIO PARAMETER - Permet d'accéder aux options Audio (page 25). HOME MENU - Appuyez pour accéder au menu d'accueil (Home - Pioneer HTP-072 | Owner's Manual - Page 43
aussi d'accéder à d'autres fonctions après avoir appuyé sur la touche RECEIVER . (Par exemple, MIDNIGHT, etc.) 13 SOURCE Permet de mettre sous tension ou hors tension des équipements DVD/DVR Pioneer lorsque la source d'entrée BD, DVD ou CD est sélectionnée à l'aide des touches de fonctions d'entr - Pioneer HTP-072 | Owner's Manual - Page 44
plus haut que vos oreilles et légèrement inclinées vers le bas. Assurez-vous que les enceintes ne sont pas face à face. Pour les signaux DVD-Audio, les enceintes doivent être plus rapprochées de l'auditeur que lors de la lecture sur un appareil de cinéma à domicile. • Essayez de placer - Pioneer HTP-072 | Owner's Manual - Page 45
panneau arrière, l'alimentation peut être coupée par mesure de sécurité. Avant droite Avant gauche 02 Centrale Caisson de basses English Français Español HDMI IN IN OUT DVD SAT/CBL GAME BD IN 1 IN 1 ASSIGNABLE (CD) (TV) ASSIGNABLE COAXIAL OPTICAL ANTENNA AM LOOP VIDEO - Pioneer HTP-072 | Owner's Manual - Page 46
signaux Deep Color • Transfert de signaux x.v.Color • Audio Return Channel (voir la section Le menu HDMI Setup à la page 30) • Entrée de signaux audio numériques DTS-HD Master Audio), DVD-Audio, CD, SACD (DSD 2 canaux uniquement), Video CD, Super VCD. • Transmission de signal 4K - Il est possible que - Pioneer HTP-072 | Owner's Manual - Page 47
é pour le raccordement du téléviseur. Les signaux des entrées vidéo analogiques (composite) de cet appareil ne seront pas transmis par la sortie HDMI OUT. Périphérique de lecture Câbles audio numériques Les câbles audio numériques coaxiaux ou les câbles optiques disponibles dans le commerce doivent - Pioneer HTP-072 | Owner's Manual - Page 48
la fonction HDMI Audio Return Channel, le son du téléviseur est envoyé vers le récepteur via la prise HDMI et il n'est alors pas nécessaire de connecter un câble audio. Dans ce cas, réglez l'option ARC sur ON dans le menu de configuration HDMI Setup (voir la section Le menu HDMI Setup à la page - Pioneer HTP-072 | Owner's Manual - Page 49
-en une ANALOG AUDIO OUT R L DIGITAL AUDIO OUT OPTICAL COAXIAL VIDEO OUT Sélectionnez-en une ANALOG AUDIO OUT R L DIGITAL AUDIO OUT OPTICAL COAXIAL HDMI IN IN OUT DVD SAT/CBL GAME BD IN 1 IN 1 ASSIGNABLE (CD) (TV) ASSIGNABLE COAXIAL OPTICAL ANTENNA AM LOOP VIDEO - Pioneer HTP-072 | Owner's Manual - Page 50
02 Raccordement de votre équipement Raccordement des antennes Raccordez l'antenne cadre AM et l'antenne filaire FM comme indiqué ci-dessous. Pour améliorer la réception et la qualité du son, raccordez les antennes externes (voir la section Utilisation des antennes externes ci-dessous). fig. a fig - Pioneer HTP-072 | Owner's Manual - Page 51
instructions concernant la lecture sur le iPod, voir la section Lecture à partir d'un iPod à la page 19. AV RECEIVER VSX-324 HDMI iPod iPhone ET ENTER MASTER VOLUME 5V 1A Câble USB fourni avec l'iPod Ce récepteur iPod/iPhone Remarque • Lorsque la fonction ARC service après-vente PIONEER le - Pioneer HTP-072 | Owner's Manual - Page 52
03 Lecture de base Chapitre 3 : Lecture de base Lecture d'une source Voici les instructions de base pour lire une source (telle qu'un DVD) avec votre système home cinéma. RECEIVER SLEEP TV SOURCE CONTROL RECEIVER INPUT SELECT BD DVD CD INPUT TUNER iPod/USB SAT/CBL CH GAME TV SIGNAL SEL - Pioneer HTP-072 | Owner's Manual - Page 53
fonctions ne soient pas accessibles pour certains modèles. HDMI IN IN OUT • Ce récepteur a été développé et testé pour la version de logiciel de l'iPod/iPhone indiquée sur le site Web de Pioneer (http://pioneer.jp/homeav/support/ios/na/). DVD SAT/CBL GAME BD IN 1 IN 1 ASSIGNABLE (CD) (TV - Pioneer HTP-072 | Owner's Manual - Page 54
TOP MENU ECO TUNE TOOLS MENU VOLUME BASS MUTE TRE PRESET PRESET ENTER HOME MENU PTY iPod CTRL TUNE BAND RETURN MUTE 1 2 3 DISP SB l'interface USB située à l'avant de ce récepteur. Important • Pioneer n'est pas en mesure de garantir la compatibilité (fonctionnement et/ou alimentation - Pioneer HTP-072 | Owner's Manual - Page 55
est possible que les fichiers encodés avec certaines versions de Windows Media® Player ne puissent pas être lus. Pour écouter la radio Les étapes suivantes MENU VOLUME GAME TV SIGNAL SEL ENTER Acous.EQ S.RETRIEVER PHASE VOL HOME MENU PTY iPod CTRL TUNE BAND RETURN MUTE 1 Appuyez sur TUNER - Pioneer HTP-072 | Owner's Manual - Page 56
SLEEP TV SOURCE CONTROL AUDIO PARAMETER TOP MENU TUNE TOOLS MENU VOLUME PRESET PRESET RECEIVER INPUT SELECT BD DVD CD INPUT TUNER iPod/USB SAT/CBL CH ENTER HOME MENU PTY iPod CTRL TUNE BAND RETURN MUTE GAME TV SIGNAL SEL BASS TRE Acous.EQ S.RETRIEVER PHASE VOL 1 2 3 DISP - Pioneer HTP-072 | Owner's Manual - Page 57
de la télécommande. • L'audio est reproduit selon vos réglages surround et vous pouvez toujours utiliser les fonctions Midnight, Loudness, Phase Control, Sound Retriever et Tone. Utilisation des effets surround avancés ADV SURR ECO ADVANCED SURROUND La fonction surround avancé permet de créer - Pioneer HTP-072 | Owner's Manual - Page 58
des enceintes) définis dans le menu de configuration manuelle des enceintes Manual SP sont appliqués à la source, ainsi que les paramètres souvent amoindrie du fait de l'inégalité de l'image sonore. La fonction Sound Retriever a recours à une nouvelle technologie DSP pour restaurer un son de qualité - Pioneer HTP-072 | Owner's Manual - Page 59
RECEIVER INPUT SELECT BD DVD CD INPUT ENTER HOME MENU PTY iPod CTRL TUNE BAND RETURN 1 Appuyez sur RECEIVER volume. M/L OFF MIDNIGHT LOUDNESS S.RTV (Sound Retriever)b Lorsque des données audio sont (+6 dB) HDMI (Audio HDMI) Permet de spécifier l'acheminement du signal audio HDMI : sortie - Pioneer HTP-072 | Owner's Manual - Page 60
plus bas). 0 à 7 Réglage par défaut : 3 DIMEN (Dimension)h Règle la balance du son surround de l'avant vers l'arrière . b. Vous pouvez modifier à tout moment la fonction Sound Retriever à l'aide de la touche S.RETRIEVER. 26 automatique ('synchronisation labiale') pour HDMI. Si le délai d'attente - Pioneer HTP-072 | Owner's Manual - Page 61
du menu actuel. • Appuyez sur HOME MENU à tout moment pour quitter le menu d'accueil (Home). 4 Sélectionnez le réglage que vous souhaitez ajuster. Home Menu 1.Manual SP Setup 2.Input Assign 3.Auto Power Down 4.HDMI Setup Return • Manual SP Setup -Speaker Setting - Permet de préciser la taille - Pioneer HTP-072 | Owner's Manual - Page 62
retournez au menu Manual SP Setup. 1 Sélectionnez 'Manual SP Setup' dans le menu Home Menu. 2 Sélectionnez 'Channel Level' sur le menu Manual SP Setup. 1.Manual SP Setup a.Speaker Setting b.X.Over c.Channel Level d.Speaker Distance 1c.Channel Level Test Tone Manual Return ENTER:Next Return - Pioneer HTP-072 | Owner's Manual - Page 63
Vous retournez au menu Manual SP Setup. Astuce • Vous pouvez modifier les niveaux des canaux à tout moment en appuyant sur RECEIVER , puis sur CH 'Auto Power Down' dans le menu Home Menu. Home Menu 1.Manual SP Setup 2.Input Assign 3.Auto Power Down 4.HDMI Setup 3.Auto Power Down Auto Power Down - Pioneer HTP-072 | Owner's Manual - Page 64
vitesse. L'utilisation d'autres types de câble HDMI peut provoquer des dysfonctionnements. 1 Sélectionnez 'HDMI Setup' dans le menu Home Menu. Home Menu 1.Manual SP Setup 2.Input Assign 3.Auto Power Down 4.HDMI Setup 4.HDMI Setup ARC OFF Standby Through [ OFF ] Return Return 2 Choisissez - Pioneer HTP-072 | Owner's Manual - Page 65
mentaires Guide de service après-vente Pioneer. L'appareil se met automatiquement sous/hors tension et permute d'une entrée à l'autre. (Lorsque la fonction ARC est activée) La fonction CEC pour désactiver la sourdine. Réglez SIGNAL SEL sur H (HDMI), C1/O1 (numérique) ou A (analogique) selon le - Pioneer HTP-072 | Owner's Manual - Page 66
le mode d'emploi fourni avec votre lecteur de DVD. Impossible de faire fonctionner la télécommande. lumière directe. Appuyez sur la touche (RECEIVER) de la télécommande et passez en mode de HDMI à votre moniteur, reportez-vous au manuel du composant ou du moniteur ou prenez contact avec le service - Pioneer HTP-072 | Owner's Manual - Page 67
pendant deux secondes environ. 3 Lorsque RESET? apparaît à l'écran, appuyez sur cas, désactivez la fonction ARC ou mettez hors tension tous une fois que l'indicateur HDMI n'est plus affiché. Important Amplificateur Puissance de sortie moyenne continue à 60 watts* par canal, minimum, à 8 ohms, - Pioneer HTP-072 | Owner's Manual - Page 68
Section Entrée/Sortie numériques Borne HDMI Type A (19 broches) Type de sortie HDMI 5 V, 100 mA Prise USB (iPod) . . . . . Ultrarapide USB2.0 (Type A) 5 V, 1 A Divers Alimentation 120 V c.a., 60 Hz Consommation électrique 185 W En mode de veille 0,45 W Dimensions externes 435 mm (L) x 168 mm - Pioneer HTP-072 | Owner's Manual - Page 69
Informations supplémentaires 06 English Français Español 35 Fr - Pioneer HTP-072 | Owner's Manual - Page 70
Anki IMPORTANTE La luz intermitente con el símbolo de punta de flecha dentro un triángulo equilátero. Está convenido para avisar el usuario de la presencia de "voltaje peligrosa" no aislada dentro el producto que podría constituir un peligro de choque eléctrico para las personas. CAUTION RISK OF - Pioneer HTP-072 | Owner's Manual - Page 71
English Français Español Precaución Para evitar el peligro de incendios, deberá utilizarse un cable de conexión de clase 2 para la conexión con el altavoz, y deberá ponerse apartado de peligros para evitar daños en el aislamiento del cable. D3-7-13-67*_A1_Es Este producto es para tareas domésticas - Pioneer HTP-072 | Owner's Manual - Page 72
opciones de Audio 25 05 Home menu Cómo utilizar el Home menu 27 Configuración manual de los altavoces 27 Ajuste de altavoz 27 X.Over 28 Nivel de canales 28 Distancia de altavoces 29 El menú Input Assign 29 El menú Auto Power Down 29 El menú HDMI Setup 30 06 Información adicional Soluci - Pioneer HTP-072 | Owner's Manual - Page 73
/DVD Sound Retriever) (página 24) • Sonido mejorado con Phase Control (página 24) • Ajuste de las opciones de Audio (página 25) • Configuración manual de los altavoces (página 27) 4 El menú Input Assign (página 29) (Cuando se usan otras conexiones que no son las recomendadas.) El menú HDMI Setup - Pioneer HTP-072 | Owner's Manual - Page 74
e indicaciones Panel frontal 1 2 3 4 56 7 HDMI iPod iPhone INPUT SELECTOR STANDBY /ON SPEAKERS DIMMER DISPLAY BAND TUNER EDIT AUTO SURROUND/ ALC/ STREAM DIRECT STANDARD SURR ADVANCED SURROUND TUNE PRESET ECO iPod iPhone DIRECT CONTROL ENTER PHONES 8 AV RECEIVER VSX-324 15 16 - Pioneer HTP-072 | Owner's Manual - Page 75
se ha seleccionado una señal de audio y la entrada de audio seleccionada no está disponible. HDMI - Se ilumina cuando se selecciona una señal HDMI. Parpadea cuando se ha seleccionado una señal HDMI y la entrada HDMI seleccionada no está disponible. 26 DIR. Se ilumina cuando se activa el modo DIRECT - Pioneer HTP-072 | Owner's Manual - Page 76
(página 18). De este modo podrá controlar otros componentes de Pioneer con el mando a distancia. 6 SIGNAL SEL Púlselo para DVD, etc.). Pulse RECEIVER primero para acceder a: AUDIO PARAMETER - Utilice este botón para acceder a las opciones de audio (página 25). HOME MENU - Muestra la pantalla HOME - Pioneer HTP-072 | Owner's Manual - Page 77
de la pantalla. Se pueden seleccionar cuatro niveles de luminosidad. 13 SOURCE Desactiva la alimentación de las unidades de DVD/DVR de Pioneer cuando se selecciona BD, DVD o CD mediante los botones de función de entrada. 14 Botones TV CONTROL Estos botones de control sólo se pueden emplear - Pioneer HTP-072 | Owner's Manual - Page 78
y a una altura de entre 60 cm y 90 cm con respecto a los oídos del usuario. Asegúrese de que los altavoces no queden frente a frente. Para DVD-Audio, los altavoces deben situarse más directamente detrás del oyente que para la reproducción de cine en casa. • Intente no colocar los altavoces de sonido - Pioneer HTP-072 | Owner's Manual - Page 79
trasero, podría provocar un corte de corriente como medida de seguridad. Frontal derecho 02 Frontal izquierdo Central Altavoz de subgraves English Français Español HDMI IN IN OUT DVD SAT/CBL GAME BD IN 1 IN 1 ASSIGNABLE (CD) (TV) ASSIGNABLE COAXIAL OPTICAL ANTENNA AM LOOP VIDEO - Pioneer HTP-072 | Owner's Manual - Page 80
(consulte El menú HDMI Setup en la página 30 DVD-Audio, CD, SACD (DSD sólo 2 canales), Video CD, Super VCD • Transferencia de señal de 4K - Según el equipo conectado, es posible que esto no funcione correctamente. - Las señales 4K 24p, 4K 25p y 4K 30p son compatibles. Nota • Utilice un Cable HDMI - Pioneer HTP-072 | Owner's Manual - Page 81
vídeo Este receptor no incorpora un conversor de vídeo. Cuando utilice cables HDMI para conectar el dispositivo de entrada, es preciso usar el mismo tipo de deo analógico (de componentes) de esta unidad no saldrán de HDMI OUT. Componente de reproducción Cables de audio digital Utilice cables de - Pioneer HTP-072 | Owner's Manual - Page 82
HDMI Audio Return Channel, el sonido del televisor se transmite al receptor a través del terminal HDMI, de modo que no hay necesidad de conectar un cable de audio. En este caso, ajuste ARC en HDMI Setup a ON (consulte El menú HDMI Setup Disc HDMI OUT HDMI OUT HDMI OUT HDMI IN IN OUT DVD SAT/ - Pioneer HTP-072 | Owner's Manual - Page 83
OUT Seleccione una ANALOG AUDIO OUT R L DIGITAL AUDIO OUT OPTICAL COAXIAL VIDEO OUT Seleccione una ANALOG AUDIO OUT R L DIGITAL AUDIO OUT OPTICAL COAXIAL HDMI IN IN OUT DVD SAT/CBL GAME BD IN 1 IN 1 ASSIGNABLE (CD) (TV) ASSIGNABLE COAXIAL OPTICAL ANTENNA AM LOOP VIDEO - Pioneer HTP-072 | Owner's Manual - Page 84
02 Conexión del equipo Conexión de antenas Conecte la antena de cuadro de AM y la antena de hilo de FM como se indica a continuación. Para mejorar la recepción y la calidad de sonido, conecte antenas exteriores (consulte más abajo Uso de antenas exteriores). fig. a fig. b ANTENNA AM LOOP 4 FM - Pioneer HTP-072 | Owner's Manual - Page 85
iPod en la página 19. AV RECEIVER VSX-324 HDMI iPod iPhone ET ENTER MASTER VOLUME 5V original, o ajuste la función ARC a OFF (consulte El menú HDMI Setup en la página 30). Conexión reemplazo a su centro de servicio autorizado o distribuidor PIONEER más cercano. • Cuando no utilice el receptor - Pioneer HTP-072 | Owner's Manual - Page 86
de cine en casa. RECEIVER SLEEP TV SOURCE CONTROL RECEIVER INPUT SELECT BD DVD CD INPUT TUNER iPod/USB SAT/CBL CH GAME TV SIGNAL SEL AUTO/ ALC/ DIRECT STEREO STANDARD ADV SURR ECO AUDIO PARAMETER TOP MENU TUNE TOOLS MENU VOLUME PRESET PRESET ENTER HOME MENU PTY iPod CTRL TUNE - Pioneer HTP-072 | Owner's Manual - Page 87
consulte el manual de instrucciones suministrado con el reproductor de DVD. Reproducción de un iPod Este receptor cuenta con un terminal iPod/iPhone exclusivo que le permitirá controlar la reproducción del contenido de audio de su iPod usando los controles de este receptor. Importante • Pioneer no - Pioneer HTP-072 | Owner's Manual - Page 88
MUTE AUDIO PARAMETER TOP MENU TUNE TOOLS MENU VOLUME BASS TRE PRESET PRESET ENTER HOME MENU PTY iPod CTRL TUNE BAND RETURN MUTE 1 2 3 DISP SB CH de la parte delantera de este receptor. Importante • Pioneer no puede garantizar la compatibilidad (funcionamiento y/o potencia de bus - Pioneer HTP-072 | Owner's Manual - Page 89
unidad reproduce archivos WMA codificados por Windows Media® Player que lleven la extensión '.wma'. Tenga en ón automática (búsqueda) y sintonización manual (por pasos). Una vez que haya TV SIGNAL SEL ENTER Acous.EQ S.RETRIEVER PHASE VOL HOME MENU PTY iPod CTRL TUNE BAND RETURN MUTE 1 Pulse - Pioneer HTP-072 | Owner's Manual - Page 90
una. Repita la operación para buscar otras emisoras. Sintonización manual Para cambiar la frecuencia un intervalo cada vez, pulse TUNE /. TUNE TOOLS MENU VOLUME PRESET PRESET RECEIVER INPUT SELECT BD DVD CD INPUT TUNER iPod/USB SAT/CBL CH ENTER HOME MENU PTY iPod CTRL TUNE BAND - Pioneer HTP-072 | Owner's Manual - Page 91
STEREO utilizando el botón STEREO. • El sonido se escucha con los ajustes de sonido envolvente seleccionados, y también están disponibles las funciones Midnight, Loudness, Phase Control, Sound Retriever y Tone. 23 Es - Pioneer HTP-072 | Owner's Manual - Page 92
DIRECT Las fuentes se escuchan según los ajustes realizados en Manual SP Setup (configuración de altavoces, nivel de canal, distancia de altavoces la calidad de sonido experimenta una imagen de sonido desigual. La función Sound Retriever utiliza la nueva tecnología DSP, que le ayuda a devolver el - Pioneer HTP-072 | Owner's Manual - Page 93
RECEIVER SLEEP TV SOURCE CONTROL RECEIVER INPUT SELECT BD DVD CD INPUT AUDIO PARAMETER TOP MENU TUNE TOOLS MENU VOLUME PRESET ENTER HOME MENU PTY iPod CTRL TUNE BAND RETURN 1 Pulse RECEIVER una imagen de sonido desigual. La función Sound Retriever utiliza la nueva tecnología DSP, que - Pioneer HTP-072 | Owner's Manual - Page 94
cualquier momento con el botón MIDNIGHT. b. Puede modificar la función Sound Retriever en cualquier momento con el botón S.RETRIEVER. c. La configuraci ón de sincronización automática de sonido/vídeo ('lip-sync') para HDMI. Si encuentra que el tiempo de retardo ajustado automáticamente es incorrecto - Pioneer HTP-072 | Owner's Manual - Page 95
para salir del menú actual. • Para salir del Home menu, pulse HOME MENU en cualquier momento. 4 Seleccione la opción que desea ajustar. Home Menu 1.Manual SP Setup 2.Input Assign 3.Auto Power Down 4.HDMI Setup Return • Manual SP Setup -Speaker Setting - Especifica el tamaño y el número de altavoces - Pioneer HTP-072 | Owner's Manual - Page 96
emiten a un volumen elevado. 1 Seleccione 'Manual SP Setup' en el Home Menu. 2 Seleccione 'Channel Level' desde el menú Manual SP Setup. 1.Manual SP Setup a.Speaker Setting b.X.Over c.Channel Level d.Speaker Distance 1c.Channel Level Test Tone Manual Return ENTER:Next Return 3 Seleccione una - Pioneer HTP-072 | Owner's Manual - Page 97
'Manual SP Setup' en el Home Menu. 2 Seleccione 'Speaker Distance' desde el menú Manual SP Setup. 1.Manual SP Setup a.Speaker Setting b.X.Over c.Channel Level 'Auto Power Down' en el Home Menu. Home Menu 1.Manual SP Setup 2.Input Assign 3.Auto Power Down 4.HDMI Setup 3.Auto Power Down Auto Power - Pioneer HTP-072 | Owner's Manual - Page 98
la función ARC, utilice un Cable HDMI® / ™ de alta velocidad. Si utiliza otros cables HDMI, es posible que la función ARC no funcione correctamente. 1 Seleccione 'HDMI Setup' en el Home Menu. Home Menu 1.Manual SP Setup 2.Input Assign 3.Auto Power Down 4.HDMI Setup 4.HDMI Setup ARC OFF Standby - Pioneer HTP-072 | Owner's Manual - Page 99
ón, diríjase al centro de servicio técnico Pioneer autorizado más cercano para que lleve a cabo CEC, desactive el HDMI CONTROL del reproductor conectado. Para una información detallada, consulte el manual de instrucciones del correspondiente dispositivo. Si esto no funciona, ajuste la función ARC - Pioneer HTP-072 | Owner's Manual - Page 100
activada. Consulte el manual de instrucciones suministrado con el reproductor de DVD. El mando a . Pulse el botón (RECEIVER) del mando a distancia y cambie HDMI (Cable HDMI®/™ de alta velocidad) para conectar este receptor a un componente o televisor con función Deep Color. La pantalla OSD (Home - Pioneer HTP-072 | Owner's Manual - Page 101
durante unos dos segundos. 3 Cuando en la pantalla aparezca el mensaje RESET?, pulse AUTO SURROUND/STREAM DIRECT. Aparece OK? en la pantalla. 4 ón ARC o apague todos los dispositivos conectados antes de apagar esta unidad (STANDBY), y lleve a cabo la inicialización después de que el indicador HDMI se - Pioneer HTP-072 | Owner's Manual - Page 102
Sección de entrada/salida digital Terminal HDMI Tipo A (19 clavijas) Tipo de salida HDMI 5 V, 100 mA Terminal USB ( ACERCA DE LOS ALTAVOCES (solo en inglés 1 Este manual de instrucciones Consumo de energía para México Modo normal1 185 PIONEER CORPORATION. Todos los derechos reservados. - Pioneer HTP-072 | Owner's Manual - Page 103
Información adicional 06 English Français Español 35 Es - Pioneer HTP-072 | Owner's Manual - Page 104
06 Información adicional 36 Es - Pioneer HTP-072 | Owner's Manual - Page 105
Información adicional 06 English Français Español 37 Es - Pioneer HTP-072 | Owner's Manual - Page 106
GIVES YOU SPECIFIC LEGAL RIGHTS AND YOU MAY HAVE OTHER RIGHTS WHICH MAY VARY FROM STATE TO STATE. IN CANADA - Service Company, please call or write: CUSTOMER SUPPORT PIONEER ELECTRONICS (USA) INC. P.O. BOX 1720 LONG BEACH, CALIFORNIA 90801 1-800-421-1404 http://www.pioneerelectronics.com IN CANADA - Pioneer HTP-072 | Owner's Manual - Page 107
ou écrivez à : AUX ÉTATS-UNIS CUSTOMER SUPPORT PIONEER ELECTRONICS (USA) INC. P.O. BOX 1720 LONG BEACH, CALIFORNIA 90801 1-800-421-1404 http://www.pioneerelectronics.com AU CANADA DÉPARTÉMENT DE SERVICE AU CONSOMMATEUR PIONEER ÉLECTRONIQUES DU CANADA, INC. 340 FERRIER STREET, UNIT 2 MARKHAM - Pioneer HTP-072 | Owner's Manual - Page 108
INC. P.O. BOX 1540, Long Beach, California 90801-1540, U.S.A. TEL: (800) 421-1404 PIONEER ELECTRONICS OF CANADA, INC. 340 Ferrier Street, Unit 2, Markham, Ontario L3R 2Z5, Canada TEL: 1-877-283-5901, 905-479-4411 PIONEER EUROPE NV Haven 1087, Keetberglaan 1, B-9120 Melsele, Belgium TEL: 03/570.05.11
-
 1
1 -
 2
2 -
 3
3 -
 4
4 -
 5
5 -
 6
6 -
 7
7 -
8
-
9
-
10
-
11
-
12
-
13
-
14
-
15
-
16
-
17
-
18
-
19
-
20
-
21
-
22
-
23
-
24
-
25
-
26
-
27
-
28
-
29
-
30
-
31
-
32
-
33
-
34
-
35
-
36
-
37
-
38
-
39
-
40
-
41
-
42
-
43
-
44
-
45
-
46
-
47
-
48
-
49
-
50
-
51
-
52
-
53
-
54
-
55
-
56
-
57
-
58
-
59
-
60
-
61
-
62
-
63
-
64
-
65
-
66
-
67
-
68
-
69
-
70
-
71
-
72
-
73
-
74
-
75
-
76
-
77
-
78
-
79
-
80
-
81
-
82
-
83
-
84
-
85
-
86
-
87
-
88
-
89
-
90
-
91
-
92
-
93
-
94
-
95
-
96
-
97
-
98
-
99
-
100
-
101
-
102
-
103
-
104
-
105
-
106
-
107
-
108
 |
 |
Register your product on
http://www.pioneerelectronics.ca (Canada)
http://www.pioneerelectronics.com (États-unis)
http://www.pioneerelectronics.ca (Canada)
•
Protect your new investment
The details of your purchase will be on file for reference in the event of an
insurance claim such as loss or theft.
•
Improve product development
Your input helps us continue to design products that meet your needs.
•
Receive a free Pioneer newsletter
Registered customers can opt in to receive a monthly newsletter.
•
Receive free tips, updates and service bulletins on
your new product
Home Theater Package
Ensemble de Cinéma Maison
Paquete de Home Theater
HTP-072
AV Receiver
Récepteur AV
Receptor AV
VSX-324
-K-P
Operating Instructions
Mode d’emploi
Manual de instrucciones