Pioneer HTZ-370DV Owner's Manual
Pioneer HTZ-370DV Manual
 |
UPC - 012562901824
View all Pioneer HTZ-370DV manuals
Add to My Manuals
Save this manual to your list of manuals |
Pioneer HTZ-370DV manual content summary:
- Pioneer HTZ-370DV | Owner's Manual - Page 1
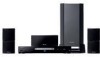
HTZ-370DV DVD/CD Receiver Récepteur-lecteur DVD/CD XV-DV370 Speaker System Enceintes acoustiques S-DV363 Register your product at: http://www.pioneerelectronics.com (US) http://www.pioneerelectronics.ca (Canada) • Protect your new investment The details of your purchase will be on file for reference - Pioneer HTZ-370DV | Owner's Manual - Page 2
Pioneer product. Please read through these operating instructions so that you will know how to operate your model properly. After you have finished reading the instructions user to the presence of important operating and maintenance (servicing) instructions OF CONTROLS OR NMB-003 du Canada. D8-10-1- - Pioneer HTZ-370DV | Owner's Manual - Page 3
instructions. Adjust only those controls that are covered by the operating instructions as an improper adjustment of other controls SERVICE EQUIPMENT Fig. A ANTENNA DISCHARGE UNIT (NEC SECTION 810-20) GROUNDING CONDUCTORS (NEC SECTION 810-21) GROUND CLAMPS POWER SERVICE GROUNDING ELECTRODE SYSTEM - Pioneer HTZ-370DV | Owner's Manual - Page 4
: • Start your volume control at a low setting. A Lifetime Used wisely, your new sound equipment will provide a lifetime User Alteration or modifications carried out without appropriate authorization may invalidate the user damaged, ask your nearest PIONEER authorized service center or your dealer - Pioneer HTZ-370DV | Owner's Manual - Page 5
Controls and displays Front panel 7 Remote control 8 Display 10 02 Getting started Home theater sound setup 11 Setting the channel levels 11 Using the on-screen displays 11 Playing discs 12 Basic playback controls 18 Browsing WMA, MP3, MPEG-4 AAC, DivX video and JPEG files with the Disc - Pioneer HTZ-370DV | Owner's Manual - Page 6
About HDMI 34 About control out connections 35 compatibility . . . 37 About DivX 37 About MPEG-4 AAC 38 About Problems with condensation 39 Moving the system unit 39 Screen sizes and disc formats 40 Frequency step setting 40 Switching off the demo 40 Dimming the Display 40 Troubleshooting - Pioneer HTZ-370DV | Owner's Manual - Page 7
displays 01 English Deutsch Français Italiano Nederlands Español Chapter 1 Controls and displays Front panel OPEN/CLOSE DVD/CD USB VOLUME 3 /sleep timer is active). 11 Remote Sensor 12 Display See Display below. 10 11 12 89 1 STANDBY/ON Switches the system on or into standby. 2 PLAY - Pioneer HTZ-370DV | Owner's Manual - Page 8
8 SLEEP 0 93 DISPLAY EXTRAPWR TOP MENU TUNE MENU ST HOME MENU ENTER ST RETURN TUNE SETUP TESTTONE SURROUND SOUND 11 12 13 14 15 TV CONTROL LINE OUT INPUT CHANNEL VOLUME MUTE SHIFT VOLUME 16 17 18 1 STANDBY/ON Switches the system on or into standby. 2 Function select buttons Selects - Pioneer HTZ-370DV | Owner's Manual - Page 9
, Disc playback features on page 17 and USB playback on page 24 for an explanation of these controls. 9 TV CONTROL buttons These control Pioneer plasma televisions. 10 SHIFT Press to access the controls highlighted in green. 11 OPEN/CLOSE Opens/closes the disc tray. 12 PLAYLIST buttons Add tracks - Pioneer HTZ-370DV | Owner's Manual - Page 10
of a DTS source (page 15). 2 PRGSVE Lights when progressive scan video output is selected (page 33). 3 SOUND Lights when the SFC Modes or the tone controls (treble, bass or bass boost) are active (page 16). 4 F.SURR. Lights when the Extra Power mode is selected (page 15). 5 RPT and RPT-1 RPT lights - Pioneer HTZ-370DV | Owner's Manual - Page 11
Guide for more placement tips). • Standard surround setup - This is a standard multichannel surround sound speaker setup for optimal 5.1 channel home theater this system makes manual, 'Select' means use the cursor buttons to highlight an item on-screen, then press ENTER. Button What it does HOME - Pioneer HTZ-370DV | Owner's Manual - Page 12
), first select whether to play the DivX video files (DivX) or the other media file types (MP3/WMA/JPEG/MPEG-4 AAC) from the on-screen display. 4 Adjust the volume. Use the VOLUME control. Basic playback controls The following table shows the basic controls on the remote for playing discs1. You can - Pioneer HTZ-370DV | Owner's Manual - Page 13
which you can choose what you want to watch. These are PBC (Playback control) menus. You can play a PBC Video CD/Super VCD without having to reach the frequency you want. If necessary, fine tune the frequency using the manual tuning method. Note 1 • The Last Memory function may not work with some - Pioneer HTZ-370DV | Owner's Manual - Page 14
you always have easy access to your favorite stations without having to tune in manually each time. 1 Tune to an AM or FM radio station. For (TV, satellite receiver, etc.) to this unit for playback through the speaker system. See Connecting auxiliary audio components on page 32 for more on this. • - Pioneer HTZ-370DV | Owner's Manual - Page 15
system Auto listening mode The Auto listening mode is the simplest way to listen to any source as it was mastered: the output from the speakers mirrors the channels front panel display. 2 Note that the input source must be switched to DVD/CD or Setup Guide for best surround sound. • When set to - Pioneer HTZ-370DV | Owner's Manual - Page 16
system Listening in stereo You can listen to any source - stereo or multichannel - in stereo. When playing a multichannel source, all channels , POP, HALL or LIVE. Adjusting the bass and treble Use the bass and treble controls to adjust the overall tone. 1 Press SOUND. 2 Use / to select BASS or - Pioneer HTZ-370DV | Owner's Manual - Page 17
this chapter apply to DVD discs, Video CDs/ Super VCDs, CDs, DivX video and WMA/ MP3/MPEG-4 AAC/JPEG discs, although the exact operation 1 Only one speed is available for DivX video discs. 2 • Depending on the disc, normal playback may automatically resume when a new chapter is reached on a DVD disc - Pioneer HTZ-370DV | Owner's Manual - Page 18
to browse through the contents of a DVD or Video CD/Super VCD disc to find the part you want to play. 1 During playback, press HOME MENU and select 'Disc Navigator' from the onscreen menu. Disc Navigator 2 Select a view option. Disc Navigator Title Chapter The options available depend on the - Pioneer HTZ-370DV | Owner's Manual - Page 19
-4 AAC, DivX video and JPEG files with the Disc Navigator Use the Disc Navigator to find a particular file or folder by filename. 1 Press HOME MENU and . Playback of both the slideshow and the audio files repeats. Playback controls are effective for the JPEG slideshow only. • To play the contents - Pioneer HTZ-370DV | Owner's Manual - Page 20
CDs and Video CD/Super VCDs, select Disc Repeat or Track Repeat. • For DivX video discs, select Title Repeat (or Repeat Off). Using random play Use this CD and Video CD/Super VCD) in a random order.2 1 During playback, press HOME MENU and select 'Play Mode'. Note 1 You can't use repeat play with WMA - Pioneer HTZ-370DV | Owner's Manual - Page 21
insert steps by just highlighting the position where you want the new step to appear and entering a title/chapter/track number. • off. Tip • Use the following controls during program play: Button HOME MENU What it does Save DivX video discs, or while a DVD disc menu is being displayed. 21 En - Pioneer HTZ-370DV | Owner's Manual - Page 22
CDs and Video CD/Super VCDs by track number or time; DivX video discs by time. 1 Press HOME MENU and select 'Play Mode'. 2 Select 'Search Mode'. these discs you can switch between the two soundtracks as well as individual channels in each. 3 Some discs only allow you to change audio language from - Pioneer HTZ-370DV | Owner's Manual - Page 23
English Deutsch Français Italiano Nederlands Español Disc playback features 04 Switching camera angles Some DVD discs feature scenes shot from two or more angles-check the disc box for details. When a multi-angle scene is playing, a icon appears on screen (this can be switched off if you prefer- - Pioneer HTZ-370DV | Owner's Manual - Page 24
channel to the correct video input. 2 Connect your USB problem, it is likely your USB device is incompatible. USB Basic playback controls (Type A) The following table shows the basic controls on the remote DivX playback. • Pioneer cannot guarantee system to read the contents of a USB device. 24 En - Pioneer HTZ-370DV | Owner's Manual - Page 25
listen to followed by the JPEG from which you want the slideshow to start. Playback of both the slideshow and the audio files repeats. Playback controls are effective for the JPEG slideshow only. • To play all of the contents, rather than just the current folder, exit the Navigator and start - Pioneer HTZ-370DV | Owner's Manual - Page 26
way discs sound. 1 Press HOME MENU and select 'Audio Settings' from the on-screen display. 1 Press HOME MENU and select 'Video Adjust' the dialog. Switching Audio DRC (Dynamic Range Control) to on can help by bringing up the quieter sounds, while controlling loud peaks. How much of a difference you - Pioneer HTZ-370DV | Owner's Manual - Page 27
Press DVD/CD. 2 With playback stopped, press HOME MENU and select 'Initial Settings'. Initial Settings 3 supports 1920 x 1080 pixel interlace video. Set if your TV supports 1280 x 720 pixel progressive-scan video. Set if your TV supports 720 x 480 pixel progressive-scan video. Set if your TV supports - Pioneer HTZ-370DV | Owner's Manual - Page 28
Set if your TV is not compatible with progressive scan video. Set if your TV is compatible with progressive scan video (see your TV's instruction manual for details). Press ENTER once more to confirm (or RETURN to cancel). Note that progressive scan video is only output from the component video - Pioneer HTZ-370DV | Owner's Manual - Page 29
input your existing password, then press ENTER. 2 Enter a new password and press ENTER. Note 1 • Not all discs use Parental Lock, and will play without requiring the password first. • If you forget your password, you'll need to reset the player to register a new password (see Resetting the system - Pioneer HTZ-370DV | Owner's Manual - Page 30
new input system. This restricts playback of content to specific, registered devices. • If you load a disc that contains DivX VOD content not authorized for your player, the message Authorization Error is displayed and the content will not play. Displaying your DivX VOD registration code 1 Press HOME - Pioneer HTZ-370DV | Owner's Manual - Page 31
ol Speaker Distance • Default setting: 10.0ft. To get the best surround sound from your system, you should set up the speakers equal distances from your listening position. 1 Press HOME MENU and select 'Initial Settings'. 2 Select 'Speakers', then 'Speaker Distance'. Initial Settings Video Output - Pioneer HTZ-370DV | Owner's Manual - Page 32
an external FM antenna. ANTENNA PAL connector Connecting auxiliary audio components Using the stereo analog inputs, you can connect an external component such as a tape deck or MD player for playback through this system. Tape deck, etc. To audio output CR/ COMPONENT PR VIDEO CB/ VIDEO PB - Pioneer HTZ-370DV | Owner's Manual - Page 33
CONTROL OUT R R AUDIO R FRO R SURRO SPE Connecting using the component video output If your TV has component video inputs Vision System problems, it is recommended that the user however, does not support audio signals. Consult new component (see Video Output settings on page 27 to do this). 33 - Pioneer HTZ-370DV | Owner's Manual - Page 34
VIDEO Y HHDDMI OUTT VIDEO OUT LINE IN OUT L L CONTROL OUT R R AUDIO R FRONT L CENTER R SURROUND L troubleshooting guide on page 43. If this doesn't solve the problem, follow the steps below to reset the HDMI connection. 1 Switch the system the capability to support standard, enhanced, - Pioneer HTZ-370DV | Owner's Manual - Page 35
English Deutsch Français Italiano Nederlands Español Other connections 08 About control out connections Many Pioneer components support SR CONTROL connections, by which you can use the remote controls of any connected components by aiming them at the sensor of just one component. When you use a - Pioneer HTZ-370DV | Owner's Manual - Page 36
DualDisc is a new two -sided disc, support. VIDEO CD Super Video CD (Super VCD) Disc compatibility table Media Compatible formats CD-R/-RW • CD-Audio, Video CD/Super VCD, ISO 9660 CD-ROM* * ISO 9660 Level 1 or 2 compliant. CD physical format: Mode1, Mode2 XA Form1. Romeo and Joliet file systems - Pioneer HTZ-370DV | Owner's Manual - Page 37
About DivX DivX is a compressed digital video format created by the DivX® video codec from DivX, Inc. This player can play DivX video 2 • For external subtitle files the following subtitle format filename extensions are supported (please note that these files are not shown within the disc navigation - Pioneer HTZ-370DV | Owner's Manual - Page 38
Byelorussian (be), Macedonian (mk), Russian (ru), Serbian (sr), Ukrainian (uk) Group 4: Hebrew (iw), Yiddish (ji) Group 5: Turkish (tr) DivX, DivX Certified, and associated logos are trademarks of DivX, Inc. and are used under license. About MPEG-4 AAC Advanced Audio Coding (AAC) is at the core of - Pioneer HTZ-370DV | Owner's Manual - Page 39
is not large enough to support all four of the system unit's feet. Cleaning the pickup lens The DVD player's lens should not become dirty in normal use, but if for some reason it should malfunction due to dust or dirt, consult your nearest Pioneer authorized service center. Although lens cleaners - Pioneer HTZ-370DV | Owner's Manual - Page 40
LIGHT or DARK then press ENTER. Note 1 Many widescreen discs override the system's settings so that the disc is shown in letterbox format regardless of the the TV controls to select how the picture is presented. Your TV may offer various zoom and stretch options; see the instructions that came - Pioneer HTZ-370DV | Owner's Manual - Page 41
nearest Pioneer authorized service center or your dealer for servicing. No sound is output when a function is selected. • If you're using the line input, make sure the component is connected correctly (see Connecting auxiliary audio components on page 32). • Press MUTE on the remote control to - Pioneer HTZ-370DV | Owner's Manual - Page 42
Problem Remedy The disc is ejected automatically after loading. • Clean the disc and align the disc properly in the disc guide plugs are inserted fully. • Check the manual of the TV/monitor to make sure the system uses copy-protection technology which may prevent recording or cause picture problems - Pioneer HTZ-370DV | Owner's Manual - Page 43
AM antenna (refer to the Setup Guide) and adjust the direction and position or FAT32. by the system. • USB devices with an internal USB hub are not supported. Files don't show up management). This is not a malfunction. HDMI connection Problem Remedy No HDMI audio output. • See Switching the - Pioneer HTZ-370DV | Owner's Manual - Page 44
24 for more on this. • See HDMI connection above for troubleshooting tips. See also Resetting the HDMI connection on page 34 if the problem persists. • Contact your Pioneer authorized service center or your dealer for servicing. • Appears when a menu is automatically exited after a set period of - Pioneer HTZ-370DV | Owner's Manual - Page 45
Français Italiano Nederlands Español Resetting the system Use the front panel controls to reset all system settings to the factory default. • With the system on, press STANDBY/ ON while holding down USB. The next time you switch on, all the system settings should be reset. Setting the Key Lock - Pioneer HTZ-370DV | Owner's Manual - Page 46
Australia, 0121, au Austria, 0120, at Belgium, 0205, be Brazil, 0218, br Canada, 0301, ca Chile, 0312, cl China, 0314, cn Denmark, 0411, dk Finland, of, 1118, kr Malaysia, 1325, my Mexico, 1324, mx Netherlands, 1412, nl New Zealand, 1426, nz Norway, 1415, no Pakistan, 1611, pk Philippines, 1608, ph - Pioneer HTZ-370DV | Owner's Manual - Page 47
): Front, Center, Surround 15 W per channel* (200 Hz to 20 kHz, 1.0 Remote control 1 AA/R6 dry cell batteries (to confirm system operation 2 Video cable (yellow plugs 1 AM loop antenna 1 FM antenna 1 Power cord 1 Warranty card 1 Setup Guide These operating instructions S-DV363 Speaker system - Pioneer HTZ-370DV | Owner's Manual - Page 48
of DTS, Inc. Published by Pioneer Corporation. Copyright © 2007 Pioneer Corporation. All rights reserved. This by Macrovision Corporation, and is intended for home and other limited uses only unless otherwise please see the instruction manuals or help files that came with your PC and/or software. - Pioneer HTZ-370DV | Owner's Manual - Page 49
49 En 09 English Deutsch Français Italiano Nederlands Español Additional information - Pioneer HTZ-370DV | Owner's Manual - Page 50
Pioneer. Veuillez lire attentivement ces instructions d'utilisation afin d'apprendre à manipuler votre modèle correctement. Lorsque vous avez terminé, rangez ces instructions NMB-003 du Canada. D8-10-1-3_EF service après-vente PIONEER le plus proche ou le revendeur pour un remplacement. - Pioneer HTZ-370DV | Owner's Manual - Page 51
Télécommande 6 Écran 8 02 Pour commencer Installation du son Home Cinema 9 Réglage des niveaux de voie 9 Utilisation de l' Navigator . . . 16 Parcourir les fichiers WMA, MP3, MPEG-4 AAC, vidéo DivX et JPEG avec Disc Navigator 17 Utilisation des listes de lecture 17 Programmation des listes - Pioneer HTZ-370DV | Owner's Manual - Page 52
À propos de la compatibilité des disques DVD+R/DVD+RW 35 À propos de DivX 35 À propos du format MPEG-4 AAC 36 À propos de WMA 36 Utilisation Annulation de la démonstration 38 Réduction de la luminosité de l'écran 38 Guide de dépannage 39 Généralités 39 Lecteur DVD/CD/Vidéo CD 40 Syntoniseur - Pioneer HTZ-370DV | Owner's Manual - Page 53
Français Français Deutsch Chapitre 1 Commandes et écrans Panneau avant OPEN/CLOSE DVD/CD USB VOLUME 3 4 56 7 STANDBY/ON PLAY LIST 1 PLAY LIST 2 PLAY LIST 3 1 2 10 11 12 7 Touches VOLUME +/- 8 Interface USB Permet de connecter et d'utiliser un appareil USB comme source de lecture (voir - Pioneer HTZ-370DV | Owner's Manual - Page 54
PLAYLIST 31 SUBTITLE 5 62 ANGLE ZOOM 8 SLEEP 0 93 DISPLAY EXTRAPWR TOP MENU TUNE MENU ST HOME MENU ENTER ST RETURN TUNE SETUP TESTTONE SURROUND SOUND 11 12 13 14 15 TV CONTROL LINE OUT INPUT CHANNEL VOLUME MUTE SHIFT VOLUME 16 17 18 1 STANDBY/ON Met le système sous tension ou - Pioneer HTZ-370DV | Owner's Manual - Page 55
10, Fonctions de lecture de disque page 15 et Lecture USB page 22 pour une explication sur ces commandes. 9 Touches TV CONTROL Ces touches permettent de commander les écrans plasma Pioneer. 10 SHIFT Appuyez sur cette touche pour accéder aux commandes allumées en vert. 11 OPEN/CLOSE Cette touche - Pioneer HTZ-370DV | Owner's Manual - Page 56
Écran 1 23 4 5 67 PRGSVE SOUND DTS F.SURR. 2D 2PL REC MODE RPT -1 kHz PGM MHz RDM 15 14 13 12 11 10 9 8 1 DTS S'allume pendant la lecture d'une source DTS (page 13). 2 PRGSVE S'allume lorsque la sortie vidéo à balayage progressif est sélectionnée (page 31). 3 SOUND S'allume lorsque les - Pioneer HTZ-370DV | Owner's Manual - Page 57
çais Français Deutsch Chapitre 2 Pour commencer Installation du son Home Cinema Pour obtenir le meilleur son d'ambiance possible, installez vos enceintes comme indiqué ci-dessous (reportez-vous au guide d'installation des enceintes pour plus d'informations). • Installation standard des enceintes - Pioneer HTZ-370DV | Owner's Manual - Page 58
Note • Le guide de touches situé en bas de chaque écran OSD indique les touches à utiliser pour cet écran. Lecture d'un disque Cette section traite des commandes de base pour la lecture de DVD, CD, Vidéo CD/Super VCD, vidéo DivX et de disques WMA/MP3/ MPEG-4 AAC. D'autres fonctions sont détaillées - Pioneer HTZ-370DV | Owner's Manual - Page 59
(PBC) Certains Vidéo CD et Super VCD sont dotés de menus permettant de choisir ce que vous souhaitez regarder. Ces menus sont appelés PBC (Playback Control). Vous pouvez commander la lecture d'un Vidéo CD PBC ou d'un Super VCD PBC sans parcourir le menu PBC, en appuyant simplement sur la touche - Pioneer HTZ-370DV | Owner's Manual - Page 60
Amélioration d'une réception FM de mauvaise qualité Si vous écoutez une station FM en stéréo et si la réception est de mauvaise qualité, vous pouvez améliorer la qualité sonore en passant en mono. 1 Réglez une station de radio FM, puis appuyez sur SETUP. 2 Utilisez / pour sélectionner FM MODE, - Pioneer HTZ-370DV | Owner's Manual - Page 61
Français Français Deutsch Chapitre 3 Écoute de votre système Mode d'écoute Auto Le mode d'écoute Auto représente le moyen le plus simple d'écouter une source puisqu'il a été masterisé : la sortie des enceintes reflète les voies de l'appareil source. • Appuyez sur SURROUND pour sélectionner le mode - Pioneer HTZ-370DV | Owner's Manual - Page 62
écouteurs sont connectés, seul le mode STEREO est disponible. Utilisation des modes SFC Vous pouvez utiliser les modes SFC (Sound Field Control) avec n'importe quelle source multivoies ou stéréo pour de nombreuses autres sonorités d'ambiance. 1 Appuyez sur SOUND. 2 Utilisez / pour sélectionner SFC - Pioneer HTZ-370DV | Owner's Manual - Page 63
Lecture au ralenti Vous disposez de quatre vitesses de ralenti vers l'avant pour lire les DVD, les Vidéo CD, les Super VCD et les vidéo DivX. Vous pouvez également lire les DVD au ralenti en marche arrière. 1 Pendant la lecture, appuyez sur (pause). 2 Appuyez sur la touche / ou / et maintenez - Pioneer HTZ-370DV | Owner's Manual - Page 64
Navigator pour examiner le contenu d'un DVD ou d'un Vidéo CD/ Super VCD et trouver le passage souhaité. 1 Pendant la lecture, appuyez sur HOME MENU, puis sélectionnez 'Disc Navigator' sur le menu affiché. Disc Navigator: Title 01- 49: - - Pour sélectionner une miniature, vous pouvez utiliser les - Pioneer HTZ-370DV | Owner's Manual - Page 65
Français Français Deutsch Parcourir les fichiers WMA, MP3, MPEG-4 AAC, vidéo DivX et JPEG avec Disc Navigator Utilisez Disc Navigator pour localiser un fichier ou un dossier dont vous connaissez le nom. 1 Appuyez sur HOME MENU, puis sélectionnez 'Disc Navigator' dans le menu affiché. 00:00/ 00:00 - Pioneer HTZ-370DV | Owner's Manual - Page 66
sélectionnez Disc Repeat ou Track Repeat. • Pour les disques vidéo DivX, sélectionnez Title Repeat (ou Repeat Off). Utilisation de la lecture au Super VCD) dans un ordre aléatoire.2 1 Pendant la lecture, appuyez sur HOME MENU et sélectionnez 'Play Mode'. 2 Sélectionnez 'Random', puis une option. - Pioneer HTZ-370DV | Owner's Manual - Page 67
de lecture des titres, chapitres ou plages d'un disque.1 1 Pendant la lecture, appuyez sur HOME MENU et sélectionnez 'Play Mode'. 2 Sélectionnez 'Program', puis 'Create/Edit' dans la WMA/MP3/ MPEG-4 AAC, les disques vidéo DivX, ni lorsque le menu d'un disque DVD est en cours d'affichage. 19 Fr - Pioneer HTZ-370DV | Owner's Manual - Page 68
peut se faire par numéro de plage ou par indication d'une durée. Pour un disque vidéo DivX, la recherche peut se faire par indication d'une durée. 1 Appuyez sur la touche HOME MENU et sélectionnez 'Play Mode'. 2 Sélectionnez 'Search Mode'. Les options de recherche qui s'affichent dépendent de la - Pioneer HTZ-370DV | Owner's Manual - Page 69
Français Français Deutsch Choix de l'angle de prise de vues Certains DVD comportent des scènes filmées sous différents angles (deux ou plus), consultez le coffret du disque pour plus de détails. Pendant la lecture d'une scène filmée sous plusieurs angles, une icône apparaît sur l'écran (pour dé - Pioneer HTZ-370DV | Owner's Manual - Page 70
de lecture). La prise USB ne permet pas la lecture de fichiers DivX. 2 • Les périphériques USB compatibles comprennent les disques durs de fichiers se trouvant sur un ordinateur personnel, via l'interface USB. • Pioneer ne garantit pas la compatibilité (utilisation et/ou alimentation) avec tous les - Pioneer HTZ-370DV | Owner's Manual - Page 71
Français Français Deutsch Exploration rapide des fichiers Vous pouvez parcourir rapidement le contenu d'une source vers le début ou vers la fin à différentes vitesses. • Pendant la lecture, appuyez sur ou pour lancer l'examen du disque. Appuyez à plusieurs reprises pour augmenter la vitesse d' - Pioneer HTZ-370DV | Owner's Manual - Page 72
les réglages qui affectent la présentation des images. 1 Appuyez sur HOME MENU et sélectionnez 'Video Adjust' sur l'écran. Audio Settings 2 Sé devenir inaudibles. L'activation de la fonction Audio DRC (Dynamic Range Control) permet d'accentuer les sons de plus faible intensité sans toucher aux - Pioneer HTZ-370DV | Owner's Manual - Page 73
. Interrompez la lecture du disque, puis modifiez le réglage. 1 Appuyez sur DVD/CD. 2 L'appareil n'étant pas en cours de lecture, appuyez sur HOME MENU et sélectionnez 'Initial Settings'. Initial Settings 3 Utilisez les touches et la touche ENTER pour sélectionner une option et sa valeur. Les - Pioneer HTZ-370DV | Owner's Manual - Page 74
Réglage Option HDMI Color (Reportez-vous à Connexion au moyen de l'interface HDMI page 31.) * Les valeurs par défaut dépendent de l'appareil connecté. Full range RGB RGB Component Component Out Interlace (Reportez-vous également à la section Connexion à l'aide de la Progressive sortie vidéo - Pioneer HTZ-370DV | Owner's Manual - Page 75
(R) VOD Option - Display Ce qu'elle signifie Reportez-vous à la section Parental Lock ci-après. Reportez-vous à la section À propos du contenu DivX® VOD ci-après. Réglage du paramètre Speakers (enceintes) Réglage Speaker Distance Option - Ce qu'elle signifie Pour préciser la distance entre - Pioneer HTZ-370DV | Owner's Manual - Page 76
Authorization Error s'affiche et le contenu n'est pas lu. Affichage du code d'enregistrement DivX VOD 1 Appuyez sur HOME MENU, puis sélectionnez 'Initial Settings'. 2 Sélectionnez 'Options', puis 'DivX (R) VOD'. Initial Settings Video Output Language Display Options Speakers Parental Lock - Pioneer HTZ-370DV | Owner's Manual - Page 77
de votre système, vous devez tenir compte de la distance entre les enceintes et votre position d'écoute. 1 Appuyez sur HOME MENU, puis sélectionnez 'Initial Settings'. 2 Sélectionnez 'Speakers', puis 'Speaker Distance'. Initial Settings Video Output Language Display Options Speakers Speaker - Pioneer HTZ-370DV | Owner's Manual - Page 78
Chapitre 8 Autres connexions Connexion d'antennes extérieures Pour une antenne AM extérieure, utilisez un câble avec protection vinyle de 5 m à 6 m et installez-la à l'intérieur ou à l'extérieur. Ne débranchez pas l'antenne cadre. Utilisez uniquement l'antenne cadre AM fournie. Antenne extérieure - Pioneer HTZ-370DV | Owner's Manual - Page 79
VIDEO PB S-VIDEO Y VIDEO OUT LINE IN OUT L L CONTROL OUT R FRO R R AUDIO R SURR SPE Connexion à l'aide la vidéo à balayage progressif Macro Vision System Copy Guard.2 Connexion au moyen de l' modèle, veuillez contacter notre centre de service après-vente. 3 • Une connexion HDMI - Pioneer HTZ-370DV | Owner's Manual - Page 80
AM LOOP UNBAL 75 S-VIDEO Y HHDDMI OUTT VIDEO OUT LINE IN OUT L L CONTROL OUT R R AUDIO R FRONT L CENTER R SURROUND L SUB WOOFER SPEAKERS (4 plus rien (par exemple après avoir changé la résolution), reportez-vous au guide de dépannage page 41. Si cela ne permet pas de résoudre le probl - Pioneer HTZ-370DV | Owner's Manual - Page 81
la mise à terre. • À l'aide d'un câble doté de mini-fiches mono de chaque côté (vendu séparément), connectez la prise CONTROL IN d'un autre appareil Pioneer à la prise CONTROL OUT de cet appareil. Ceci vous permettra de commander l'autre appareil en dirigeant sa télécommande vers cet appareil. 33 Fr - Pioneer HTZ-370DV | Owner's Manual - Page 82
informations au sujet des spécifications DualDisc, consultez le fabricant ou le revendeur de ce type de disque. Tableau de compatibilité des disques Support Formats compatibles CD-R/-RW • CD Audio, Vidéo CD/Super VCD, CD-ROM ISO 9660* * Conforme à la norme ISO 9660 Niveau 1 ou 2. Format physique - Pioneer HTZ-370DV | Owner's Manual - Page 83
Français Français Deutsch Support Formats compatibles Fichiers • MPEG-1 Audio Layer 3 (MP3), audio Windows Media Audio . À propos de DivX DivX est un format vidéo numérique compressé créé par le codec vidéo DivX® de DivX, Inc. Ce lecteur peut lire les fichiers vidéo DivX gravés sur des disques - Pioneer HTZ-370DV | Owner's Manual - Page 84
(iw), Yiddish (ji) Groupe 5 : Turkish (tr) DivX, la certification DivX et les logos associés sont des marques de DivX, Inc. et sont utilisés sous licence. À propos du format l'utilisation de disques conventionnels parfaitement circulaires. Pioneer décline toute responsabilité liée à l'utilisation de - Pioneer HTZ-370DV | Owner's Manual - Page 85
normale, mais si, pour une raison quelconque, des poussières ou saletés perturbaient son fonctionnement, consultez un centre d'entretien agréé par Pioneer. Bien que des agents de nettoyage pour optique soient disponibles dans le commerce, nous vous déconseillons de les utiliser car ils risquent - Pioneer HTZ-370DV | Owner's Manual - Page 86
Tailles de l'écran et formats de disque Les images des DVD-Vidéo existent en différents formats, du format TV 4/3 usuel au format CinemaScope1, qui peut atteindre 7/3. Les téléviseurs existent également en différents formats, du 4/3 'standard' à l'écran large 16/9.2 En mode 4:3 (Letter Box), les - Pioneer HTZ-370DV | Owner's Manual - Page 87
Français Français Deutsch Guide de dépannage Les erreurs de commande sont souvent prises pour Si ces vérifications ne vous permettent pas de remédier au dysfonctionnement, consultez le service après-vente agréé par Pioneer le plus proche de chez vous ou votre revendeur pour faire réparer l'appareil. - Pioneer HTZ-370DV | Owner's Manual - Page 88
Lecteur DVD/CD/Vidéo CD Anomalie Action corrective Le disque est éjecté • Nettoyez le disque et alignez-le correctement dans l'alvéole correspondante. automatiquement après • Si le code de région figurant sur le DVD-vidéo ne correspond pas à celui du lecteur, son chargement. vous ne pouvez - Pioneer HTZ-370DV | Owner's Manual - Page 89
Français Français Deutsch Anomalie Le disque DVD-ROM n'est pas reconnu. Les fichiers ne s'affichent pas dans Disc Navigator/ Photo Browser. Lecture des fichiers WMA ou MPEG-4 AAC impossible. Action corrective • Assurez-vous que le DVD-ROM a bien été enregistré au format UDF Bridge. Reportez-vous à - Pioneer HTZ-370DV | Owner's Manual - Page 90
• Le mode Sound Demo est activé. Reportez-vous à la section Généralités de Guide de dépannage page 39. CANNOT • Une opération est interdite, car l'option DVD EEP ERR • Pour les réparations, contactez le service après-vente agréé par Pioneer ou votre revendeur. EXIT • S'affiche lorsqu'un menu - Pioneer HTZ-370DV | Owner's Manual - Page 91
Français Français Deutsch Réinitialisation du système Utilisez les commandes du panneau avant pour restaurer toutes les configurations par défaut du système. • L'appareil étant en marche, appuyez sur la touche STANDBY/ON tout en actionnant la touche USB. À la prochaine mise sous tension, tous - Pioneer HTZ-370DV | Owner's Manual - Page 92
de pays/région, Lettre de code de pays/région Argentine, 0118, ar Australie, 0121, au Autriche, 0120, at Belgique, 0205, be Brésil, 0218, br Canada, 0301, ca Chili, 0312, cl Chine, 0314, cn Danemark, 0411, dk Finlande, 0609, fi France, 0618, fr Allemagne, 0405, de Hong Kong, 0811, hk Inde - Pioneer HTZ-370DV | Owner's Manual - Page 93
Français Français Deutsch Caractéristiques techniques Section amplificateur Puissance de sortie continue (FTC) : Frontale, centrale et d'ambiance 15 W par voie* (200 Hz à 20 kHz, 1,0 %** T.H.D., 4 Ω) Caisson de graves 20 W* (45 Hz à 200 Hz, 1,0 %** T.H.D., 4 Ω) Puissance de sortie RMS : Frontale, - Pioneer HTZ-370DV | Owner's Manual - Page 94
Câbles d'enceinte 6 Supports 2 Vis (pour supports 4 Coussinets antidérapants déposées de DTS, Inc. Publication de Pioneer Corporation. © 2007 Pioneer Corporation. Tous droits de reproduction et de traduction reporter au manuel d'instruction ou aux fichiers d'aide de l'ordinateur et/ou du logiciel. - Pioneer HTZ-370DV | Owner's Manual - Page 95
or if you wish to purchase replacement parts, operating instructions, service manuals, or accessories, please call the number shown below. 8 0 0 - 4 2 1 - 1 4 0 4 Please do not ship your product to Pioneer without first calling the Customer Support Division at the above listed number for assistance
-
 1
1 -
 2
2 -
 3
3 -
 4
4 -
 5
5 -
 6
6 -
 7
7 -
8
-
9
-
10
-
11
-
12
-
13
-
14
-
15
-
16
-
17
-
18
-
19
-
20
-
21
-
22
-
23
-
24
-
25
-
26
-
27
-
28
-
29
-
30
-
31
-
32
-
33
-
34
-
35
-
36
-
37
-
38
-
39
-
40
-
41
-
42
-
43
-
44
-
45
-
46
-
47
-
48
-
49
-
50
-
51
-
52
-
53
-
54
-
55
-
56
-
57
-
58
-
59
-
60
-
61
-
62
-
63
-
64
-
65
-
66
-
67
-
68
-
69
-
70
-
71
-
72
-
73
-
74
-
75
-
76
-
77
-
78
-
79
-
80
-
81
-
82
-
83
-
84
-
85
-
86
-
87
-
88
-
89
-
90
-
91
-
92
-
93
-
94
-
95
 |
 |

Operating Instructions
Mode d’emploi
HTZ-370DV
DVD/CD Receiver
Récepteur-lecteur DVD/CD
XV-DV370
Speaker System
Enceintes acoustiques
S-DV363
Register your product at:
http://www.pioneerelectronics.ca (Canada)
http://www.pioneerelectronics.ca (Canada)
• Protect your new investment
The details of your purchase will be on file for reference in the event of an insurance claim such as loss or theft.
• Improve product development
Your input helps us continue to design products that meet your needs.
• Receive a free Pioneer newsletter
Registered customers can opt in to receive a monthly newsletter.
• Receive free tips, updates and service bulletins on your new product