Pioneer PRO-800HD Owner's Manual
Pioneer PRO-800HD Manual
 |
View all Pioneer PRO-800HD manuals
Add to My Manuals
Save this manual to your list of manuals |
Pioneer PRO-800HD manual content summary:
- Pioneer PRO-800HD | Owner's Manual - Page 1
PLASMA DISPLAY PRO-1000HD PRO-800HD Operating Instructions - Pioneer PRO-800HD | Owner's Manual - Page 2
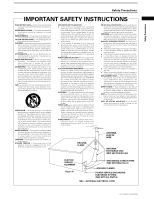
symbols are found on labels attached to the product. They alert the operators and service personnel of this equipment to any potentially dangerous conditions. IMPORTANT NOTICE The serial number for or unsafe practice which can result in severe personal injury or death. ii PRO-1000HD / PRO-800HD - Pioneer PRO-800HD | Owner's Manual - Page 3
the manufacturer. ANTENNA LEAD IN WIRE ANTENNA DISCHARGE UNIT (NEC SECTION 810-20) ELECTRIC SERVICE EQUIPMENT Figure A GROUNDING CONDUCTORS (NEC SECTION 810-21) GROUND CLAMPS POWER SERVICE GROUNDING ELECTRODE SYSTEM (NEC ART 250, PART H) NEC - NATIONAL ELECTRICAL CODE iii PRO-1000HD / PRO-800HD - Pioneer PRO-800HD | Owner's Manual - Page 4
that may cause undesired operation. Product Name: Plasma Display with Video Card Model Number: PRO-1000HD / PRO-800HD Product Category: Class B Personal Computers & Peripherals Responsible Party Name: PIONEER ELECTRONICS [USA] INC. Customer Support Division Address: P.O. BOX 1760, LONG BEACH, CA - Pioneer PRO-800HD | Owner's Manual - Page 5
: After installation, be sure to deliver this manual to the customer and explain to the customer how to handle the product. Thank you very much for purchasing this PIONEER product. Before using your Plasma Display, please carefully read the "Safety Precautions" and these "Operating Instructions" so - Pioneer PRO-800HD | Owner's Manual - Page 6
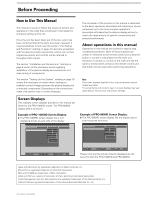
on input source and specific settings. Screen Displays The example screen displays provided in this manual are those for the PRO-1000HD model. The PRO-800HD display differs as shown: Example of PRO-1000HD Screen Display: ÷ The PRO-1000HD screen display has a non- displaying border at each side - Pioneer PRO-800HD | Owner's Manual - Page 7
0 RE S ET INPUT1 OPTION Checking Supplied Accessories Check that the following accessories were supplied. 1 Power cord 2 Remote control unit 3 AA (R6) batteries I ON : 0 ADJUST MENU SET EXIT SET 5 Press 5/∞/2/3 to adjust the value. ÷ Operating Instructions ÷ Warranty 3 PRO-1000HD / PRO-800HD - Pioneer PRO-800HD | Owner's Manual - Page 8
green when Power-Management function is operating (page 24). The flashing pattern is also used to indicate error messages (page 35). 2 Remote control sensor Point the remote control toward the remote is clearly indicated in the on-screen display (pages 18 to 32). 7 SET button PRO-1000HD / PRO-800HD - Pioneer PRO-800HD | Owner's Manual - Page 9
the on-screen menu display (pages 18 to 32 part of the screen (page 23). - VOLUME (+/-) buttons Use to adjust the volume (page 21). Inserting the batteries in the remote control unit While pressing down lightly instruction's rules that apply in your country or area. H048 En 5 PRO-1000HD / PRO-800HD - Pioneer PRO-800HD | Owner's Manual - Page 10
's remote control unit may be influenced by the infrared rays discharged from the plasma display, hampering reception of its rays or limiting its operational distance. The strength of infrared rays discharged from the screen will differ according to the picture displayed. 6 PRO-1000HD / PRO-800HD - Pioneer PRO-800HD | Owner's Manual - Page 11
power switch Use to switch the main power of the unit on and off. $ AC INLET Use to connect the supplied power cord to an AC outlet (page 16). % SPEAKER (L) terminal For connection of an external left speaker. Connect a speaker that has an impedance of 8 -16 Ω (page 14). 7 PRO-1000HD / PRO-800HD - Pioneer PRO-800HD | Owner's Manual - Page 12
over. Center line Rear view diagram (PRO-800HD) 7 Optional line (sold separately) (For details, please consult the dealer where this unit was purchased.) 1 Table top stand : PRO-1000HD / PRO-800HD display stand. 2 Wall installation unit : Wall installation bracket designed as a wall interface for - Pioneer PRO-800HD | Owner's Manual - Page 13
Installation and Connections About the Input Connectors on this Unit computer component Consult the following chart when making connections to a plasma display video output board of the computer, this type of connection may not be possible. Installation and Connections PRO-1000HD / PRO-800HD - Pioneer PRO-800HD | Owner's Manual - Page 14
Installation and Connections Connection of G ON SYNC analog RGB source Make G ON SYNC connections for a component with output that has the synchronization signal layered on top of the green signal the VD terminal. If connected to, the picture may not be displayed properly. 10 PRO-1000HD / PRO-800HD - Pioneer PRO-800HD | Owner's Manual - Page 15
Installation and Connections Connection to a personal computer Connection method differs depending on the computer type. When connecting, please thoroughly read the computer's instruction manual. Before making connections, be sure to make sure that the personal computer's power and this unit's main - Pioneer PRO-800HD | Owner's Manual - Page 16
Installation and Connections Connection of G ON SYNC analog RGB source Make G ON SYNC connections for a personal computer with output that has the synchronization signal layered on top of the green made, the picture may be not displayed normally. 12 PRO-1000HD / PRO-800HD When using INPUT2, set the - Pioneer PRO-800HD | Owner's Manual - Page 17
the main power of this display is off or in standby mode. AUDIO R INPUT4 VIDEO L OUTPUT To a monitor or a recording device Installation and Connections AV component About DTV Set Top Box Connection To ensure proper connection, please carefully read the instruction manual supplied with the - Pioneer PRO-800HD | Owner's Manual - Page 18
power and the unit's main power is off. Connecting the speakers This unit is equipped with a 2W+2W internal amplifier. If speakers are to be connected to the unit, following the accompanying connection instructions SPEAKER terminals according to the video input selection. 14 PRO-1000HD / PRO-800HD - Pioneer PRO-800HD | Owner's Manual - Page 19
video input selection. Installation and Connections Control Cord Connection When control cord connections are made, remote control operation of connected PIONEER components that bear The control cables (not supplied) are monaural cables with mini plugs (no resistance). 15 PRO-1000HD / PRO-800HD - Pioneer PRO-800HD | Owner's Manual - Page 20
to this unit. 2 Plug the power cord into a power outlet. CAUTION ÷ Use only the power cord provided. ÷ Do not use a power supply voltage other than that indicated (AC 120 V, 60 Hz) as this may cause fire or electric shock. ÷ For the plasma display, a three-core power cord with a ground terminal is - Pioneer PRO-800HD | Owner's Manual - Page 21
the following steps to route cables. Installation and Connections * As viewed from the rear of the display. 1 2 1 Organize cables together using bands. Note Cables can be routed to the right or left. Illustration depicts PRO-1000HD model. To remove speed clamps Using pliers, twist the clamp 90° - Pioneer PRO-800HD | Owner's Manual - Page 22
power. The STANDBY/ON indicator lights red. 2 Press STANDBY/ON to put the unit in the operation mode. The STANDBY/ON indicator turns green. 3 Select INPUT1 or INPUT2. 4 Press MENU to display SET UP INPUT1 OPTION RE S ET SELECT 18 PRO-1000HD / PRO-800HD SET ENTER MENU EXIT 5 Press 2/3 to - Pioneer PRO-800HD | Owner's Manual - Page 23
and 60 Hz (vertical), pressing 2/3 will cause the display mode to change alternately as follows: VIDEO VGA WIDE RGB video output of a PC VGA Not supported WIDE VGA XGA WIDE XGA 10 When the setup instruction manual supplied with the component you are connecting. 19 PRO-1000HD / PRO-800HD - Pioneer PRO-800HD | Owner's Manual - Page 24
Installation is not supported by the display, the following message will be displayed: I power on. The STANDBY/ON indicator lights red. 2 Press STANDBY/ON to put this unit in the operation mode. The STANDBY/ON indicator turns green. 20 PRO-1000HD / PRO-800HD FULL 4 Use VOLUME +/- on the remote - Pioneer PRO-800HD | Owner's Manual - Page 25
on the remote control unit. Press MUTING again to restore the sound. Muting is automatically canceled about 8 minutes after the button is pressed, and the volume level is adjusted to the minimum level. Press VOLUME + or VOLUME - to adjust the volume at a desired level. 21 PRO-1000HD / PRO-800HD - Pioneer PRO-800HD | Owner's Manual - Page 26
BY DOT or 4:3 screen sizes are selected, the display position is moved slightly each time the power is turned on, in order to prevent image burning 480 input.) [PRO-800HD] * The PRO-800HD is designed with horizontally oblong elements, with the result that the image displayed will appear more oblong - Pioneer PRO-800HD | Owner's Manual - Page 27
range AREA 4 x 4.0 x 2.0 x 1.5 x 3.0 AREA 7 display range AREA 5 x 4.0 x 2.0 x 1.5 AREA 8 display range x 3.0 x 3.0 AREA 6 x 4.0 x 2.0 x 1.5 AREA 9 display range AREA 7 x 4.0 x 2.0 x 1.5 x 3.0 AREA 8 x 4.0 x 2.0 x 1.5 x 3.0 x 3.0 AREA 9 x 4.0 x 2.0 x 1.5 23 PRO-1000HD / PRO-800HD - Pioneer PRO-800HD | Owner's Manual - Page 28
24 PRO-1000HD / PRO-800HD 3 Press 5/∞ to select either the POWER MANAGEMENT or AUTO POWER OFF displayed for 8 seconds, after which the display automatically enters the power-saving mode (*1) and the STANDBY/ON indicator flashes green. If a sync signal (*2) is input again later, the plasma display - Pioneer PRO-800HD | Owner's Manual - Page 29
clearly. BRIGHT Adjust so that the dark parts of the picture can be seen clearly the picture. G. LEVEL Adjust the amount of green in the picture. B. LEVEL Adjust the amount SET writes the value into the memory and returns the display to the step 2 screen. 5 When the setup is PRO-1000HD /PRO-800HD - Pioneer PRO-800HD | Owner's Manual - Page 30
remote control unit. ÷ Optimum settings may not be possible for low- luminance and certain other kinds of signals. In this case, following the instructions in the following section "Manual OCK / PHASE : SET UP 0/ 0 0/ 0 RE S ET INPUT1 OPTION 26 PRO-1000HD / PRO-800HD SELECT SET ENTER MENU EXIT - Pioneer PRO-800HD | Owner's Manual - Page 31
the SCREEN mode are adjusted excessively, the picture may not be displayed properly. SCREE N YES RESET ? NO SELECT SET SET MENU EXIT 2 Press 2/3 to select YES, and press SET. All SCREEN mode settings are returned to the factory set default. Display Panel Adjustments 27 PRO-1000HD /PRO-800HD - Pioneer PRO-800HD | Owner's Manual - Page 32
followed by SET to move the input point (cursor position) back by one. ÷ To return the display to its default value, press RESET followed by SET. MAIN MENU INPUT1 I NPUT L ABEL COMPUT SELECT SET ENTER MENU EXIT 7 Press MENU to return to the normal display screen. 28 PRO-1000HD / PRO-800HD - Pioneer PRO-800HD | Owner's Manual - Page 33
noise reduction settings are supported only with input signals from a video device. Settings are made individually for each of the inputs (INPUT1 - INPUT4). 1 Press MENU to display the menu screen. of the setting, press MENU once again to return to the normal display. 29 PRO-1000HD / PRO-800HD - Pioneer PRO-800HD | Owner's Manual - Page 34
, only standard progressive conversion is used. Note The PureCinema mode is supported only with 480i or NTSC input signals. This setting must be made independently setting, press MENU once again to return to the normal display. 30 PRO-1000HD / PRO-800HD Viewing a Fast Moving Picture (3D Y/C MODE) When - Pioneer PRO-800HD | Owner's Manual - Page 35
setting is supported only when power consumption. ÷ MODE 2 fixes the screen brightness regardless of the input signal. This is effective at reducing panel deterioration due to screen burning. 4 Following completion of settings, press MENU to return to normal screen display. 31 PRO-1000HD / PRO-800HD - Pioneer PRO-800HD | Owner's Manual - Page 36
display to its normal screen. Note The AUTO FUNCTION for INPUT1 is supported only when a separate SYNC or composite SYNC analog RGB signal is input. (When a G on SYNC or component video signal is input, AUTO FUNCTION is disable.) 32 PRO-1000HD / PRO-800HD SCREEN SET UP OPTION POWER CONT R OL : - Pioneer PRO-800HD | Owner's Manual - Page 37
. Vents Illustration depicts PRO-1000HD model. SHUT DOWN ¶ Turn off main power, wait for 1-2 minutes, then try turning power on again. If problem persists, remove power plug from its outlet and consult a Pioneer service center or your dealer. 33 PRO-1000HD / PRO-800HD Additional Information - Pioneer PRO-800HD | Owner's Manual - Page 38
picture distortion and similar problems. • Normal sound of the cooling fan and internal sliding parts of the plasma display panel. Not a malfunction. • Fan is set to operate only after ambient temperature exceeds 35 °C (95 °F)(differs depending on installation conditions). Not a malfunction. • Fan - Pioneer PRO-800HD | Owner's Manual - Page 39
If the green light displays a flashing pattern other than the above, an error message is indicated. Consult any onscreen messages (page 33) and check ambient conditions (temperature, condensation, etc.) and respond accordingly (pages 34 - 35). If the problem persists, disconnect the power plug and - Pioneer PRO-800HD | Owner's Manual - Page 40
lbs. 8 oz) General (PRO-800HD) Light emission panel 43 inch plasma display panel Number of pixels 1024 x 768 Power supply AC 120 V, 60 Hz Rated current 2.5 A Standby power consumption 0.9 W External dimensions ...... 1111 (W) x 692 (H) x 104 (D) mm 43-3/4 (W) x 27-1/4 (H) x 4 (D) in. Weight - Pioneer PRO-800HD | Owner's Manual - Page 41
70Hz 75Hz (74.9Hz) 85Hz 56Hz 60Hz 70Hz 24.8kHz 31.5kHz 31.5kHz 35.0kHz 37.9kHz 37.5kHz 43.3kHz 35.2kHz 37.9kHz 48.1kHz 46.9kHz 53.7kHz 49.7kHz 31.7kHz 48.4kHz 56.5kHz 60.0kHz . : Picture will be enlarged but some fine detail will be hard to see. Additional Information 37 PRO-1000HD / PRO-800HD - Pioneer PRO-800HD | Owner's Manual - Page 42
60Hz 70Hz 24.8kHz 31.5kHz 31.5kHz 35.0kHz 37.9kHz 37.5kHz 43.3kHz 35.2kHz 37.9kHz 48.1kHz 46.9kHz 53.7kHz 49.7kHz 31 line ratio are made to display at 1:1 ratio. Note: The PRO-800HD is designed with horizontally oblong elements, with the result that the image displayed will appear more oblong - Pioneer PRO-800HD | Owner's Manual - Page 43
which reproduces light and GREEN) signal of the R.G.B signal. VGA VGA is short for "Video Graphics Array". Generally this indicates a 640 dot x 480 line resolution. XGA General term for "eXtended Graphics Array". Generally this indicates a 1024 dot x 768 line resolution. 39 PRO-1000HD / PRO-800HD - Pioneer PRO-800HD | Owner's Manual - Page 44
(USA) INC. P.O. BOX 1540, Long Beach, California 90801-1540, U.S.A. PIONEER ELECTRONICS OF CANADA, INC. 300 Allstate Parkway, Markham, Ontario L3R OP2, Canada Published by Pioneer Corporation. Copyright © 2002 Pioneer Corporation. All rights reserved. Printed in USA
-
 1
1 -
 2
2 -
 3
3 -
 4
4 -
 5
5 -
 6
6 -
 7
7 -
8
-
9
-
10
-
11
-
12
-
13
-
14
-
15
-
16
-
17
-
18
-
19
-
20
-
21
-
22
-
23
-
24
-
25
-
26
-
27
-
28
-
29
-
30
-
31
-
32
-
33
-
34
-
35
-
36
-
37
-
38
-
39
-
40
-
41
-
42
-
43
-
44
 |
 |

Operating Instructions
PLASMA DISPLAY
PRO-1000HD
PRO-800HD