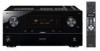
Pioneer SC-07 Owner's Manual
Pioneer SC-07 - Elite AV Network Receiver Manual
 |
UPC - 012562891538
View all Pioneer SC-07 manuals
Add to My Manuals
Save this manual to your list of manuals |
Pioneer SC-07 manual content summary:
- Pioneer SC-07 | Owner's Manual - Page 1
Operating Instructions audio/video multi-channel receiver - Pioneer SC-07 | Owner's Manual - Page 2
CHANNEL RECEIVER Model Number: SC-07 / SC-05 Responsible Party Name: PIONEER ELECTRONICS SERVICE, and used in accordance with the instructions, may cause harmful interference to radio est conforme à la norme NMB-003 du Canada. D8-10-1-3_EF Information to User Alteration HDMI SC-07 MVOALSUTMERE - Pioneer SC-07 | Owner's Manual - Page 3
servicing) instructions in the literature accompanying the appliance. D3-4-2-1-1_En-A 1) Read these instructions. 2) Keep these instructions. 3) Heed all warnings. 4) Follow all instructions used for connection with speaker, and should be routed away from hazards to avoid damage to the insulation of - Pioneer SC-07 | Owner's Manual - Page 4
and appropriate one fitted. Replacement and mounting of an AC plug on the power supply cord of this unit should be performed only by qualified service personnel. If connected to an AC outlet, the cut-off plug can cause severe electrical shock. Make sure it is properly disposed of after removal - Pioneer SC-07 | Owner's Manual - Page 5
42 Naming station presets 42 Listening to station presets 42 07 The Advanced MCACC menu Making receiver settings from the Advanced MCACC menu 43 Automatic MCACC (Expert 44 Manual MCACC setup 46 Fine Channel Level 47 Fine Speaker Distance 47 Standing Wave 48 Acoustic Calibration EQ Adjust 48 - Pioneer SC-07 | Owner's Manual - Page 6
84 Retrieving saved Internet radio stations 84 Setting up the network 84 Checking the network settings 86 Software update 87 Glossary 87 11 HDMI Control Making the HDMI Control connections 89 Setting the HDMI options 90 Setting the HDMI Control mode 90 Before using synchronization 90 - Pioneer SC-07 | Owner's Manual - Page 7
information Speaker Setting Guide 109 Positional relationship between speakers and monitor 111 Troubleshooting 112 Power 112 No sound 113 Other audio problems 114 Video 115 Settings 115 Professional Calibration EQ graphical output . . . . . 116 Display 116 Remote control 117 HDMI 117 - Pioneer SC-07 | Owner's Manual - Page 8
the following supplied accessories: • Setup microphone (cable: 5 m (16.4 ft.)) • Remote control unit • AA/IEC R6P dry cell batteries x2 • AM loop antenna • FM wire antenna • Warranty card • These operating instructions Installing the receiver • When installing this unit, make sure to put it on - Pioneer SC-07 | Owner's Manual - Page 9
only on your speaker setup, but also on the source and the sound settings of the receiver. This receiver will automatically decode multichannel showing in the receiver's display, indicating that the DVD input is selected. If it isn't, press DVD on the remote control to set the receiver to the DVD - Pioneer SC-07 | Owner's Manual - Page 10
Auto MCACC A/V RECEIVER Surr Back System : Normal Save SYMMETRY to : M1.MEMORY 1 START Exit Return 3 Make sure 'Normal' is selected,2 select an MCACC preset3, then select START.4 Check that the remote control's operation selector switch is set to RCV. 4 Follow the instructions on-screen. Make - Pioneer SC-07 | Owner's Manual - Page 11
the basic instructions for playing a source (such as a DVD disc) with your home theater system. RECEIVER MAIN speakers and viewing environment, we recommend adjusting the settings manually. 3 Make sure that the TV's video input is set to this receiver (for example, if you connected this receiver - Pioneer SC-07 | Owner's Manual - Page 12
02 Simple Home Theater Guide 3 Set the operation selector switch to RCV, then press AUTO/DIRECT the connections and settings. 4 Use the volume control to adjust the volume level. Turn down the volume of your TV so that all sound is coming from the speakers connected to this receiver. Better sound - Pioneer SC-07 | Owner's Manual - Page 13
Phase Control on page 13). Also, when your PC is connected to this receiver, the original characteristics of group delay of the speakers calibrated and the corrected characteristics of group delay can be displayed in 3-dimension on your PC (see Advanced MCACC output using your PC on page 72). 13 - Pioneer SC-07 | Owner's Manual - Page 14
Guide Full Band Phase Control ON Tweeter DIRECT PGM STEREO/ A.L.C. STANDARD ADV SURR BD MENU • Set the operation selector switch to RCV, then press PHASE CTRL panel lights. Note 1 The FULL BAND PHASE CTRL mode cannot be set to ON in the following cases: - When headphones are plugged in. - Pioneer SC-07 | Owner's Manual - Page 15
(MULTI-ZONE & SOURCE) Use for connection to an external remote control sensor for use in a MULTI-ZONE setup, for example. See Connecting an IR receiver on page 69. 4 Optical and coaxial digital audio inputs (x7 (SC-07), x6 (SC-05)) Use for digital audio sources, including DVD players/ recorders - Pioneer SC-07 | Owner's Manual - Page 16
video jacks on page 23. 12 SC-07 only: ZONE 2 component video output /recorders, VCRs, etc. Each set of inputs has jacks for composite speakers. See Installing your speaker system on page 26. When making cable connections • To avoid hum, do not lay connected cables over the top of the receiver - Pioneer SC-07 | Owner's Manual - Page 17
About the video converter above for more on HDMI compatibility. SC-07 only: When connecting to an HDMI/DVIcompatible monitor or a flat panel TV using the HDMI OUT2 terminal, switch the HDMI output setting to HDMI OUT2 or HDMI OUT ALL. See Switching the HDMI output on page 100. Note 1 If the video - Pioneer SC-07 | Owner's Manual - Page 18
HDMI on the remote control repeatedly. • Set the HDMI parameter in Setting the Audio options on page 96 to THROUGH if you want to hear HDMI audio output from your TV or flat panel TV (no sound will be heard from this receiver). About HDMI HDMI (High Definition Multimedia Interface) supports - Pioneer SC-07 | Owner's Manual - Page 19
: SPEAKER IMPEDANCE 6Ω - 16Ω . ATTENTION: ENCEINTE D'IMPEDANCE DE 6Ω - 16Ω . L (Single) SELECTABLE SEE INSTRUCTION MANUAL SELECTABLE VOIR LE MODE D'EMPLOI R SURROUND L R SUBWOOFER AR FRONT L CENTER Blu-ray disc player HDMI OUT The diagram shows a basic setup of this receiver together - Pioneer SC-07 | Owner's Manual - Page 20
R SUBWOOFER MULTI CH IN FRONT CENTER SURROUND SURROUND BACK L R SPEAKERS R SURROUND BACK/ B CAUTION: SPEAKER IMPEDANCE 6Ω - 16Ω . ATTENTION: ENCEINTE D'IMPEDANCE DE 6Ω - 16Ω . L (Single) SELECTABLE SEE INSTRUCTION MANUAL SELECTABLE VOIR LE MODE D'EMPLOI R SURROUND L R SUBWOOFER AR FRONT - Pioneer SC-07 | Owner's Manual - Page 21
Connecting your equipment 03 Connecting a satellite/cable receiver or other set-top box Satellite and cable receivers, and terrestrial digital TV tuners are all examples of so-called 'set-top boxes'. SC-07 LAN(10/100) XM IN HDMI COAXIAL ASSIGNABLE IN 1 (DVD) BD IN IN 2 (CD) IN 3 (DVR2) IN - Pioneer SC-07 | Owner's Manual - Page 22
Connecting a DVD/HDD recorder, VCR and other video sources This receiver has two sets of audio/video inputs and outputs suitable for connecting analog or digital video devices, including DVD/HDD recorders and VCRs. SC-07 LAN(10/100) XM IN HDMI COAXIAL ASSIGNABLE IN 1 (DVD) BD IN IN 2 (CD) IN - Pioneer SC-07 | Owner's Manual - Page 23
TV are both compatible), which delivers a very stable, flickerfree picture. See the manuals that came with your TV and source component to check whether they are compatible with progressive-scan video. SC-07 LAN(10/100) XM IN HDMI COAXIAL ASSIGNABLE IN 1 (DVD) BD IN IN 2 (CD) IN 3 (DVR2) IN - Pioneer SC-07 | Owner's Manual - Page 24
too. SC-07 LAN(10/100) XM IN HDMI COAXIAL ASSIGNABLE SPEAKERS R SURROUND BACK/ B CAUTION: SPEAKER IMPEDANCE 6Ω - 16Ω . ATTENTION: ENCEINTE D'IMPEDANCE DE 6Ω - 16Ω . L (Single) SELECTABLE SEE INSTRUCTION MANUAL receiver. You can assign them when setting up the receiver problems may occur depending on - Pioneer SC-07 | Owner's Manual - Page 25
require. SC-07 LAN(10/100) XM IN HDMI COAXIAL ASSIGNABLE SPEAKERS R SURROUND BACK/ B CAUTION: SPEAKER IMPEDANCE 6Ω - 16Ω . ATTENTION: ENCEINTE D'IMPEDANCE DE 6Ω - 16Ω . L (Single) SELECTABLE SEE INSTRUCTION MANUAL receiver remote) or the INPUT SELECTOR dial (front panel) to select VIDEO 3. - Pioneer SC-07 | Owner's Manual - Page 26
-R) ASSIGNABLE 1 - 3 ASSIGNABLE OUT 1 (HDMI CTRL) ZONE3/ SOURCE OUT SOURCE OUT OUT INSTRUCTION MANUAL SELECTABLE VOIR LE MODE D'EMPLOI R SURROUND L R SUBWOOFER AR FRONT L CENTER SC-07 Surround right Surround back right Connecting the speakers Each speaker connection on the receiver - Pioneer SC-07 | Owner's Manual - Page 27
fully shut, then plug the banana plug into the end of the speaker terminal. Important • Please refer to the manual that came with your speakers for details on how to connect the other end of the speaker cables to your speakers. • Other connections on page 60 provides greater detail on alternate - Pioneer SC-07 | Owner's Manual - Page 28
back speakers THX recommends placing them together and the same distance from your listening position for the following THX modes: SC-07 - THX Ultra2 CINEMA, THX Ultra2 MUSIC and THX Ultra2 GAMES SC-05 - THX Select2 CINEMA, THX Select2 MUSIC and THX Select2 GAMES See also THX Audio Setting on - Pioneer SC-07 | Owner's Manual - Page 29
. Avoid placing near computers, television sets or other electrical appliances and do in the receiver Only plug in after you have connected all your components to this receiver, including the speakers. • nearest Pioneer authorized independent service company for a replacement. • The receiver should - Pioneer SC-07 | Owner's Manual - Page 30
CONTROL ADVANCED MCACC DIGITAL VIDEO SCALER HDMI 6 SC-07 MASTER VOLUME 8 9 10 11 12 13 14 15 AUDIO PARAMETER (TUNE) VIDEO AUTO SURR/ HOME STANDARD ADVANCED STEREO/ TUNER EDIT BAND STREAM DIRECT THX SURROUND SURROUND A.L.C. CONTROL ON/OFF SPEAKERS (ST) ENTER (ST) 7 iPod DIRECT USB - Pioneer SC-07 | Owner's Manual - Page 31
ADMVCAANCCCED DIGSITCAALLVEIRDEO HDMI MVOALSUTMERE 8 ) /ENTER Use the arrow buttons when setting up your HOME MENU. Use TUNE / speakers. Operating range of remote control unit The remote control may not work properly if: • There are obstacles between the remote control and the receiver's remote - Pioneer SC-07 | Owner's Manual - Page 32
CD TUNER SIRIUS CD-R PHONO DVD TV BDP DVR VIDEO HMG HDMI [ 1 ] [ 2 ] STREAM DIRECT 2PRO LOGIC Neo :6 input signal. AUTO lights when the receiver is set to select the input signal automatically is selected (page 38). 15 Speaker indicators Lights to indicate the current speaker system, A and/or B - Pioneer SC-07 | Owner's Manual - Page 33
Remote control Illustration shows the SC-07 remote control. 1 RECEIVER MAIN SOURCE 2 ZONE2 3 3 MULTI OPERATION DVD BD DVR1 DVR2 VIDEO1 VIDEO2 VIDEO3 TV HOME MEDIA GALLERY CD CD-R PHONO 4 HDMI are explained on page 41 and page 42. Set the operation selector switch to RCV to access the following - Pioneer SC-07 | Owner's Manual - Page 34
settings (page 100). GENRE - Automatically selects the most appropriate Advanced Surround mode for the genre of the source currently being played back (this feature is available only when a Pioneer DVD recorder supporting HDMI Control is connected to this receiver via HDMI) (page 40). SC-07 - Pioneer SC-07 | Owner's Manual - Page 35
, settings and status of the receiver. speaker setting on page 56 is set to anything but Normal), 2 Pro Logic IIx becomes 2 Pro Logic II (5.1 channel sound). 6 When listening to 2-channel sources in Dolby Pro Logic IIx Music mode, there are three further parameters you can adjust: C.WIDTH, DIMENSION - Pioneer SC-07 | Owner's Manual - Page 36
or Neo:6 Music mode, you can also adjust the center image effect (see Setting the Audio options on page 96). 2 Neural THX can be selected for input. 4 • If you only have one surround back speaker connected, THX Ultra2 GAMES (SC-07)/THX Select2 GAMES (SC-05) is not available. • You can't use the THX - Pioneer SC-07 | Owner's Manual - Page 37
(and possibly your subwoofer depending on your speaker settings). Dolby Digital, DTS and WMA9 Pro multichannel sources are downmixed to stereo. In the Auto level control stereo mode (A.L.C.), this receiver equalizes playback sound levels if each sound level varies with the music source recorded - Pioneer SC-07 | Owner's Manual - Page 38
AUTO - This is the default setting. The receiver selects the first available signal in the following order: HDMI; DIGITAL; ANALOG. • ANALOG - 24) and set the signal input to DIGITAL. • Some DVD players don't output DTS signals. For more details, refer to the instruction manual supplied with your - Pioneer SC-07 | Owner's Manual - Page 39
headphones are connected to this receiver or when any of the THX, stereo, Front Stage Surround Advance or Stream Direct mode is selected. • You can only use the Virtual Surround Back mode if the surround speakers are on and the SB setting is set to NO in the Speaker Setting on page 56. • The Virtual - Pioneer SC-07 | Owner's Manual - Page 40
on a Pioneer DVD recorder supporting HDMI Control connected to this receiver via HDMI.1 For details on HDMI Control, see HDMI Control on page 89. SIGNAL SEL SLEEP DIMMER AUDIO TV SOURCE RCV CH VOL VOL SR+ SBch MCACC DISP A.ATT GENRE HDMI OUT D.ACCESS CLR CLASS CH ENTER TV CONTROL 1 Set the - Pioneer SC-07 | Owner's Manual - Page 41
AUDIO SR+ SBch MCACC DISP A.ATT GENRE HDMI OUT D.ACCESS CLR CLASS CH ENTER 2 Use receiver will start searching for the next station, stopping when it has found one. Repeat to search for other stations. Manual directly using the number buttons on the remote control. 1 Press TUNER to select the - Pioneer SC-07 | Owner's Manual - Page 42
manually tuning in each time. This receiver can memorize up to 30 stations, stored in three banks, or classes (A, B and C) of 10 stations each. When saving an FM frequency, the MPX setting SBch MCACC DISP A.ATT GENRE HDMI OUT D.ACCESS CLR CLASS CH remote control to recall the station preset. 42 En - Pioneer SC-07 | Owner's Manual - Page 43
-phase characteristics of the connected speakers. • Manual MCACC - Fine-tunes your speaker settings and customize the Acoustic Calibration EQ (see Manual MCACC setup on page 46). • Demo - No settings are saved and no errors occur. When the speakers are connected to this receiver, the test tone is - Pioneer SC-07 | Owner's Manual - Page 44
on page 43. 1.Advanced MCACC A/V RECEIVER a. Full Auto MCACC b. Auto MCACC c. Manual MCACC d. Demo 1b.Auto MCACC A/V RECEIVER ALL SYMMETRY : M1.MEMORY 1 ALL CH ADJ : M2.MEMORY 2 FRONT ALIGH : M3.MEMORY 3 THX Speaker : NO Speaker Setting Channel Level Speaker Distance EQ Pro. & S-Wave FULL - Pioneer SC-07 | Owner's Manual - Page 45
. If there doesn't seem to be a problem, you can simply use / to select the speaker and / to change the setting (and number for surround back) and continue. 8 Make sure 'OK' is selected, then press ENTER. A progress report is displayed on-screen while the receiver outputs more test tones to - Pioneer SC-07 | Owner's Manual - Page 46
system or add new speakers). Caution • The test tones used in the Manual MCACC setup are output at high volume. Important • You will need to first specify the MCACC preset you want to adjust by pressing MCACC before pressing HOME MENU (step 2 in Making receiver settings from the Advanced MCACC - Pioneer SC-07 | Owner's Manual - Page 47
adjust the distance of each speaker in 1 inch increments. The following setting can help you make detailed adjustments that you may not achieve using the Manual speaker setup on page 55. 1 Select 'Fine SP Distance' from the Manual MCACC setup menu. 1c.Manual MCACC A/V RECEIVER 1. Fine Channel Level - Pioneer SC-07 | Owner's Manual - Page 48
Manual MCACC setup menu. Standing Wave • Default setting: ON2/ATT 0.0dB (all filters) Acoustic standing waves occur when, under certain conditions, sound waves from your speaker 1 Select 'Standing Wave' from the Manual MCACC setup menu. 1c.Manual MCACC A/V RECEIVER 1. Fine Channel Level 2. Fine SP - Pioneer SC-07 | Owner's Manual - Page 49
the speakers. This is done with the help of a graphical output that can be displayed on-screen, or using a computer (with software available from Pioneer - see this receiver.2 Setting Acoustic Calibration EQ Professional according to your room characteristics Using the manual setup, you can set the - Pioneer SC-07 | Owner's Manual - Page 50
07 your speaker system, it is influenced by room characteristics, such as walls, furniture, and the dimensions of a 30~50ms setting. Later time settings may provide a more detailed sound experience with your speaker system. It is then press ENTER. 1c.Manual MCACC A/V RECEIVER 1. Fine Channel Level - Pioneer SC-07 | Owner's Manual - Page 51
A/V RECEIVER a. Speaker Setting b. Channel Level c. Speaker Distance d. Standing Wave e. Acoustic Cal EQ f. Group Delay g. Output PC Exit Return Exit Return 3 Select the setting you want to check. • Speaker Setting - Used to check the settings of the speaker systems. See Speaker Setting on - Pioneer SC-07 | Owner's Manual - Page 52
. You will return to the HOME MENU. Speaker Setting Use this to display the speaker size and number of speakers. See Speaker Setting on page 56 for more on this. 1 Select 'Speaker Setting' from the MCACC Data Check menu. 2a.Speaker Setting A/V RECEIVER Front : LARGE Center : SMALL Surr : SMALL - Pioneer SC-07 | Owner's Manual - Page 53
Advanced MCACC menu 07 Acoustic Cal EQ Use this to display the calibration values for the frequency response of the various channels set in the Management A/V RECEIVER a. Memory Rename b. MCACC Memory Copy c. MCACC Memory Clear Exit Return Exit Return 3 Select the setting you want to - Pioneer SC-07 | Owner's Manual - Page 54
of the selected MCACC preset memory. • Level & Distance - Copies only the channel level and speaker distance settings of the selected MCACC preset memory. 3 Select the MCACC preset you'll be copying the settings 'From', then specify where you want to copy them ('To'). Make sure you don't overwrite - Pioneer SC-07 | Owner's Manual - Page 55
SP Setup b. Input Setup c. OSD Language d. Other Setup 4a.Manual SP Setup A/V RECEIVER 1. Surr Back System 2. Speaker Setting 3. Channel Level 4. Speaker Distance 5. X-Curve 6. THX Audio Setting Exit Return Exit Return 2 Select the setting you want to adjust. If you are doing this for the - Pioneer SC-07 | Owner's Manual - Page 56
presets, and cannot be set independently. 1 Select 'Speaker Setting' from the Manual SP Setup menu. 4a.Manual SP Setup A/V RECEIVER 1. Surr Back System 2. Speaker Setting 3. Channel Level 4. Speaker Distance 5. X-Curve 6. THX Audio Setting 4a2.Speaker Setting A/V RECEIVER Front : LARGE Center - Pioneer SC-07 | Owner's Manual - Page 57
1 Exit Cancel 1 Select 'Channel Level' from the Manual SP Setup menu. 4a.Manual SP Setup A/V RECEIVER 1. Surr Back System 2. Speaker Setting 3. Channel Level 4. Speaker Distance 5. X-Curve 6. THX Audio Setting 4a3.Channel Level A/V RECEIVER MCACC : M1.MEMORY 1 Test Tone : AUTO Exit Return - Pioneer SC-07 | Owner's Manual - Page 58
36). 2 Ultra2 for the SC-07, Select2 for the SC-05. 3 If you don't have surround back speakers, or just have one, you won't be able to select this setting. 4 • THX Ultra2/Select2 SW can only be selected when SW at Speaker Setting is set to YES or PLUS. • The BGC setting can only be selected when - Pioneer SC-07 | Owner's Manual - Page 59
Audio Setting' from the Manual SP setup menu. 4a.Manual SP Setup A/V RECEIVER 1. Surr Back System 2. Speaker Setting 3. Channel Level 4. Speaker Distance 5. X-Curve 6. THX Audio Setting 5 Select either ON or OFF for Boundary Gain Compensation setting. 4a6.THX Audio Setting A/V RECEIVER Loudness - Pioneer SC-07 | Owner's Manual - Page 60
R CAUTION: SPEAKER IMPEDA ATTENTIO ENCEINTE D'IMPE SELECTAB SEE INSTR MANUAL SELECTAB VOIR LE MO D'EMPLOI SC-07 SATELLiTE RADiO SATELLiTE RADiO XM Mini-Tuner 1 Connect an XM Mini-Tuner to the XM IN jack on the rear of this receiver. You will also need to activate the XM Radio service. 2 Press - Pioneer SC-07 | Owner's Manual - Page 61
can be selected also with STANDARD. Saving channel presets This receiver can memorize up to 30 channels, stored in three banks, remote control to recall the channel preset. Using the XM Menu The XM Menu provides additional XM Radio features. 1 Set and is available in Canada for subscribers with a - Pioneer SC-07 | Owner's Manual - Page 62
™ Tuner To receive SIRIUS Satellite Radio broadcasts, you will need to activate your SiriusConnect™ tuner.1 SC-07 LAN(10/100) XM IN HDMI COAXIAL ASSIGNABLE IN IN IN SIGNAL GND L R CAUTION: SPEAKER IMPED ATTENTIO ENCEINTE D'IMP SELECTAB SEE INSTR MANUAL SELECTAB VOIR LE M D'EMPLOI SIRIUS - Pioneer SC-07 | Owner's Manual - Page 63
can also use the number buttons on the remote control to recall the channel preset. 3 supports surround back channels). Make sure that the player is set to this receiver. • To use a 5.1-channel speaker set, use the surround speakers for not displayed in the Channel Guide, but may be accessed by - Pioneer SC-07 | Owner's Manual - Page 64
SURROUND L AR FRONT L CENTER SELECTABLE SEE INSTRUCTION MANUAL SELECTABLE VOIR LE MODE D'EMPLOI L R Switching the speaker system If you selected Speaker B in Surround back speaker setting on page 56, three speaker system settings are possible using SPEAKERS. If you selected Normal or Front Bi - Pioneer SC-07 | Owner's Manual - Page 65
way. Connecting additional amplifiers This receiver has more than enough power for any home use, but it's possible to add additional amplifiers to every channel of your system using the pre-outs. Make the connections shown below to add amplifiers to power your speakers. SC-07 M LOOP VR2 IN FRONT - Pioneer SC-07 | Owner's Manual - Page 66
SPEAKERS R SURROUND BACK/ B L (Single) R SURROUND L AR FRONT L CENTER CAUTION: SPEAKER IMPEDANCE 6Ω - 16Ω . ATTENTION: ENCEINTE D'IMPEDANCE DE 6Ω - 16Ω . SELECTABLE SEE INSTRUCTION MANUAL set to HOME MEDIA GALLERY. c.The COMPONENT VIDEO ZONE2 OUT jack is only provided on the SC-07. d.SC-07 - Pioneer SC-07 | Owner's Manual - Page 67
IMPEDANCE 6Ω - 16Ω . ATTENTION: ENCEINTE D'IMPEDANCE DE 6Ω - 16Ω . SELECTABLE SEE INSTRUCTION MANUAL SELECTABLE VOIR LE MODE D'EMPLOI AUDIO IN MULTI-ZONE setup using speaker terminals (Zone 2) You must select ZONE 2 in Surround back speaker setting on page 56 to use this setup. Note that the - Pioneer SC-07 | Owner's Manual - Page 68
THX SURROUND SURROUND A.L.C. CONTROL ON/OFF SPEAKERS iPod DIRECT USB VIDEO3 INPUT MULTI-ZONE & SOURCE DIGITAL IN S-VIDEO VIDEO L AUDIO R MCACC SETUP MIC PHONES SC-07 INPUT SELECTOR STANDBY/ON PHASE CONTROL ADVANCED MCACC DIGITAL VIDEO SCALER HDMI MASTER VOLUME 1 Press MULTI-ZONE - Pioneer SC-07 | Owner's Manual - Page 69
all output to the sub zone(s).3 MULTI-ZONE remote controls Set the MULTI-ZONE operation switch to ZONE 2 or ZONE SPEAKER IMPEDANCE 6Ω ATTENTION: ENCEINTE D'IMPEDANCE D SELECTABLE SEE INSTRUCTION MANUAL SELECTABLE VOIR LE MODE D'EMPLOI IR IN 1 IN 2 OUT IN CONTROL OUT SIGNAL GND L R IR receiver - Pioneer SC-07 | Owner's Manual - Page 70
to control the receiver using the remote control if you switch the flat panel TV off. • Before you can use the extra SR+ features, you need to make a few settings in the receiver. See The Input Setup menu on page 92 and SR+ Setup for Pioneer flat panel TVs on page 95 for detailed instructions. Note - Pioneer SC-07 | Owner's Manual - Page 71
flat panel TV. See also SR+ Setup for Pioneer flat panel TVs on page 95 for more on setting up the receiver. DVD AUDIO IN TV/SAT AUDIO IN SC-07 INPUT SELECTOR STANDBY/ON PHASE CONTROL ADVANCED MCACC DIGITAL VIDEO SCALER HDMI MASTER VOLUME This receiver To make the most of the SR+ features - Pioneer SC-07 | Owner's Manual - Page 72
receiver (the cable must be cross type, female-female). The software to output the results is available from the support area of the Pioneer website (http:// www.pioneerelectronics.com/PUSA/ Home+Entertainment+Custom+Install). Instructions RECEIVER a. Speaker Setting b. Channel Level c. Speaker - Pioneer SC-07 | Owner's Manual - Page 73
operation manual supplied with your network component. Features of Home Media Gallery This receiver is managed by the vTuner database service exclusively for use with the Pioneer products. Also, you can on this. 2 Configure the network settings. The setup is necessary only when the router to - Pioneer SC-07 | Owner's Manual - Page 74
- 3 ASSIGNABLE OUT 1 (HDMI CTRL) ZONE3/ SOURCE OUT SOURCE OUT OUT 2 OPTICAL DIGITAL SC-07 12 V TRIGGER (OUTPUT 12V TOTAL 50mA MAX) SIRIUS IN 1 (DVD) 2 PR IR IN 1 SIG IN G 2 OUT IN CONTROL OUT RS-232C LAN 3 2 Internet Modem Router 1 WAN By connecting this receiver to the - Pioneer SC-07 | Owner's Manual - Page 75
OFF SPEAKERS iPod as the receiver. This set up the network manually. Otherwise, supporting WMDRM. Content owners owners may require you to upgrade WMDRM to access their content. If you decline an upgrade, you will not be able to access content that requires the upgrade . • Pioneer cannot guarantee - Pioneer SC-07 | Owner's Manual - Page 76
installed on a connected PC and the setting of such software, network connection may be blocked. Pioneer is not responsible for any malfunction of being connected. For more information on authorizing this receiver, refer to the instruction manual of your server. Playback with Home Media Gallery - Pioneer SC-07 | Owner's Manual - Page 77
Neural Music Direct - Internet radio that supports Neural Surround • Server Name - Server Genres Composers Audiobooks 1/ 9 iPod A/V RECEIVER iPod CTRL Return Top Menu PLAY to play back the desired song or photo. For detailed operating instructions, refer to the section shown below. • iPod - See - Pioneer SC-07 | Owner's Manual - Page 78
information You can perform the following operations with the remote control of this receiver. Note that some buttons are not available for .) ENTER When browsing, press to move to next levels. During playback, press to set the play and pause modes. TOP MENU Press to return to the Top Menu screen - Pioneer SC-07 | Owner's Manual - Page 79
. 1 Set the operation selector switch to SOURCE, then press iPod CTRL to switch the iPod controls.2 This enables operation and display on your iPod, and this receiver's remote control and OSD become inactive. 2 Press iPod CTRL again to switch back to the receiver controls. iPod is a trademark - Pioneer SC-07 | Owner's Manual - Page 80
controls on the remote for USB playback. Set the operation selector switch to SOURCE, then press HOME MEDIA GALLERY to switch the remote control to the with the receiver switched off. • Use a dedicated AC adapter (supplied with the device) for USB power. If this doesn't remedy the problem, it is - Pioneer SC-07 | Owner's Manual - Page 81
vTuner list from the special Pioneer site With the receiver, broadcast stations not included instructions on the screen. 5 Register the desired broadcast stations as your favorites, following the instructions settings. • A list of Internet radio stations provided by the vTuner database service is - Pioneer SC-07 | Owner's Manual - Page 82
mode is automatically selected and lets you enjoy a rich multichannel surround sound experience. For details about Neural THX, see the operation manual supplied separately. Neural Surround is a trademark owned by Neural Audio Corporation, THX is a trademark of THX Ltd., which may be registered - Pioneer SC-07 | Owner's Manual - Page 83
Playback with HOME MEDIA GALLERY inputs 10 About playable file formats The Home Media Gallery feature of this receiver supports the following file formats. Note that some file formats are not available for playback although they are listed as playable file formats. Also, the compatibility - Pioneer SC-07 | Owner's Manual - Page 84
DISP A.ATT GENRE HDMI OUT D.ACCESS CLR CLASS CH ENTER Saving Internet radio stations This receiver can remember the set up the network manually. You must set up the network as described below only when you have connected this receiver to a server without the DHCP server function. Before you set - Pioneer SC-07 | Owner's Manual - Page 85
MENU SIGNAL SEL SLEEP DIMMER AUDIO SR+ SBch MCACC DISP A.ATT GENRE HDMI OUT SOURCE TV RCV CATEGORY HOME MENU iPod CTRL TUNE STATUS PHASE is automatically set up, and you do not need to follow Steps 7 to 16. Proceed with Step 17. Top Menu Network IP Settings A/V RECEIVER Automatic (DHCP - Pioneer SC-07 | Owner's Manual - Page 86
You can check the following network settings of this receiver: the MAC address, the IP address, the gateway IP address, the proxy server, the Subnet mask, and the firmware version (for the Home Media Gallery of this receiver). Before proceeding with the following steps, check whether you have - Pioneer SC-07 | Owner's Manual - Page 87
Firmware Version (for the Home Media Gallery of this receiver) screen appears. Top Menu Firmware Version A/V RECEIVER X.X.XX.XXX 1/ 6 Return (The version of the illustration is not the latest.) 2 Check the network settings This player supports 100BASE-TX and 10BASE-T. FLAC FLAC (Free Lossless Audio - Pioneer SC-07 | Owner's Manual - Page 88
Serial Bus) USB provides a serial bus standard for connecting devices, usually to computers such as PCs. This receiver supports the Mass Storage Class. vTuner vTuner is a paid online database service that allows you to listen to radio and TV broadcasts on the Internet. vTuner lists thousands of - Pioneer SC-07 | Owner's Manual - Page 89
in catalogues is referred to as HDMI Control in the operating instructions and on the product. By connecting this receiver to an HDMI Controlcompatible Pioneer flat panel TV or the HDD/DVD recorder with an HDMI cable, you can control this receiver from the remote control of a connected flat panel TV - Pioneer SC-07 | Owner's Manual - Page 90
the operating instructions for each component. Setting the HDMI Control mode Choose whether to set this unit's HDMI Control function ON or OFF. You will need to set it to ON to use the HDMI Control function. • When using a TV not manufactured by Pioneer, put this setting to OFF. 1 Set the operation - Pioneer SC-07 | Owner's Manual - Page 91
out an operation for the flat panel TV. For more information, see the operating manual of your flat panel TV. Synchronized amp mode operations By connecting a component to this receiver with an HDMI cable you can use synchronized amp mode, which allows you to synchronize the following operations1 - Pioneer SC-07 | Owner's Manual - Page 92
an SR+ cable connection from a CONTROL OUT jack on the display to the CONTROL IN jack on this receiver (opposite from the setup in Using this receiver with a Pioneer flat panel TV on page 70). Note that to control this receiver using the remote, you will have to point it at the flat panel TV - Pioneer SC-07 | Owner's Manual - Page 93
COAX-3b OPT-3 (Fixed) Input Terminals HDMI Component a IN 1 (BD) a a a a IN 2 a IN 3 a (HDMI-1) (HDMI-2) (HDMI-3) a COAX-2 OPT-4 a.With HDMI Control set to ON, assignments cannot be made (see HDMI Control on page 89). b.SC-07 only Changing the OSD display - Pioneer SC-07 | Owner's Manual - Page 94
Setup - Specify how you want to control your Pioneer flat panel TV (see SR+ Setup for Pioneer flat panel TVs on page 95). • HDMI Control Setup - Synchronizes this receiver with your Pioneer component supporting HDMI Control (see Setting the HDMI Control mode on page 90). • Flicker Reduction - Adjust - Pioneer SC-07 | Owner's Manual - Page 95
Other Setup menu. Exit Return Exit Finish 2 Select the 'PDP Volume Control' setting you want. • OFF - The receiver does not control the volume of the flat panel TV. Note 1 If you selected ZONE 2 in the Surround back speaker setting on page 56, you won't be able to change the volume level. 95 - Pioneer SC-07 | Owner's Manual - Page 96
that if a setting doesn't appear in the AUDIO PARAMETER menu, it is unavailable due to the current source, settings and status of the receiver. 1 Set the operation selector , more delicate ON Sampling) musical expression can be (SC-05 only) achieved by requantizing 16 bit PCM or 20 bit compressed audio - Pioneer SC-07 | Owner's Manual - Page 97
This feature is only available when the connected display supports the automatic audio/video synchronizing capability ('lip-sync') for HDMI. If you find the automatically set delay time unsuitable, set A. DELAY to OFF and adjust the delay time manually. For more details about the lip-sync feature of - Pioneer SC-07 | Owner's Manual - Page 98
the same type of terminals to which they were input). • This setting is valid for HDMI and component outputs. b.If the image doesn't match your monitor type, from the built-in tuner, or from an audio or video source connected to the receiver (such as a CD player or TV).2 Keep in mind you can't make - Pioneer SC-07 | Owner's Manual - Page 99
DTVVR2 HOME MEDIA GALLERY CD CD-R PHONO HDMI TUNER XM SIRIUS INPUT SELECT PARAMETER EXIT video recorders set the audio recording level automatically-check the component's instruction manual if you worrying about the receiver being left on all night. Use the remote control to set the sleep timer. - Pioneer SC-07 | Owner's Manual - Page 100
13 Using other functions Switching the HDMI output SC-07 only Set which terminal to use when outputting video and audio signals from the HDMI output terminals (HDMI OUT1, HDMI OUT2 or HDMI OUT ALL). The HDMI OUT1 terminal is compatible with the HDMI control function. TV SOURCE RCV CH VOL VOL - Pioneer SC-07 | Owner's Manual - Page 101
Speaker System Front SMALL Center SMALL Surr SMALL SB SMALLx2 SW YES Crossover 80 Hz X-Curve OFF THX Audio Setting 4 ft< DIMMER brightest Inputs See Input function default and possible settings on page 93. MULTI-ZONE Zone 2/3 Volume Level Variable Zone 2/3 Volume -60 dB HDMI - Pioneer SC-07 | Owner's Manual - Page 102
remote LCD display shows OK. 102 En RECEIVER MAIN ZONE2 DVD BD SOURCE 3 MULTI OPERATION DTVVR1 DVR12 VIDEO1 VIDEO2 VIDEO3 DTVVR2 HOME MEDIA GALLERY CD CD-R PHONO HDMI CONTROL, set the operation selector switch to Pioneer HDD recorder, please select PIONEER DVR 487, 488, 489 or 493. • When using a Pioneer - Pioneer SC-07 | Owner's Manual - Page 103
just need to be moved closer together or farther apart. • If the remote LCD shows FULL, it means the memory is full. See Erasing one of the remote control button settings above to erase a programmed button you're not using to free up more memory (note that some signals may take more memory than - Pioneer SC-07 | Owner's Manual - Page 104
to playback a different component. This could let you, for example, use the remote control to set up and listen to a CD on the receiver, and then use the remote control to rewind a tape in your VCR while you continue to listen to your CD player. When direct function is on, any component you select - Pioneer SC-07 | Owner's Manual - Page 105
off a series of components in your system at the same time.1 Programming a multi-operation or a shutdown sequence Set the remote control operation mode selector switch to RCV when you want to program this receiver's operations, to SOURCE when you want to program operations of other components - Pioneer SC-07 | Owner's Manual - Page 106
you programmed will run, then all Pioneer components will switch off1, followed by this receiver. Controls for TVs This remote control can control components after entering the proper codes or teaching the receiver the commands (see Setting the remote to control other components on page 102 - Pioneer SC-07 | Owner's Manual - Page 107
control can control these components after entering the proper codes or teaching the receiver the commands (see Setting the remote to control other components on page 102 for more on this). Set the operation selector switch to SOURCE, then press the other device operation button of the device you - Pioneer SC-07 | Owner's Manual - Page 108
control, see Setting the remote to control other components on page 102. • If you have connected a remote control to the CONTROL IN jack (using a mini-plug cable), you won't be able to control this unit using the remote sensor. • See Using this receiver with a Pioneer flat panel TV on page 70 if - Pioneer SC-07 | Owner's Manual - Page 109
Speaker Setting Guide In order to achieve an even better surround effect, it is important to accurately position the speakers receiver it is possible to automatically correct the speaker speakers are pointed towards the listening position, the sound field will seem cramped. Testing by the Pioneer - Pioneer SC-07 | Owner's Manual - Page 110
units) sections of the center and front speakers parallel to the subwoofer's front surface achieves a more natural, powerful bass sound. Fig. 4 SW C L R Set the subwoofer parallel to the connecting line. is because this distance is corrected for electric delay, and is not a problem. 110 En - Pioneer SC-07 | Owner's Manual - Page 111
as close as possible to the screen makes the overall sound more natural. For TVs using Braun tubes, however, when installing the center speaker on the floor, adjust its angle of elevation to point it towards the listening position. Installation on floor (Diagram as seen from the side) Monitor - Pioneer SC-07 | Owner's Manual - Page 112
rear panel or another set of off or the PHASE CONTROL wires. If so, re-attach the speaker wires, making sure there are no stray strands. indicator blinks. • The receiver may have a serious problem. Disconnect from the power and call a Pioneer authorized independent service company. During loud - Pioneer SC-07 | Owner's Manual - Page 113
from digital ones (DVD, LD, CD-ROM etc.). • Check the speaker connection (see Connecting the speakers on page 26). • Check the speaker level settings (see Channel Level on page 57). • Check that the speaker hasn't been set to NO (see Speaker Setting on page 56). • The channel may not be recorded in - Pioneer SC-07 | Owner's Manual - Page 114
more signal to the subwoofer, set it to PLUS or set the front speakers to SMALL (see Speaker Setting on page 56). Everything seems to be set up • The speakers may be out of phase. Check that the positive/negative speaker terminals on the correctly, but the playback receiver are matched with the - Pioneer SC-07 | Owner's Manual - Page 115
in some cases. Change the speaker setting manually in Speaker Setting on page 56, and use the ALL (Keep SP System) option for the Auto MCACC menu in Automatic MCACC (Expert) on page 44 if this is a recurring problem. Can't adjust the Fine Speaker Distance setting (page 47) properly. The display - Pioneer SC-07 | Owner's Manual - Page 116
measurements. EQ adjustments made using the Manual MCACC setup on page 46 do not Calibration is performed, but due to your speakers' low frequency limitations, no measurable sound the receiver is set to AUTO or DIGITAL (see Choosing the input signal on page 38). • Check that the player isn't set up - Pioneer SC-07 | Owner's Manual - Page 117
component, S-Video or composite video jacks between source and receiver. • If the problem still persists when connecting your HDMI component directly to your monitor, please consult the component or monitor manual or contact the manufacturer for support. • If video images do not appear on your TV - Pioneer SC-07 | Owner's Manual - Page 118
so long as there is no problem with displaying video, this is not a malfunction. • Select ON for the HDMI control setting (see Setting the HDMI Control mode on page 90). • Turn the TV's power on before turning on this receiver's power. • Set the TV side HDMI control setting to ON. • Connect the TV - Pioneer SC-07 | Owner's Manual - Page 119
. connected to this receiver or the power continues to be displayed. supply. The PC or Internet radio is The corresponding IP address is not properly Switch on the built-in DHCP server function 84 not properly operated. set. of your router, or set up the network manually according to your - Pioneer SC-07 | Owner's Manual - Page 120
not recorded in a format playable on this a format supported by this receiver. disturbed. receiver. Check whether the folder has been damaged or corrupted Check the connection settings for 84 Internet. components on the network, and consult with your network service provider if necessary. - Pioneer SC-07 | Owner's Manual - Page 121
Problem There is a problem with the network settings. Check the network settings. The message also appears then the network settings of this receiver Aiming option to optimize the antenna properly aimed. position. See instructions supplied with the XM Mini-Tuner and Dock for antenna installation - Pioneer SC-07 | Owner's Manual - Page 122
Firmware Updating The SIRIUS Connect tuner's firmware is being updated. Wait for updating to finish. Meaning of messages displayed when the HDMI control function is set to ON Message (error number) Problem HDMI C ERR 110 to 190 HDMI C ERR 1A0 HDMI C ERR 1B0 HDMI C ERR 1C0 HDMI C ERR 2C0 HDMI - Pioneer SC-07 | Owner's Manual - Page 123
, the ".1" subwoofer channel is generated by bass management in the receiver. Dolby Surround is an encoding system which embeds surround sound information within and streaming capability in advanced systems. Supported by HighDefinition Media Interface (HDMI), a single-cable digital connection is - Pioneer SC-07 | Owner's Manual - Page 124
channel sources, the ".1" subwoofer channel is generated by bass management in the receiver). Two modes (Cinema and Music) are available using DTS Neo:6 with . DTS-EXPRESS DTS-EXPRESS is a low-bitrate encoding technology supporting up to 5.1 channels with fixed data transfer rates. This format - Pioneer SC-07 | Owner's Manual - Page 125
case of SC-07 In case of SC-05 • THX Cinema processing THX is an exclusive set of standards listening position and creates-with only two speakers- the same spacious surround experience as in the Dolby web site at www.dolby.com. Only receiver and controller products bearing the THX Surround EX logo, - Pioneer SC-07 | Owner's Manual - Page 126
Select2 Plus™ Certified receivers. With THX Loudness settings for each type of content • THX Ultra2/Select2 Cinema THX Ultra2/Select2 Cinema mode plays 5.1 movies using all 8 speakers EX, you can manually select the THX their respective owners. About 7.1-channel support for gaming Ltd. PIONEER hereby - Pioneer SC-07 | Owner's Manual - Page 127
offering an extraordinary variety of commercial-free music, plus the best in the antenna, you are ready to subscribe and begin receiving XM programming. There are three places to find your 800-967-2346). Activate your XM Satellite Radio service in Canada online at https://activate.xmradio.ca or call - Pioneer SC-07 | Owner's Manual - Page 128
15 Additional information Listening modes with different input signal formats The following charts outline the listening modes available with different input signal formats, depending on the surround back channel processing and decoding method you have selected. Stereo (2 channel) signal formats - Pioneer SC-07 | Owner's Manual - Page 129
is output from the surround back speakers when 2 Pro Logic is selected. b.Unavailable with only one surround back speaker connected. c.This is only selectable when the input signal is an analog or PCM signal. d.Ultra2 for the SC-07, Select2 for the SC-05. e.Automatically selected if no surround - Pioneer SC-07 | Owner's Manual - Page 130
15 Additional information Multichannel signal formats SBch Processing Input signal format Standard THX SBch Processing ON (7.1 channel decoding used for all sources) Dolby Digital Plus Dolby TrueHD DTS-HD DTS-HD Master Audio WMA9 Pro PCM (6.1/7.1 channel) Straight decoding THX CINEMA THX - Pioneer SC-07 | Owner's Manual - Page 131
Additional information 15 SBch Processing Input signal format Standard THX Auto Surround SBch Processing ON (7.1 channel decoding used for all sources) DTS-ES (6.1 channel sources/ 6.1 channel flagged) DTS-ES (Matrix/Discrete) DTS+2 Pro Logic llx MOVIEa DTS+2 Pro Logic llx MUSIC DTS-ES - Pioneer SC-07 | Owner's Manual - Page 132
As above THX MUSIC THX CINEMA THX MUSIC THX GAMES Straight decoding As above a.Unavailable with only one surround back speaker connected. b.This can be selected when only one surround speaker is connected. c.Ultra2 for the SC-07, Select2 for the SC-05. d.Automatically selected if no surround back - Pioneer SC-07 | Owner's Manual - Page 133
on the Stream Direct mode (see Using Stream Direct on page 38) you have selected. Stereo (2 channel) signal formats Surround Back speaker(s) Connected Input signal format Dolby Digital Surround Not connected DTS Surround Other stereo sources Analog sources PCM sources DVD-A sources SACD sources - Pioneer SC-07 | Owner's Manual - Page 134
average power output of 140 watts* per channel, min., at 8 ohms, from 20 Hz to 20 000 Hz with no more than 0.09 %** total harmonic distortion (front). Multi channel simultaneous power output (1 kHz, 1 %, 8 Ω) 7ch total 700 W (SC-07)/630 W (SC-05) Continuous Power Output (20 Hz to 20 kHz, 8 Ω, 0.09 - Pioneer SC-07 | Owner's Manual - Page 135
Through a collaboration, Pioneer and ICEpower have jointly development a unique class D amplifier called a "Direct Energy High Fidelity Class D (HD) amplifier". This new generation reference amplifier offers outstanding performance (high output of 700 W (SC-07)/630 W (SC-05) simultaneous) with - Pioneer SC-07 | Owner's Manual - Page 136
case of SC-07 This receiver is THX Ultra2™ certified, allowing you to take advantage of new THX technologies such as ASA (Advanced Speaker Array), receiver in synchronization with your Pioneer component that supports the HDMI Control function by connecting your component to this receiver via HDMI - Pioneer SC-07 | Owner's Manual - Page 137
and clearly, and without distortion. Once you have established a comfortable sound level: • Set the dial and leave it there. Taking a minute to do this now will chain saw, pneumatic drill 120 Rock band concert in front of speakers, thunderclap 140 Gunshot blast, jet plane 180 Rocket launching pad - Pioneer SC-07 | Owner's Manual - Page 138
replacement parts, operating instructions, service manuals, or accessories, please call the number shown below. Si ce produit doit être réparé au Canada, veuillez vous adresser à un distributeur autorisé Pioneer du Canada pour obtenir le nom du Centre de Service Autorisé Pioneer le plus près de
-
 1
1 -
 2
2 -
 3
3 -
 4
4 -
 5
5 -
 6
6 -
 7
7 -
8
-
9
-
10
-
11
-
12
-
13
-
14
-
15
-
16
-
17
-
18
-
19
-
20
-
21
-
22
-
23
-
24
-
25
-
26
-
27
-
28
-
29
-
30
-
31
-
32
-
33
-
34
-
35
-
36
-
37
-
38
-
39
-
40
-
41
-
42
-
43
-
44
-
45
-
46
-
47
-
48
-
49
-
50
-
51
-
52
-
53
-
54
-
55
-
56
-
57
-
58
-
59
-
60
-
61
-
62
-
63
-
64
-
65
-
66
-
67
-
68
-
69
-
70
-
71
-
72
-
73
-
74
-
75
-
76
-
77
-
78
-
79
-
80
-
81
-
82
-
83
-
84
-
85
-
86
-
87
-
88
-
89
-
90
-
91
-
92
-
93
-
94
-
95
-
96
-
97
-
98
-
99
-
100
-
101
-
102
-
103
-
104
-
105
-
106
-
107
-
108
-
109
-
110
-
111
-
112
-
113
-
114
-
115
-
116
-
117
-
118
-
119
-
120
-
121
-
122
-
123
-
124
-
125
-
126
-
127
-
128
-
129
-
130
-
131
-
132
-
133
-
134
-
135
-
136
-
137
-
138
 |
 |

Operating Instructions
audio/video multi-channel receiver