Pioneer SC-27 Owner's Manual - Page 103
Controlling the rest of your system (In case of SC-25), Operating multiple receivers, Setting
 |
UPC - 012562957487
View all Pioneer SC-27 manuals
Add to My Manuals
Save this manual to your list of manuals |
Page 103 highlights
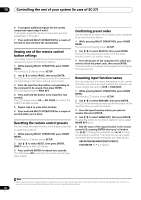
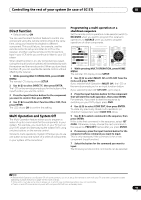
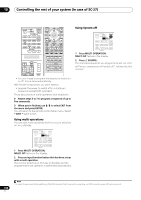
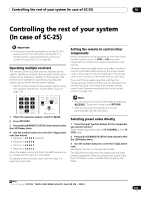
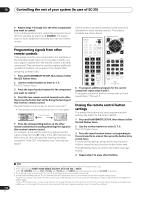
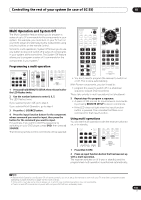
Controlling the rest of your system (In case of SC-25) 10 Controlling the rest of your system (In case of SC-25) Important • This section includes explanations for the SC-25's remote control. For instructions for the SC-27's remote control, see Controlling the rest of your system (In case of SC-27) on page 96. Operating multiple receivers The remote control included with this receiver can be used to operate up to three other receivers (of the same model as this receiver) in addition to this receiver. The receiver to be operated is switched by inputting the preset code to set the remote control setting. • Set the remote modes on the receivers before using this function (see Remote Control Mode Setup on page 130). INPUT SELECT 12 HDMI OUT 3 SIGNAL SEL MCACC 45 SLEEP 6 SBch A.ATT DIMMER 789 D.ACCESS CH LEVEL /CLR 0 CLASS ENTER INPUT MASTER VOLUME AUDIO INFO CH DISP MULTI OPE TV CTRL RECEIVER REMOTE SETUP ZONE 2 ZONE 3 MAIN 1 Check the operation selector switch to MAIN. 2 Press RECEIVER . 3 Press and hold REMOTE SETUP, then release it after the LED flashes twice. 4 Use the number buttons to enter the 5-digit preset code (see below). • Receiver 1: 6 1 9 3 5 (Default) • Receiver 2: 6 2 6 3 0 • Receiver 3: 6 2 6 3 1 • Receiver 4: 6 2 6 3 2 When the preset code is fully input, the LED flashes once to indicate that the setting is completed. To operate another receiver, start over from step 1 to input its preset code. Setting the remote to control other components Most components can be assigned to one of the input function buttons (such as DVD or CD) using the component's manufacturer preset code stored in the remote. However, there are cases where only certain functions may be controllable after assigning the proper preset code, or the codes for the manufacturer in the remote control will not work for the model that you are using. If you can't find a preset code that matches the component you want to control, you can still teach the remote individual commands from another remote control (see Programming signals from other remote controls on page 104). Note • You can cancel or exit any of the steps by pressing RECEIVER . To go back a step, press RETURN. • After ten seconds of inactivity, the remote automatically exits the operation. Selecting preset codes directly 1 Press the input function button for the component you want to control.1 When assigning preset codes to TV CONTROL, press TV CTRL here. 2 Press and hold REMOTE SETUP, then release it after the LED flashes twice. 3 Use the number buttons to enter the 5-digit preset code. See Preset code list on the separate booklet. The LED flashes twice when the preset code has been properly registered. When the preset code is fully input, the LED flashes once to indicate that the setting has failed. Note 1 You can't assign RECEIVER , TUNER, HOME MEDIA GALLERY, iPod USB, XM or SIRIUS. 103 en
-
 1
1 -
2
-
3
-
4
-
5
-
6
-
7
-
8
-
9
-
10
-
11
-
12
-
13
-
14
-
15
-
16
-
17
-
18
-
19
-
20
-
21
-
22
-
23
-
24
-
25
-
26
-
27
-
28
-
29
-
30
-
31
-
32
-
33
-
34
-
35
-
36
-
37
-
38
-
39
-
40
-
41
-
42
-
43
-
44
-
45
-
46
-
47
-
48
-
49
-
50
-
51
-
52
-
53
-
54
-
55
-
56
-
57
-
58
-
59
-
60
-
61
-
62
-
63
-
64
-
65
-
66
-
67
-
68
-
69
-
70
-
71
-
72
-
73
-
74
-
75
-
76
-
77
-
78
-
79
-
80
-
81
-
82
-
83
-
84
-
85
-
86
-
87
-
88
-
89
-
90
-
91
-
92
-
93
-
94
-
95
-
96
-
97
-
 98
98 -
 99
99 -
 100
100 -
 101
101 -
 102
102 -
 103
103 -
 104
104 -
 105
105 -
 106
106 -
 107
107 -
 108
108 -
109
-
110
-
111
-
112
-
113
-
114
-
115
-
116
-
117
-
118
-
119
-
120
-
121
-
122
-
123
-
124
-
125
-
126
-
127
-
128
-
129
-
130
-
131
-
132
-
133
-
134
-
135
-
136
-
137
-
138
-
139
-
140
-
141
-
142
-
143
-
144
-
145
-
146
-
147
-
148
-
149
-
150
-
151
-
152
-
153
-
154
 |
 |
