Pioneer SC-27 Owner's Manual - Page 115
Acoustic Calibration EQ Adjust, Acoustic Calibration EQ Professional, AUDIO PARAMETER, EQ Adjust
 |
UPC - 012562957487
View all Pioneer SC-27 manuals
Add to My Manuals
Save this manual to your list of manuals |
Page 115 highlights
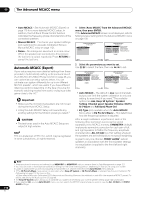
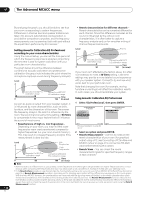
The Advanced MCACC menu 11 • Freq / Q / ATT - These are the filter parameters where Freq represents the frequency you will be targeting and Q is the bandwidth (the higher the Q, the narrower the bandwidth, or range) of the attenuation (ATT, the amount of reduction to the targeted frequency). 3 When you're finished, press RETURN. You will return to the Manual MCACC setup menu. Acoustic Calibration EQ Adjust • Default setting: ON1/0.0dB (all channels/bands) Acoustic Calibration Equalization is a kind of room equalizer for your speakers (excluding the subwoofer). It works by measuring the acoustic characteristics of your room and neutralizing the ambient characteristics that can color the original source material (providing a 'flat' equalization setting). If you're not satisfied with the adjustment provided in Automatically setting up for surround sound (Auto MCACC & Full Band Phase Control) on page 46 or Automatic MCACC (Expert) on page 110, you can also adjust these settings manually to get a frequency balance that suits your tastes.2 1 Select 'EQ Adjust' from the Manual MCACC setup menu. 1c.Manual MCACC A/V RECEIVER 1. Fine Channel Level 2. Fine SP Distance 3. Standing Wave 4. EQ Adjust 5. EQ Professional 6. Precision Distance Exit Return Precision Distance is only for SC-27. 2 Select the channel(s) you want and adjust to your liking. Ch : L 1c4.EQ Adjust A/V RECEIVER dB 0.0 -8.0 -6.0 0.0 +3.0 +8.5 +8.5 +3.0 0.0 0.0 MCACC M1.MEMORY1 63 125 250 500 1k 2k 4k 8k 16k TRIM [Hz] [Hz] [Hz] [Hz] [Hz] [Hz] [Hz] [Hz] [Hz] Exit Finish Use / to select the channel. Use / to select the frequency and / to boost or cut the EQ. When you're finished, go back to the top of the screen and press to return to Ch, then use / to select the channel. • The OVER! indicator shows in the display if the frequency adjustment is too drastic and might distort. If this happens, bring the level down until OVER! disappears from the display. Tip • Changing the frequency curve of one channel too drastically will affect the overall balance. If the speaker balance seems uneven, you can raise or lower channel levels using test tones with the TRIM feature. Use / to select TRIM, then use / to raise or lower the channel level for the current speaker. 3 When you're finished, press RETURN. You will return to the Manual MCACC setup menu. Acoustic Calibration EQ Professional This setup minimizes the unwanted effects of room reverberation by allowing you to calibrate your system based on the direct sound coming from the speakers. It can also provide you with a graphical output of the frequency response of your room.3 How to use Acoustic Calibration EQ Professional If you find that lower frequencies seem overly reverberant in your listening room (i.e. it sounds 'boomy'), or that different channels seem to exhibit different reverb characteristics, select EQ Pro & S-Wave (or ALL) for the Auto MCACC setting in Automatic MCACC (Expert) on page 110 to calibrate the room automatically. This should provide a balanced calibration that suits the characteristics of your listening room. If you still aren't satisfied with the results, the manual Advanced EQ Setup (below) provides a more customized calibration of your system using the direct sound of the speakers. This is done with the help of a graphical output that can be displayed on-screen, or using a computer (with software available from Pioneer - see Output PC on page 120). How to interpret the graphical output The graph shows decibels on the vertical axis and time (in milliseconds) on the horizontal axis. A straight line indicates a flat-response room (no reverb), whereas a sloping line indicates the presence of reverberation when outputting test tones. The sloping line will eventually flatten out when the reverberant sound stabilizes (this usually takes about 100 ms or so). Note 1 You can switch on or off the Acoustic Calibration EQ feature in the AUDIO PARAMETER menu. See Setting the Audio options on page 88 for more on this. 2 When EQ Adjust is selected for an MCACC preset memory where EQ is set to OFF in the AUDIO PARAMETER, EQ ON is automatically selected. 3 This system allows you to customize your system calibration with the help of a graphical output that can be displayed on-screen, or using a computer (with software available from Pioneer-see Output PC on page 120 for more on this). 115 en
-
 1
1 -
2
-
3
-
4
-
5
-
6
-
7
-
8
-
9
-
10
-
11
-
12
-
13
-
14
-
15
-
16
-
17
-
18
-
19
-
20
-
21
-
22
-
23
-
24
-
25
-
26
-
27
-
28
-
29
-
30
-
31
-
32
-
33
-
34
-
35
-
36
-
37
-
38
-
39
-
40
-
41
-
42
-
43
-
44
-
45
-
46
-
47
-
48
-
49
-
50
-
51
-
52
-
53
-
54
-
55
-
56
-
57
-
58
-
59
-
60
-
61
-
62
-
63
-
64
-
65
-
66
-
67
-
68
-
69
-
70
-
71
-
72
-
73
-
74
-
75
-
76
-
77
-
78
-
79
-
80
-
81
-
82
-
83
-
84
-
85
-
86
-
87
-
88
-
89
-
90
-
91
-
92
-
93
-
94
-
95
-
96
-
97
-
98
-
99
-
100
-
101
-
102
-
103
-
104
-
105
-
106
-
107
-
108
-
109
-
 110
110 -
 111
111 -
 112
112 -
 113
113 -
 114
114 -
 115
115 -
 116
116 -
 117
117 -
 118
118 -
 119
119 -
 120
120 -
121
-
122
-
123
-
124
-
125
-
126
-
127
-
128
-
129
-
130
-
131
-
132
-
133
-
134
-
135
-
136
-
137
-
138
-
139
-
140
-
141
-
142
-
143
-
144
-
145
-
146
-
147
-
148
-
149
-
150
-
151
-
152
-
153
-
154
 |
 |