Pioneer SC-27 Owner's Manual - Page 120
Acoustic Cal EQ, Group Delay, Output PC
 |
UPC - 012562957487
View all Pioneer SC-27 manuals
Add to My Manuals
Save this manual to your list of manuals |
Page 120 highlights
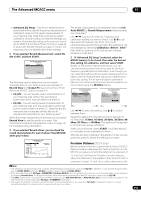
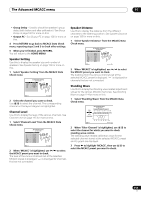
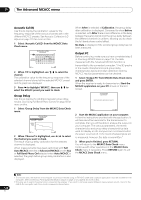
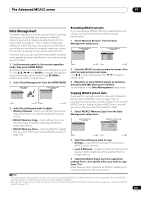
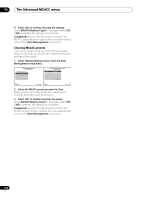
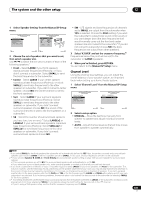
11 The Advanced MCACC menu Acoustic Cal EQ Use this to display the calibration values for the frequency response of the various channels set in the different MCACC presets. See Acoustic Calibration EQ Adjust on page 115 for more on this. 1 Select 'Acoustic Cal EQ' from the MCACC Data Check menu. Ch : L 2e.Acoustic Cal EQ A/V RECEIVER dB 0.0 -8.0 -6.0 0.0 +3.0 +8.5 +8.5 +3.0 0.0 0.0 MCACC M1.MEMORY1 63 125 250 500 1k 2k 4k 8k 16k TRIM [Hz] [Hz] [Hz] [Hz] [Hz] [Hz] [Hz] [Hz] [Hz] Exit Return 2 When 'Ch' is highlighted, use / to select the channel. The calibration value for the frequency response of the selected channel stored at the selected MCACC preset and its graph are displayed. 3 Press to highlight 'MCACC', then use / to select the MCACC preset you want to check. Group Delay Use this to display the calibrated speaker group delay results. See Using Full Band Phase Control on page 69 for more on this. 1 Select 'Group Delay' from the MCACC Data Check menu. Channel : Calibration : 2f.Group Delay A/V RECEIVER Front Before ms Front 2.0 Center Surr 1.4 SB 0.8 0.2 -0.4 -1.0 200 2k Exit 20k Hz Return 2 When 'Channel' is highlighted, use / to select the channel you want to check. The result of group delay calibration for the selected channel is displayed. When measurements have been performed with Full Auto MCACC selected at Advanced MCACC or with ALL or Full Band Phase Ctrl selected when Auto MCACC is selected, the graph before group delay calibration is also displayed. When After is selected at Calibration, the group delay after calibration is displayed. Compared to when Before is selected, with After there is less difference in the delay between frequency bands and the group delay between the different channels is uniform, allowing you to check the full band phase control effect. No Data is displayed if the selected group delay has not been measured. Output PC Before continuing, make sure you have completed step 2 in Checking MCACC Data on page 118. The data measured with the Advanced MCACC function is transmitted to the connected computer.1 The 3D graphs of the reverb characteristics and group delay characteristics before and after calibration and the MCACC results (parameters) can be checked. 1 Select 'Output PC' from MCACC Data Check menu and press ENTER. When the receiver is ready for transmission, Start the MCACC application on your PC shows on the GUI screen. 2g.Output PC A/V RECEIVER Start the MCACC application on your PC. Exit Cancel 2 Start the MCACC application on your computer. Follow the instructions provided with the application. It will take about ten seconds for the transmission to complete, then you will be able to analyze the output on your computer. The various parameters, the reverb characteristics and group delay characteristics data used for display on the computer are not cleared when the power is turned off. If the reverb characteristics are re-measured, however, the data is overwritten.2 3 When you're finished, press RETURN. You will return to the MCACC Data Check menu. Continue with other operations in the MCACC Data Check menu if necessary. Press RETURN again to exit the MCACC Data Check menu. 120 en Note 1 To transmit data, the receiver and computer must be connected using an RS-232C cable and a special application must be installed on the computer. See Connecting a PC for Advanced MCACC output on page 41 on page 34 for more on this. 2 Only one set of reverb characteristics is stored on the receiver. If you wish to compare several different measurement results, transmit the data to the computer each time reverb measurements are taken.
-
 1
1 -
2
-
3
-
4
-
5
-
6
-
7
-
8
-
9
-
10
-
11
-
12
-
13
-
14
-
15
-
16
-
17
-
18
-
19
-
20
-
21
-
22
-
23
-
24
-
25
-
26
-
27
-
28
-
29
-
30
-
31
-
32
-
33
-
34
-
35
-
36
-
37
-
38
-
39
-
40
-
41
-
42
-
43
-
44
-
45
-
46
-
47
-
48
-
49
-
50
-
51
-
52
-
53
-
54
-
55
-
56
-
57
-
58
-
59
-
60
-
61
-
62
-
63
-
64
-
65
-
66
-
67
-
68
-
69
-
70
-
71
-
72
-
73
-
74
-
75
-
76
-
77
-
78
-
79
-
80
-
81
-
82
-
83
-
84
-
85
-
86
-
87
-
88
-
89
-
90
-
91
-
92
-
93
-
94
-
95
-
96
-
97
-
98
-
99
-
100
-
101
-
102
-
103
-
104
-
105
-
106
-
107
-
108
-
109
-
110
-
111
-
112
-
113
-
114
-
 115
115 -
 116
116 -
 117
117 -
 118
118 -
 119
119 -
 120
120 -
 121
121 -
 122
122 -
 123
123 -
 124
124 -
 125
125 -
126
-
127
-
128
-
129
-
130
-
131
-
132
-
133
-
134
-
135
-
136
-
137
-
138
-
139
-
140
-
141
-
142
-
143
-
144
-
145
-
146
-
147
-
148
-
149
-
150
-
151
-
152
-
153
-
154
 |
 |
