Pioneer SC-27 Owner's Manual - Page 46
Automatically setting up for surround sound (Auto MCACC & Full Band Phase Control
 |
UPC - 012562957487
View all Pioneer SC-27 manuals
Add to My Manuals
Save this manual to your list of manuals |
Page 46 highlights
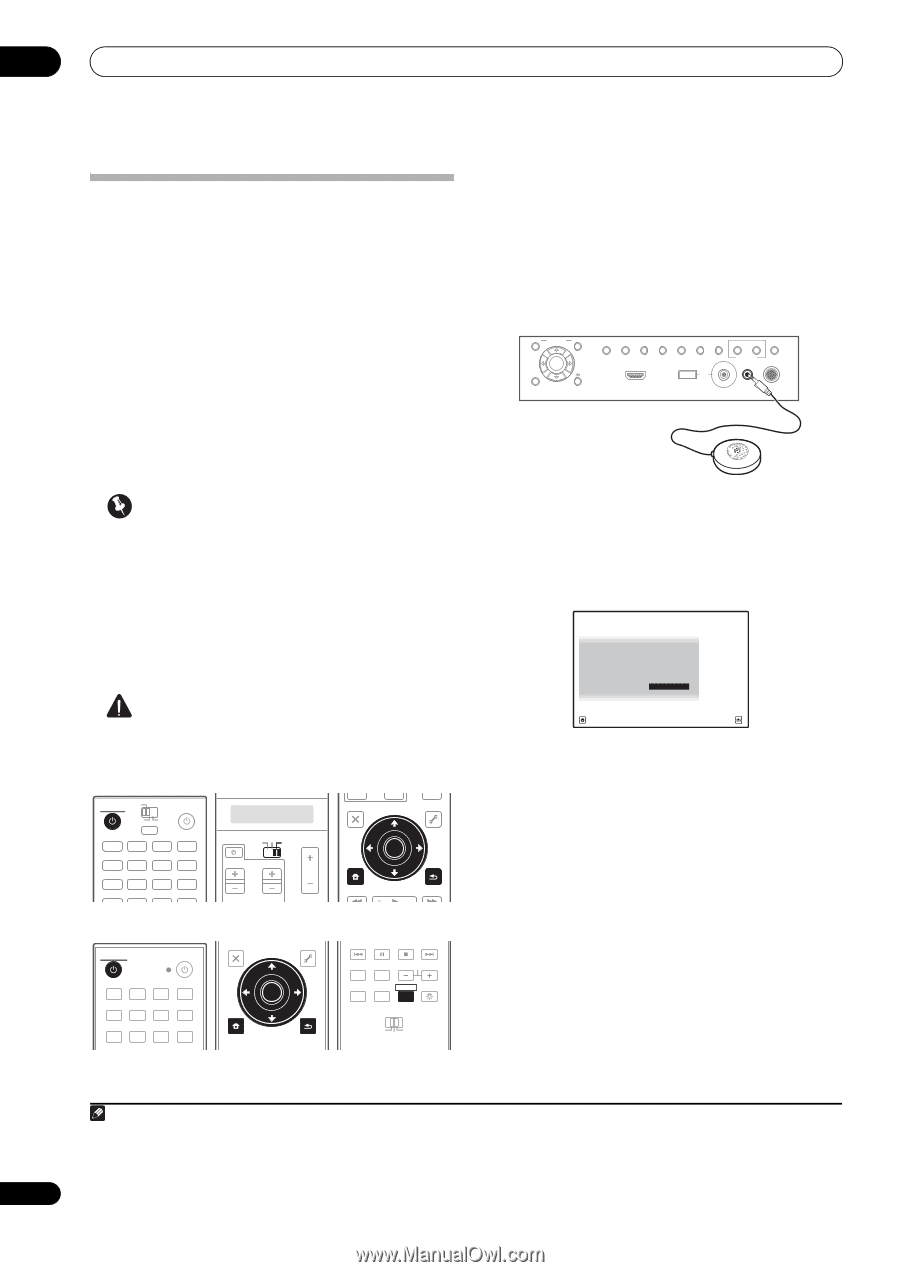
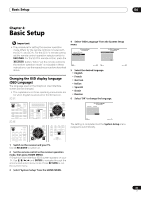
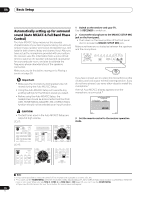
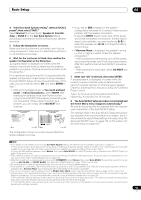
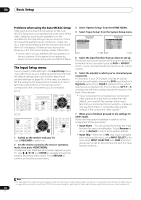
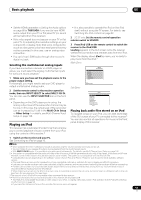
04 Basic Setup Automatically setting up for surround sound (Auto MCACC & Full Band Phase Control) The Auto MCACC Setup measures the acoustic characteristics of your listening area, taking into account ambient noise, speaker connection and speaker size, and tests for both channel delay and channel level. After you have set up the microphone provided with your system, the receiver uses the information from a series of test tones to optimize the speaker settings and equalization for your particular room, and also to calibrate the frequency-phase characteristics of the speakers connected. Make sure you do this before moving on to Playing a source on page 50. Important • Make sure the microphone and speakers are not moved during the Auto MCACC Setup. • Using the Auto MCACC Setup will overwrite any existing settings for the MCACC preset you select. • Before using the Auto MCACC Setup, the headphones should be disconnected and the iPod/ USB, HOME MEDIA GALLERY, XM or SIRIUS Radio function should not be selected as an input function. CAUTION • The test tones used in the Auto MCACC Setup are output at high volume. SC-27: RECEIVER MAIN ZONE2 SOURCE 3 MULTI OPERATION DVD BD TV DVR HOME MEDIA VIDEO1 VIDEO2 HDMI GALLERY USB iPod CD CD-R TUNER MULTI CH PHONO IN XM SIRIUS SC-25: TV SOURCE RECEIVER CH VOL VOL TV CONTROL INPUT AUDIO PARAMETER LIST TOP MENU BAND PRESET MUTE TUNE MUTE VIDEO PARAMETER TOOLS ENTER T.EDIT GUIDE PRESET CATEGORY HOME MENU iPod CTRL TUNE STATUS PHASE CTRL RETURN CH LEVEL RECEIVER SOURCE DVD BD DVR HDMI HOME MEDIA TV CD CD-R GALLERY iPod USB TUNER XM SIRIUS INPUT AUDIO PARAMETER LIST VIDEO PARAMETER TUNE TOOLS TOP MENU BAND T.EDIT GUIDE PRESET ENTER PRESET CATEGORY HOME MENU TUNE iPod CTRL RETURN ANT MPX PQLS MEMORY AUDIO INFO CH DISP MULTI OPE TV CTRL RECEIVER REMOTE SETUP ZONE 2 ZONE 3 MAIN 1 Switch on the receiver and your TV. Use RECEIVER to switch on. 2 Connect the microphone to the MCACC SETUP MIC jack on the front panel. • Push down on the lower portion of the front panel door to access the MCACC SETUP MIC jack. Make sure there are no obstacles between the speakers and the microphone. AUDIO PARAMETER (TUNE) VIDEO CONTROL ON/OFF (PRESET) ENTER (TUNE) HOME MENU (PRESET) TUNER EDIT BAND AUTO SURR/ALC/ HOME STANDARD ADVANCED STEREO STREAM DIRECT THX SURROUND SURROUND RETURN HDMI 4 VIDEO CAMERA iPod iPhone USB MULTI-ZONE SPEAKERS MCACC SETUP MIC PHONES If you have a tripod, use it to place the microphone so that it's about ear level at your normal listening position. If you do not have a tripod, use some other object to install the microphone.1 The Full Auto MCACC display appears once the microphone is connected.2 1a.Full Auto MCACC A/V RECEIVER Surr Back System : Normal Save SYMMETRY to : M1.MEMORY 1 START Exit Return 3 Set the remote control to the receiver operation mode. Note 1 It may not be possible to measure correctly if the microphone is placed on a table, sofa, etc. 2 • You can't use the HOME MENU when the iPod/USB, HOME MEDIA GALLERY, XM or SIRIUS Radio input function is selected (in either the main or sub zone). When you set ZONE 2, ZONE 3 or ZONE 2&3 to ON (page 91), you can't use the HOME MENU. • If you leave the GUI screen for over five minutes, the screen saver will appear. 46 en
-
 1
1 -
2
-
3
-
4
-
5
-
6
-
7
-
8
-
9
-
10
-
11
-
12
-
13
-
14
-
15
-
16
-
17
-
18
-
19
-
20
-
21
-
22
-
23
-
24
-
25
-
26
-
27
-
28
-
29
-
30
-
31
-
32
-
33
-
34
-
35
-
36
-
37
-
38
-
39
-
40
-
 41
41 -
 42
42 -
 43
43 -
 44
44 -
 45
45 -
 46
46 -
 47
47 -
 48
48 -
 49
49 -
 50
50 -
 51
51 -
52
-
53
-
54
-
55
-
56
-
57
-
58
-
59
-
60
-
61
-
62
-
63
-
64
-
65
-
66
-
67
-
68
-
69
-
70
-
71
-
72
-
73
-
74
-
75
-
76
-
77
-
78
-
79
-
80
-
81
-
82
-
83
-
84
-
85
-
86
-
87
-
88
-
89
-
90
-
91
-
92
-
93
-
94
-
95
-
96
-
97
-
98
-
99
-
100
-
101
-
102
-
103
-
104
-
105
-
106
-
107
-
108
-
109
-
110
-
111
-
112
-
113
-
114
-
115
-
116
-
117
-
118
-
119
-
120
-
121
-
122
-
123
-
124
-
125
-
126
-
127
-
128
-
129
-
130
-
131
-
132
-
133
-
134
-
135
-
136
-
137
-
138
-
139
-
140
-
141
-
142
-
143
-
144
-
145
-
146
-
147
-
148
-
149
-
150
-
151
-
152
-
153
-
154
 |
 |