Pioneer SC-55 Owner's Manual - Page 54
Setting the PQLS function, Before using synchronization, About synchronized, operations
 |
View all Pioneer SC-55 manuals
Add to My Manuals
Save this manual to your list of manuals |
Page 54 highlights
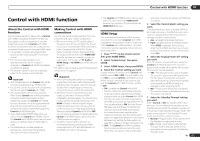
08 Control with HDMI function 8 Select the 'TV Audio' setting you want. When a TV supporting the HDMI ARC (Audio Return Channel) function is connected to the receiver, the sound of the TV can be input via the HDMI OUT terminal. ! Normal - The TV's sound is input from the Audio input terminals other than HDMI inputs. ! via HDMI - The TV's sound is input via the HDMI terminal. This can only be selected when Control is set to ON. 9 Select the '12V Trigger' setting you want. The component connected to the 12 V TRIGGER jack can be turned on and off when HDMI OUT is switched. HDMI OUT 1, HDMI OUT 2 or OFF can be selected. Select OFF when you want the component to switch when the input function is switched. 10 Select the 'Speaker B Link' setting you want. The speaker terminal settings (the settings set with the SPEAKERS button) can be switched automatically when HDMI OUT is switched by turning the Speaker B Link setting on. This is only valid when "7.1ch + Speaker B" or "5.1ch + SP-B Bi-Amp" is selected for the Speaker System setting. ! OFF - The speaker terminal settings do not switch automatically when HDMI OUT is switched. ! ON - The speaker terminal settings switch automatically when HDMI OUT is switched. For details, see Switching the HDMI output on page 61 . 11 When you're finished, press HOME MENU. Before using synchronization Once you have finished all connections and settings, you must: 1 Put all components into standby mode. 2 Turn the power on for all components, with the power for the TV being turned on last. 3 Choose the HDMI input to which the TV is connected to this receiver, and see if video output from connected components displays properly on the screen or not. 4 Check whether the components connected to all HDMI inputs are properly displayed. About synchronized operations The Control with HDMI-compatible component connected to the receiver operates in sync as described below. ! From the menu screen of the Control with HDMI-compatible TV, set audio to be played through this receiver, and the receiver will switch to the synchronized amp mode. ! When in the synchronized amp mode, you can adjust the receiver's volume or mute the sound using the TV's remote control. ! When in the synchronized amp mode, the synchronized amp mode is canceled when the receiver's power is turned off. To turn the synchronized amp mode back on, set audio to be played through the receiver from the TV's menu screen, etc. This receiver will power up and switch to the synchronized amp mode. ! When the synchronized amp mode is canceled, the receiver's power turns off if you were viewing an HDMI input or a TV program on the TV. ! When in the synchronized amp mode, the synchronized amp mode is canceled if an operation that produces sound from the TV is performed from the TV's menu screen, etc. ! When the TV's power is set to standby, the receiver's power is also set to standby. (Only when the input for a component connected to the receiver by HDMI connection is selected or when watching the TV.) ! The receiver's input switches automatically when the Control with HDMI-compatible component is played. ! The receiver's input switches automatically when the TV's input is switched. ! The synchronized amp mode remains in effect even if the receiver's input is switched to a component other than one connected by HDMI. The operations below can also be used on Pioneer Control with HDMI-compatible TVs. ! When the receiver's volume is adjusted or the sound is muted, the volume status is displayed on the TV's screen. ! When the OSD language is switched on the TV, the receiver's language setting also switches accordingly. About connections with a product of a different brand that supports the Control with HDMI function The synchronized operations below can be used when the receiver's Control with HDMI function is connected to a TV of a brand other than Pioneer that supports the Control with HDMI function. (Depending on the TV, however, some of the Control with HDMI functions may not work.) ! When the TV's power is set to standby, the receiver's power is also set to standby. (Only when the input for a component connected to the receiver by HDMI connection is selected or when watching the TV) ! The sound of TV programs or an external input connected to the TV can also be output from the speakers connected to the receiver. (If the TV does not support the HDMI ARC (Audio Return Channel) function, this requires connection of an optical digital cable, etc., in addition to the HDMI cable.) The synchronized operations below can be used when the receiver's Control with HDMI function is connected to a player or recorder of a brand other than Pioneer that supports the Control with HDMI function. ! When playback starts on the player or recorder, the receiver's input switches to the HDMI input to which that component is connected. See the Pioneer website for the latest information on the models of non-Pioneer brands and products that support the Control with HDMI function. Setting the PQLS function PQLS (Precision Quartz Lock System) is a digital audio signal transfer control technology using the Control with HDMI function. It offers higher-quality audio playback by controlling audio signals from the receiver to a PQLS compatible player, etc. This enables removing jitter that has a negative effect on the quality of the sound and is generated upon transmission. ! On players compatible with PQLS Bit-stream, PQLS always works for all sources. ! On players compatible with PQLS Multi Surround, PQLS works for all sources. Set the player's audio output to Linear PCM. ! On players compatible with PQLS 2 ch Audio, PQLS only works when playing CDs. Please refer to the operating instructions supplied with your player for more information. This function is activated when Control is set to ON. 54 En
-
 1
1 -
2
-
3
-
4
-
5
-
6
-
7
-
8
-
9
-
10
-
11
-
12
-
13
-
14
-
15
-
16
-
17
-
18
-
19
-
20
-
21
-
22
-
23
-
24
-
25
-
26
-
27
-
28
-
29
-
30
-
31
-
32
-
33
-
34
-
35
-
36
-
37
-
38
-
39
-
40
-
41
-
42
-
43
-
44
-
45
-
46
-
47
-
48
-
 49
49 -
 50
50 -
 51
51 -
 52
52 -
 53
53 -
 54
54 -
 55
55 -
 56
56 -
 57
57 -
 58
58 -
 59
59 -
60
-
61
-
62
-
63
-
64
-
65
-
66
-
67
-
68
-
69
-
70
-
71
-
72
-
73
-
74
-
75
-
76
-
77
-
78
-
79
-
80
-
81
-
82
-
83
-
84
-
85
-
86
-
87
-
88
-
89
-
90
-
91
-
92
-
93
-
94
-
95
-
96
-
97
-
98
-
99
-
100
-
101
-
102
-
103
-
104
-
105
-
106
-
107
-
108
 |
 |