Pioneer SC-55 Owner's Manual - Page 86
Symptom, Remedy
 |
View all Pioneer SC-55 manuals
Add to My Manuals
Save this manual to your list of manuals |
Page 86 highlights
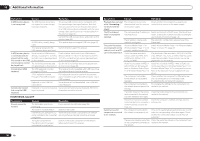
13 Additional information Symptom Noisy, intermittent, or distorted picture. Video signals are not output from the component terminal. The picture's movement is unnatural. Remedy Sometimes a video deck may output a noisy video signal (during scanning, for example), or the video quality may just be poor (with some video game units, for example). The picture quality may also depend on the settings, etc. of your display device. Switch off the video converter and reconnect the source and display device using the same type of connection (component or composite), then start playback again. When a monitor only compatible with resolutions of 480i is connected to the component terminal and another monitor is connected to the HDMI terminal, the video signals may not be output to the monitor connected to the component terminal. If this happens, do the following: - Turn off the power of the monitor connected to the HDMI terminal. - Change the VIDEO PARAMETER menu RES setting (see Setting the Video options on page 58 ). - Video signals from the HDMI terminal cannot be output to the component terminals. Input the video signals from the player or other source to the composite or component terminals. When using the component terminal, assign it at Input Setup (see The Input Setup menu on page 34 ). When Resolution under VIDEO PARAMETER is set to 1080/24p, the picture may not be displayed properly for some source materials. In this case, set the resolution to something other than 1080/24p (page 58). Settings Symptom The Auto MCACC Setup continually shows an error. Remedy The ambient noise level may be too high. Keep the noise level in the room as low as possible (see also Problems when using the Auto MCACC Setup on page 33 ). If the noise level cannot be kept low enough, you will have to set up the surround sound manually (page 76). When using only one surround back speaker, connect it to the SURROUND BACK L (Single) terminals. To use a 5.1-channel speaker set, use the surround speakers for the surround channel, not the surround back channel. Make sure there are no obstacles between the speakers and the microphone. If Reverse Phase is displayed, try the following: - The speaker's wiring (+ and -) may be inverted. Check the speaker connections. - Depending on the type of speakers and their installation conditions, Reverse Phase may be displayed even if the speakers are properly connected. If this happens, select GO NEXT and continue. - If the speaker is not pointed to the microphone (listening position) or when using speakers that affect the phase (dipole speakers, reflective speakers, etc.), it may not be possible to properly identify the polarity. Symptom Remedy After using the Auto MCACC There may have been some low frequency noise in the room from an air- Setup, the speaker size setting conditioner, motor, etc. Switch off all other appliances in the room and use is incorrect. Auto MCACC Setup again. Depending on a number of factors (bass reproduction capabilities of the speakers, room size, speaker placement, etc.) this may occur in some cases. Change the speaker setting manually in Speaker Setting on page 77 , and use the ALL (Keep SP System) option for the Auto MCACC menu in Automatic MCACC (Expert) on page 69 if this is a recurring problem. Can't adjust the Fine Speaker Check that the speakers are all in phase (make sure the positive (+) and nega- Distance setting properly. tive (-) terminals are matched up properly). SC-57 only: Gauge (value) Check that the speakers are all in phase (make sure the positive (+) and nega- does not increase with the tive (-) terminals are matched up properly). Precision Distance adjustment. Perform the Full Auto MCACC procedure before the Precision Distance adjustment (see Automatically conducting optimum sound tuning (Full Auto MCACC) on page 32 ). Place the microphone accurately in the same position as when the Full Auto MCACC procedure was performed. Do not move the speaker used as the reference point. Also, adjust in order, starting from the front right speaker. When adjusting the speaker positions, do not move the speakers much; only move them about 1 inch towards or away from the microphone. If you forget exactly where the microphone should be positioned or if there are problems after the procedure has been performed repeatedly, re-calibrate the distance using the Full Auto MCACC procedure, then without moving the microphone redo the Precision Distance adjustment. The display shows KEY LOCK ON when you try to make settings. With the receiver in standby, press u STANDBY/ON for about 10 seconds while holding down SPEAKERS to disable the key lock. Most recent settings have been The power cord was disconnected from the wall while adjusting this setting. erased. Settings are only stored if all the zones are turned off. Turn off all the zones before unplugging the power cord. The various system settings are not stored. Do not pull out the power cord while conducting the settings. (The settings will be stored when both the main zone and sub zone turn off. Turn off all zones before pulling out the power cord.) Certain listening modes or HOME MENU items cannot be selected. When Operation Mode is set to Basic, the Pioneer-recommended settings are made and not all of the functions can be used. To use all of the functions without restrictions, set Operation Mode to Expert (see Operation Mode Setup on page 34 ). 86 En
-
 1
1 -
2
-
3
-
4
-
5
-
6
-
7
-
8
-
9
-
10
-
11
-
12
-
13
-
14
-
15
-
16
-
17
-
18
-
19
-
20
-
21
-
22
-
23
-
24
-
25
-
26
-
27
-
28
-
29
-
30
-
31
-
32
-
33
-
34
-
35
-
36
-
37
-
38
-
39
-
40
-
41
-
42
-
43
-
44
-
45
-
46
-
47
-
48
-
49
-
50
-
51
-
52
-
53
-
54
-
55
-
56
-
57
-
58
-
59
-
60
-
61
-
62
-
63
-
64
-
65
-
66
-
67
-
68
-
69
-
70
-
71
-
72
-
73
-
74
-
75
-
76
-
77
-
78
-
79
-
80
-
 81
81 -
 82
82 -
 83
83 -
 84
84 -
 85
85 -
 86
86 -
 87
87 -
 88
88 -
 89
89 -
 90
90 -
 91
91 -
92
-
93
-
94
-
95
-
96
-
97
-
98
-
99
-
100
-
101
-
102
-
103
-
104
-
105
-
106
-
107
-
108
 |
 |