Pioneer SVM 1000 SVM-1000 Operating Instructions - Page 18
Touch the [BPM AUTO/TAP] button to select the BPM =Beat - case
 |
UPC - 012562870540
View all Pioneer SVM 1000 manuals
Add to My Manuals
Save this manual to your list of manuals |
Page 18 highlights
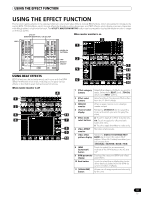
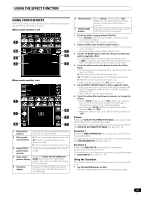
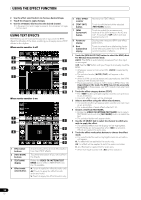
USING THE EFFECT FUNCTION 1 Touch the [BPM AUTO/TAP] button to select the BPM (=Beat Per Minute) measurement mode. AUTO: The BPM is automatically measured from the input music signal. TAP: Tap the TAP button with your finger to manually input the BPM. • Whenever power is first turned ON, [AUTO] is selected by default. • The selected mode ([AUTO]/[TAP]) will appear in the display. • When a BPM cannot be measured automatically, the BPM display in the display will flash. • The measurement range of AUTO mode is BPM=70 to 180. Depending on the track, the BPM may not be accurately measured. In these cases, use TAP mode to manually enter the BPM. [Manually entering the BPM using the TAP button] When the TAP button is tapped to the beat (a quarter note) more than twice, the average length will be set as the BPM. • Pressing the TAP button during [AUTO] mode will switch the BPM measurement mode to [TAP], and the length between the taps will be measured. • When a BPM is set using the TAP button, the multiplication factor will become [1/1] or [4/1] (depending on the effect), and the effect time will be set to either the length of 1 beat (a quarter note) or 4 beats. • Rotate the TIME/PARAMETER dial while pressing the TAP button to set the BPM directly. • Touch the [BPM AUTO/TAP] button to return to [AUTO] mode. 2 Touch the effect category button [BEAT]. • The [BEAT] button will light brightly, and the icon will move as an animation. • The BEAT effect screen will be displayed. • Whenever power is first turned ON, the [BEAT] effect is selected by default. 3 Use the effect select buttons to select an effect type. • The selected button will appear white, and the icon will move as an animation. • For a description of each effect, refer to P. 23. 4 Use the CH SELECT dial to select the channel to which you wish to apply the effect. • The selected effect channel display will appear white. • If [MIC] is selected, the audio effect will be applied to both MIC 1 and MIC 2. There will be no effect on the video. • When turning the power ON, [MASTER] will be selected. 5 Touch the effect mode select button to select the effect mode. • The selected button will appear white, and the icon will move as an animation. A: The effect will be applied to the audio only. AV: The effect will be applied to both the audio and video. V: The effect will be applied to the video only. • When turning the power ON, [AV] will be selected. 6 Touch the beat button to choose the multiplication factor of the beat for synchronization of the effect. • Select the beat number calculated from the BPM. • The selected beat button will be highlighted. • An effect time that corresponds to the multiplication factor of the beat will be automatically set. [Example] When BPM=120 1/1 = 500 ms 1/2 = 250 ms 2/1 = 1000 ms 7 Set the EFFECT ON/OFF button to ON to apply the effect. • Each time the button is pressed it will switch between ON and OFF (whenever power is first turned ON, the setting defaults to OFF). • When effect is ON, the button flashes. Video effect pattern Rotate the VIDEO FX PATTERN/TEXT BANK dial to select a video effect pattern for the selected video effect. For descriptions on the video effect pattern change caused by rotating the VIDEO FX PATTERN/TEXT BANK dial, refer to P. 24. Parameter 1 Rotate the TIME/PARAMETER dial to adjust temporal parameters of the selected effect. For descriptions on the changes in parameter 1 caused by turning the TIME/PARAMETER dial, refer to P. 23. Parameter 2 Rotate the LEVEL/DEPTH dial to adjust quantitative parameters of the selected effect. For descriptions on the changes in parameter 2 caused by rotating the LEVEL/DEPTH dial, refer to P. 23. Using the visualizer This function allows the use of images produced internally by the unit. 1 Set [VISUALIZER] button to [ON]. The video effect monitor displays the image. 2 Use the effect select buttons to choose a desired image. 3 Use the CH SELECT dial to select the desired channel. • The image will move automatically in rhythm to the music's beat. • In the event no input image is present, the visualizer's image can be used. 18 En
-
 1
1 -
2
-
3
-
4
-
5
-
6
-
7
-
8
-
9
-
10
-
11
-
12
-
 13
13 -
 14
14 -
 15
15 -
 16
16 -
 17
17 -
 18
18 -
 19
19 -
 20
20 -
 21
21 -
 22
22 -
 23
23 -
24
-
25
-
26
-
27
-
28
-
29
-
30
-
31
-
32
-
33
-
34
-
35
-
36
-
37
-
38
-
39
-
40
-
41
-
42
-
43
-
44
-
45
-
46
-
47
-
48
 |
 |