Pioneer SVM 1000 SVM-1000 Operating Instructions - Page 22
Editing Text, Displaying/hiding The Master Monitor
 |
UPC - 012562870540
View all Pioneer SVM 1000 manuals
Add to My Manuals
Save this manual to your list of manuals |
Page 22 highlights
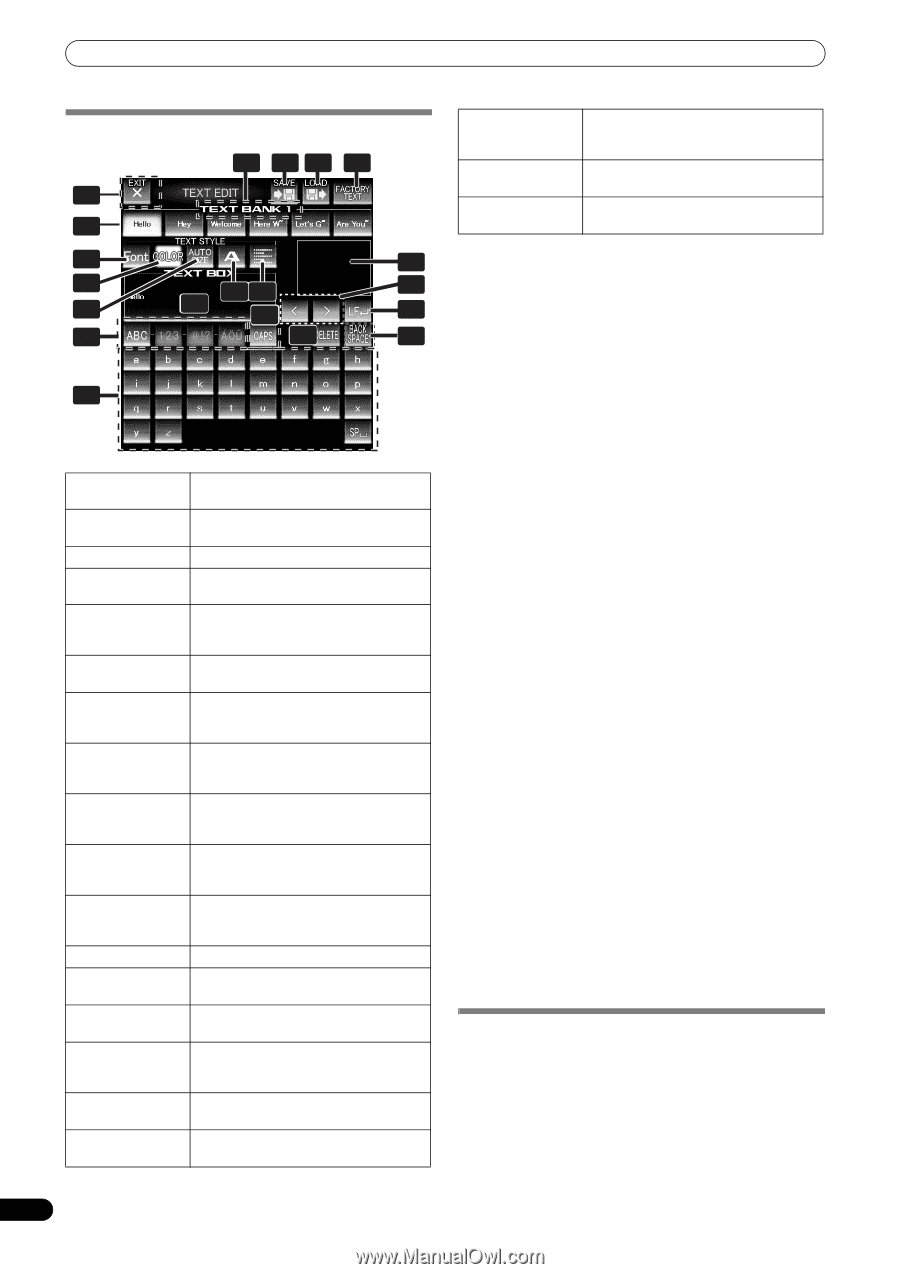
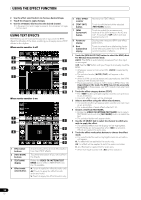
USING THE EFFECT FUNCTION EDITING TEXT 5 43 2 1 6 7 13 8 9 12 10 181 165 16 17 14 168 19 20 1 [EXIT] button Touch to exit the TEXT EDIT screen and return to the TEXT effect screen. 2 [FACTORY TEXT] Touch to load factory text data. button 3 [LOAD] button Touch to load text data from an SD card. 4 [SAVE] button Text entered into the TEXT BANK can be saved to an SD card. 5 TEXT BANK display Rotate the VIDEO FX PATTERN/TEXT BANK dial to select a TEXT BANK you wish to edit from the 10 available. 6 [TEXT BANK] buttons Entered text can be stored. Also touch to call up stored text. 7 [FONT] button Touch to change the font of the text. The font alternates each time the button is touched. 8 [COLOR] button Touch to change the color of the entered text. The color alternates each time the button is touched. 9 [SIZE] button Touch to change the size of the entered text. The size alternates each time the button is touched. 10 Character button Touch to change the character of the input text. The character alternates each time the button is touched. 11 Justify button Touch to justify the text to the left, center, or right. The justification alternates each time the button is touched. 12 TEXT BOX Displays the entered text. 13 TEXT effect monitor The TEXT effect is monitored here. 14 Text type select Use to change the text type. buttons 15 [CAPS] / [PAGE] Touch to alternate between upper and button lower case, and between page display for page 1 and 2. 16 Cursor move button () Touch to move the cursor. 17 Line break button (LF) Touch to create a line break in the text. 18 [DELETE] button Touch to delete entered text. The text behind the cursor will be deleted. Hold depressed to delete all text. 19 [BACK SPACE] Touch to delete entered text. The text button before the cursor will be deleted. 20 Text input button Touch to enter text. 1 Touch the [TEXT EDIT] button. • The TEXT EDIT screen appears. • Touch the [EXIT] button to return to the TEXT effect screen. 2 Rotate the VIDEO FX PATTERN/TEXT BANK dial to select TEXT BANK and touch the [TEXT BANK] button to select the text you wish to edit. • The selected button will be highlighted. • If the [TEXT BANK] button is touched, the text will appear in the TEXT BOX. 3 Touch the [FONT] button to change the font of the text. • The font will change each time the button is touched. The font alternates between six different fonts. 4 Touch the [COLOR] button to change the text color. • The color changes each time the button is touched. The color alternates between eight different colors. 5 Touch the [SIZE] button to change the text size. • The size changes each time the button is touched. The size alternates between four different sizes. • Under some conditions, [AUTO SIZE] and [BIG] settings will produce the same sized images. 6 Touch the character button to change the text character. • The character changes each time the button is touched. The character alternates between five different characters. • For the character, refer to P. 30 7 Touch the justify button to change the justification of the text. • The justification changes each time the button is touched. The justification alternates between three different justifications. 8 Touch the text type select button to change the text type of the text. • The selected button will be highlighted. • Touch the caps button to switch between upper case and lower case. 9 Touch the text input button to enter text. • The entered text will appear in the text box. • A maximum of 50 letters can be entered. 10 Touch the [EXIT] button to finish text edit. • Text can be edited in real time. • When power is turned off, settings return to default values. SAVE/LOAD • TEXT BANK can be saved to SD card. TEXT BANK saved on an SD card can also be loaded. • The [LOAD] button and [SAVE] button will not be displayed if no SD card is detected. USB keyboard A USB keyboard can be connected to the USB port to allow text to be entered directly from the keyboard. For the encoding setting of the keyboard, refer to P. 41. DISPLAYING/HIDING THE MASTER MONITOR 1 Press the UTILITY (MASTER MONITOR) button. Each time the button is pressed, the master monitor display alternates ON/OFF. • When the master monitor is set to display, the master monitor will appear in the center display, and the content of the master output video can be observed. • Whenever power is first turned ON, the master monitor defaults to OFF. 22 En
-
 1
1 -
2
-
3
-
4
-
5
-
6
-
7
-
8
-
9
-
10
-
11
-
12
-
13
-
14
-
15
-
16
-
 17
17 -
 18
18 -
 19
19 -
 20
20 -
 21
21 -
 22
22 -
 23
23 -
 24
24 -
 25
25 -
 26
26 -
 27
27 -
28
-
29
-
30
-
31
-
32
-
33
-
34
-
35
-
36
-
37
-
38
-
39
-
40
-
41
-
42
-
43
-
44
-
45
-
46
-
47
-
48
 |
 |