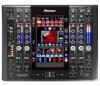
Pioneer SVM 1000 SVM-1000 Operating Instructions - Page 3
Contents - video
 |
UPC - 012562870540
View all Pioneer SVM 1000 manuals
Add to My Manuals
Save this manual to your list of manuals |
Page 3 highlights
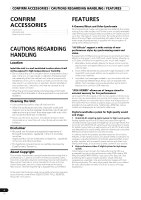
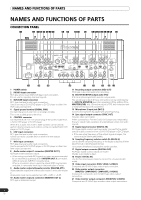
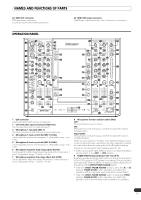
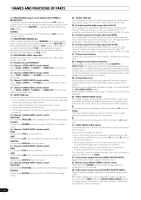
Selecting fine audio equipment such as the unit you've just purchased is only the start of your musical enjoyment. Now it's time to consider how you can maximize the fun and excitement your equipment offers. This manufacturer and the Electronic Industries Association's Consumer Electronics Group want you to get the most out of your equipment by playing it at a safe level. One that lets the sound come through loud and clear without annoying blaring or distortion-and, most importantly, without affecting your sensitive hearing. Sound can be deceiving. Over time your hearing "comfort level" adapts to higher volumes of sound. So what sounds "normal" can actually be loud and harmful to your hearing. Guard against this by setting your equipment at a safe level BEFORE your hearing adapts. To establish a safe level: • Start your volume control at a low setting. • Slowly increase the sound until you can hear it comfortably and clearly, and without distortion. Once you have established a comfortable sound level: • Set the dial and leave it there. Taking a minute to do this now will help to prevent hearing damage or loss in the future. After all, we want you listening for a lifetime. We Want You Listening For A Lifetime Used wisely, your new sound equipment will provide a lifetime of fun and enjoyment. Since hearing damage from loud noise is often undetectable until it is too late, this manufacturer and the Electronic Industries Association's Consumer Electronics Group recommend you avoid prolonged exposure to excessive noise. This list of sound levels is included for your protection. Decibel Level Example 30 Quiet library, soft whispers 40 Living room, refrigerator, bedroom away from traffic 50 Light traffic, normal conversation, quiet office 60 Air conditioner at 20 feet, sewing machine 70 Vacuum cleaner, hair dryer, noisy restaurant 80 Average city traffic, garbage disposals, alarm clock at two feet. THE FOLLOWING NOISES CAN BE DANGEROUS UNDER CONSTANT EXPOSURE 90 Subway, motorcycle, truck traffic, lawn mower 100 Garbage truck, chain saw, pneumatic drill 120 Rock band concert in front of speakers, thunderclap 140 Gunshot blast, jet plane 180 Rocket launching pad Information courtesy of the Deafness Research Foundation. S001_En Operating Environment Operating environment temperature and humidity: +5 ºC - +35 ºC (+41 ºF - +95 ºF); less than 85 %RH (cooling vents not blocked) Do not install this unit in a poorly ventilated area, or in locations exposed to high humidity or direct sunlight (or strong artificial light) D3-4-2-1-7c_A_En WARNING Before plugging in for the first time, read the following section carefully. The voltage of the available power supply differs according to country or region. Be sure that the power supply voltage of the area where this unit will be used meets the required voltage (e.g., 230V or 120V) written on the bottom panel. D3-4-2-1-4_A_En mod If the AC plug of this unit does not match the AC outlet you want to use, the plug must be removed and appropriate one fitted. Replacement and mounting of an AC plug on the power supply cord of this unit should be performed only by qualified service personnel. If connected to an AC outlet, the cut-off plug can cause severe electrical shock. Make sure it is properly disposed of after removal. The equipment should be disconnected by removing the mains plug from the wall socket when left unused for a long period of time (for example, when on vacation). D3-4-2-2-1a_A_En Contents CONFIRM ACCESSORIES 4 CAUTIONS REGARDING HANDLING 4 Location 4 Cleaning the Unit 4 Disclaimer 4 About Copyright 4 FEATURES 4 NAMES AND FUNCTIONS OF PARTS 6 CONNECTION PANEL 6 OPERATION PANEL 7 CONNECTIONS 10 CONNECTING INPUTS 10 CONNECTING OUTPUTS 11 CONNECTING MICROPHONE AND HEADPHONES 12 CONNECTING THE POWER CORD 12 BASIC OPERATIONS 13 FADER CURVE SELECTION 14 USING THE VIDEO CONTROL FUNCTIONS 15 OPERATING THE VIDEO CROSS FADER 15 OPERATING THE VIDEO CHANNEL SWITCH 15 OPERATING IN THE VIDEO SOLO MODE 16 VIDEO MIX EFFECTS CHART 16 USING THE EFFECT FUNCTION 17 USING BEAT EFFECTS 17 USING TOUCH EFFECTS 19 USING TEXT EFFECTS 20 EDITING TEXT 22 DISPLAYING/HIDING THE MASTER MONITOR 22 EFFECT LIST 23 USING THE JPEG VIEWER 31 BEFORE USING THE JPEG VIEWER 31 JPEG VIEWER SETUP 31 THE VIDEO EQUALIZER FUNCTION 34 SET UP THE VIDEO EQ 34 TURNING THE EQUALIZER ON/OFF 34 FADER START FUNCTION 35 CROSS FADER START PLAY AND BACK CUE PLAY 35 PERFORM UTILITY SETUP 36 MIDI SETTINGS 36 SYNCHRONIZING AUDIO SIGNALS TO EXTERNAL SEQUENCER, OR USING SVM-1000 INFORMATION TO OPERATE AN EXTERNAL SEQUENCER 36 MIDI CODE LIST 37 PERFORM VIDEO MONITOR SETUP 41 KEYBOARD LANGUAGE SETUP 41 HARDWARE SETUP 42 MIC SETTING 42 SYSTEM SETTINGS 42 MASTER OUT SETTINGS 43 LCD SETTINGS 43 MONITOR OUT SETTINGS 43 TOUCH PANEL SETTINGS 44 RETURNING TO DEFAULT SETTINGS 44 ENDING HARDWARE SET UP 44 TROUBLESHOOTING 45 ABOUT THE LCD SCREEN 46 ABOUT MINIATURE FLUORESCENT TUBE TECHNOLOGY ..... 46 SPECIFICATIONS 47 3 En
-
 1
1 -
 2
2 -
 3
3 -
 4
4 -
 5
5 -
 6
6 -
 7
7 -
 8
8 -
 9
9 -
10
-
11
-
12
-
13
-
14
-
15
-
16
-
17
-
18
-
19
-
20
-
21
-
22
-
23
-
24
-
25
-
26
-
27
-
28
-
29
-
30
-
31
-
32
-
33
-
34
-
35
-
36
-
37
-
38
-
39
-
40
-
41
-
42
-
43
-
44
-
45
-
46
-
47
-
48
 |
 |