Pioneer TS-WX70DA Owner s Manual
Pioneer TS-WX70DA Manual
 |
View all Pioneer TS-WX70DA manuals
Add to My Manuals
Save this manual to your list of manuals |
Pioneer TS-WX70DA manual content summary:
- Pioneer TS-WX70DA | Owner s Manual - Page 1
TS-WX7ODA ACTIVE SUBWOOFER HP DE GRAVES ACTIF SUBWOOFER ATTIVO SUBWOOFER ACTIVO 200 TOTAL OUTPUT/SORTIE WAINC. SUBWOOFER ATIVO AKTVIBHbIVI CABBYDEP CE HIE Be sure to read this instruction manual (-) battery power cable. This will prevent possible electrical shock 2. When wiring this unit - Pioneer TS-WX70DA | Owner s Manual - Page 2
TS information, refer to your car stereo manual. • The internal PHASE control is : 460 g (1 lb)X 2 • Amplifier Max. Power output Nom. Power output 100 WX2 (80 Hz. 30 % THD) 50 PIONEER CORPORATION 2016 PIONEER CORPORATION 28-8, Honkomagome 2-chome, Bunkyo-ku, Tokyo 113-0021, JAPAN/JAPON PIONEER
-
 1
1 -
 2
2
 |
 |
1
3
scon
t-
TS-WX7ODA
ACTIVE
SUBWOOFER
HP
DE
GRAVES
ACTIF
SUBWOOFER
ATTIVO
TOTAL
OUTPUT/SORTIE
200
WAINC.
SUBWOOFER
ACTIVO
SUBWOOFER
ATIVO
AKTVIBHbIVI
CABBYDEP
CE
HIE
Be
sure
to read
this
instruction
manual
before
installing
this
speaker.
Vor
dem Einbau
des Lautsprecher,
verfehlen
Sie nicht
diese Vorschrift
zu lesen.
Priere
de lire
obligatoirement
ce manuel
d'
installation
avant
de monter
le haut-parleur.
Prima
di installare
altoparlante
leggete
tassativamente
le istruzioni.
&WARNING
1.
Before
starting
the
installation
make
sure
to
disconnect
the
vehicle's
negative
(—)
battery
power
cable.
This
will
prevent
possible
electrical
shock
2.
When
wiring
this
unit
please
use
the
supplied
connecting
cords.
DO
NOT
remove
the
fuses.
The
protection
circuit
will
not
work
in
case
of
an
emergency.
3.
TS-WX7ODA
installed
in
the
passenger
compartment
should
be
securely
anchored
in
place.
4.
Before
drilling
any
mounting
holes
check
behind
where
you
want
to
drill
the
holes
to
make
sure
you
DO
NOT
drill
into
anything
such
as
the
gas
lines,
brake
lines
or
electrical
wiring.
5.
Do
not
install
the
TS-WX7ODA
anywhere
it
can
get
wet
6.
Install
the
TS-WX7ODA
in
a
location
with
good
ventilation.
Do
not
place
anything
on
top
of
TS-WX7ODA
to
prevent
airflow
through
the
unit
7.
While
driving
keep
your
listening
volume
at
a
level
which
does
not
mask
important
outside
traffic
noises,
such
as
emergency
vehicles,
etc.
8.
High
sound
levels
may
cause
permanent
hearing
loss.
,I,WARNUNG
1.
Vor
dem
Beginn
der
installation
1st
sicherzustellen,
dal?
das
negative
(—)
Batteriekabel
des
Fahrzeugs
abgetrennt
ist.
Dadurch
wird
elektrischer
Schlag
vermieden.
2.
Zur
Verkabelung
dieses
Gerates
sollten
nur
die
mitgelieferten
Kabel
verwendet
werden.
Sicherstellen,
daft
die
vor
Kurzsdilua
schutzen-
den
Abdeckungen
angebracht
werden.
NICHT
die
Sicherungen
entfernen.
Der
Schutzschaltkreis
funktioniert
sonst im
Notfall
nicht.
3.
Das
im
hinenratun
eines
Fahrzeugs
installierte
Gerat
IS-WX7ODA
sollte
fest
angebracht
werden.
4.
Vor
dem
Bohren
von
offnungen
sollte
sichergestellt
werden,
daft
hinter
der
offnung
keine
Benzinleitung„
Bremsleitungen
oder
elektrische
Verkabelungen
vorhanden
sind.
5.
Das
Gerat
TS-WX7ODA
nicht
an
Orten
installieren,
an
denen
es
feucht
werden
kann.
6.
Das
Gerat
TS-WX7ODA
nur
an
einem
gut
belinetem
Ort
installieren.
Keine
Gegenstande
auf
das
Gerat
IS-WX7ODA
stellen,
damit
die
Beliiftung
nicht
beeinfluBt
wird.
7.
Bei
der
Fahrt
sollte
der
Lautst5rkepegel
so
niedrig
gehalten
werden,
dali
er
die
Verkehrsgerausche
nicht
ubertont,
z.B.Notfallfahrzeuge
usw.
8.
Hohe
Lautstarkepegel
konnen
einen
permanenten
Horverlust
zur
Folge
haben.
&AVERTISSEMENT
1.
Avant
d'installer
l'appareil,
debranchez
le
cable
du
pole
moins
(—)
de
la
batterie
afin
d'eviter
d'eventuelles
decharges
electriques.
2. Lorsque
vous
brancherez
cette
unto,
utilisez
les
cordons
fournis.
N'ENLEVEZ
PAS
les
fusibles.
Sinon,
le
circuit
de
protection
de
l'appareil
ne
pourra
pas
se
declencher
en
cas
de
probleme.
3.
L'equipement
TS-WX7ODA
installs
dans
la
cabine
du
passager
doit
etre
bien
fi
xe.
4.
Avant
de
percer
quelque
tree
que
ce
soit,
verifiez
qu'aucun
tuyau
de
gaz,
qu'aucun
circuit
de
freinage,
qu'aucun
fi
t
electrique
ne
se
trouve
derriere
le
trou
que
vous
souhaitez
percer.
5.
N'installez
pas
le
TS-WX7ODA
dans
un
endroit
qui
eat
humide
ou
qui
pourrait
le
devenir.
6.
Installez
le
TS-WX7ODA
dana
un
endroit
bien
ventile.
En
outre,
ne
placez
rien
sur
le
dessus
du
TS-WX7ODA
qui
pourrait
nuire
a
la
circulation
de
fair
dans
l'appareil.
7.
Lorsque
vous
conduisez,
maintenez
le
niveau
d'ecoute
sonore
suffisamment
bas
de
facon
a
pouvoir
entendre
les
bruits
exterieurs
de
la
circulation
tell
que
les
sirens
des
ambulances.
8.
Des
niveaux
sonores
trop
eleves
peuvent
entrainer
une
degradation
definitive
du
sisteme
auditif.
&ATTENZIONE
1.
Prima
di
iniziare
la
installazione,
assicurarsi
di
soollegare
II
cavo
negativo
dell'alimentazione
della
batteria
(—)
del
veicolo.
Questa
precauzione
permette
di
evitare
delle
eventuali
scosse
elettriche.
2.
Quando
questa
unit&
viene
collegata,
utilizzare
dei
cavi
per
collegamento
forniti.
Assicurarsi
di
attaccare
tl
coperchio
di
protezione
contro
cortocircuiti
per
evitare
i
cortocircuiti.
NON
RIMUOVERE
i
fusibili.
Se
non
viene
press
in
considerazione
quest°
fatto,
it
circuito
di
protezione
non
funzionera
net
caso
di
una
emergenza.
3.
II
TS-WX7ODA
installato
nel
compartimento
dei
passaggeri
dovrebbe
essere
fissato
sicuramente
in
posizione.
4.
Prima
di
eseguire
qualunque
foro
di
montaggio,
controllare
la
parte
di
dietro
dove
si
desidera
esaguire
la
foratura,
per
assicurarsi
che
non
ci
siano
elementi
come
tubi
di
benzine,
tubi
del
freno
oppure
cablaggio
elettrico.
5.
Non
installare
II
TS-WX7ODA
la
dove
pun
diventare
umido.
6.
Installare
II
TS-WX7ODA
in
un
posto
dove
de
una
buona
ventilazione.
Non
mettere
oggetto
qualunque
sulla
parte
superiore
del
TS-WX7ODA
che
posse
otturare
II
flusso
dell'aria
attraverso
l'unita.
7.
Mentre
si
guide
la
macchina,
mantenere
tl
suo
proprio
volume
di
ascolto
al
livello
che
non
maschera
I
suoni
importanti
del
traffic()
dall'estemo,
come
per
esempio
ambulanze,
ecc.
8.
livelli
di
suono
alti
possono
causare
una
perdita
permanente
dell'udito.
®CAUTION
1.
This
device
is
for
12
volt
(—)
negative
ground.
Please
check
your
automobile
to
make
sure
it
is
this
type.
2.
When
routing
leads
and
cords,
secure
them
with
cable
retainers
and
electrician's
adhesive
tape
or
shrink
tubing
wherever
they
may
touch
sharp
edges.
Keep
all
wiring
away
from
hot
surfaces
or
heater
outlets
to
prevent
short
circuits.
3.
Refer
to
your
car
stereo's
operation
manual
as
well
when
installing
speakers
in
your
car.
Note:
If
low
frequency
noise
exists
in
head
unit,
noise
may
be
amplified
by
TS-WX7ODA.
VORSICHT
1.
Dieses
Gerat
ist
fiir
Fahrzeuge
mit
12-Volt-Batterie
(Masse
an
Minuspol)
ausgelegt.
Stellen
Sie
bitte
sicher,
daBlhr
Fahrzeug
von
diesem
Typist.
2.
Drahte
and
Kabel
sind
mit
Kablhaltem
and
lsolierband
oder
lsolierschlauch
zu
schtitzen,
worm
sie
scharfe
Kanten
bertthren
konnen.
Fiihren
Sie
keine
kabel
an
Oberflachen
oder
Heizungsfiffnungen
entlang,
urn
Kurzschliisse
zu
verhindern.
3.
Schlagen
Sie
beim
Einbau
der
Lautsprecher
in
Ihr
Auto
auch
in
der
Bedienungsanleitung
lhrer
Auto-Stereoanlage
nach.
Hiweise:
Wenn
niederfrequente
Stbrungen
im
Hauptgerat
vorhanden
sind,
Karmen
diese
durch
das
Gerat
TS-WX7ODA
verstarkt
werden.
®ATTENTION
1.
Ce
dispositif
est
destine
a
une
masse
negative
(—)
de
12
volts.
Contreiler
]'automobile
pour
etre
stir
qu'elle
est
de
ce
type.
2.
Lors
de
Facheminement
des
cables
et
cordons,
les
fi
xer
avec
des
attaches
et
du
ruban
adhesif
isolant
ou
les
placer
dans
des
tubes
lorsqu'ils
peuvent
toucher
des
herds
affiles.
Eloigner
tout
le
cablage
des
surfaces
ou
sorties
de
chauffage
pour
eviter
des
court
-circuits.
3.
Se
reporter
aussi
au
mode
d'emploi
de
]'auto
-stereo
pour
installer
des
enceintes
dans
une
voiture.
Remarque:
Les
bruits
basse-frequence
de
la
chaine
stereo
de
la
voiture
peuvent
parfois
etre
amplifies
par
le
TS-WX7ODA.
&PRECAUZIONE
1.
Questo
apparecchio
6
per
l'uso
a
12
V
(—)
massa
negative.
Controllare
che
la
propria
automobile
sia
di
questo
tipo.
2.
Quando
si
collocano
cavi
e
fill,
fissarli
con
fermacavi
e
nastro
da
elettricisti
o
tubature
restringibill
dove
possono
toccare
superfici
taglienti.
Tenere
tutti
fill
lontani
da
superfici
o
uscite
di
riscaldamento
per
evitare
cortocircuiti.
3.
Fare
riferimento
anche
al
manuale
di
istruzioni
dell'autostereo
quando
si
installano
i
diffusori
nell'automobile.
Nota:
Se
del
rumore
di
frequenza
bassa
viene
osservato
nella
unit&
principale,
rumors
pu6
essere
amplificato
del
TS-WX7ODA.
A
PRECAUCION
1.
Este
aparato
es
pars
el
uso
con
12
voltios
negativo
(—)
en
tierra.
Revise
su
autom6vil
pare
asegurarse
que
es
de
este
tipo.
2.
Cuando
haga
el
reparto
de
las
guise
y
los
cables,
asegarelos
con
fijadores
para
cables
y
cinta
adhesive
de
electricista
o
tuberfas
de
plastic°
contraido
dondequiera
que
estos
puedan
tocar
bordes
afliados.
Mantenga
todo
el
cableado
lejos
de
las
superficies
calientes
o
de
las
salidas
de
calefaccian
pars
evitar
cortocircuitos.
3.
Asimismo,
tamblen
consulte
con
el
manual
de
operaciones
del
estereo
de
su
coche
cuando
instale
los
altavoces
en
el
coche.
Note:
Si
esiste
ruido
de
baja
frecuencia
en
el
estereo
del
autom6vil,
el
ruido
puede
ser
amplificado
par
el
TS-WX7ODA.
PRECAUCAO
1.
Este
dispositivo
6
pars
urn
terra
negativo
(—)
de
12
volts.
Verffique
se
ode
seu
carro
6
deste
tipo.
2.
Qunado
fazendo
a
ligagao
de
fi
ns
e
cabos,
fi
xe
os
mesmos
corn
fi
xadores
de
cabo
e
fi
ts
adesiva
eletrica
protegendo
os
mesmos
em
locals
onde
possam
tocar
em
bordas
cortantes.
Mantenha
toda
fiacao
distante
de
superficies
quentes
ou
saidas
de
aquecedor
para
evitar
curto-circuito.
3.
Refire
-se
tambem
ao
manual
de
operagao
do
estereo
de
seu
cane
quando
da
instalagao
de
alto-falantes.
Obesarvagao:
Caso
exists
urn
ruido
de
baixa
frequencia
na
unidade
do
cabegote,
este
ruido
podera
ser
amplificado
polo
TS-WX7ODA.
&
OCTOPO)KHO
1.
Yorpoilcreo
paccHwraHo
Ha
nwraHme
12
B
c
sasemneHmem
orpmarenbmoro
moHrawra
(—)
6arapew
flomcanykra,
y6eAwrecb
coenan,aer
nap
Ten
ntTBHNR
B
aeromoomne
C
3TIAM
rmnom.
2.
flpm
npoeogice
ma6eneA
HICKHO
sampennnrb
ex
ItlIAKCaTOpaMH
N
06MaTblBaTb
H3WIFILIMOHHOI7I
fleHTOVI
mute, rile
OHM
MOryT
macarbcs
OCTpblX
yrnoe.
Bo
ins6excaHme
KOpOTKOTO
3aMblKaHHFI
HO
ponycicarb,
4T06bl
wHypim
Haxominmcb
B61114311
CIATIbH0
Harpeaarowxcs
flOBEVXHOCTOR
MOCT
BblX0Aa
ropnyero
mosAyxa.
3.
0pH
yCTaHOBKI3
rpommoroeopHrenn
B
awromobiane
o6pawailrecb
-
mime
K
pymoeomcrey
no
110/1630BaHH0)
awromobianbHoii
crepeocmcremoit
lipmmeHamme:
BOCIWOH3BOAIAMbal
aBTOMO6W1bHbIM
pecineepom
HH3KOHaCTOTHbal
WyM
MWKOT
yCIAJMBaTbCIR
ycrpoficreom
TS-WX7ODA.
Lt,
Alt
1.
*212
f
-
R/4Ot
(-)
*HEAL
Meg
ErihM*IMPff.‘714Ag,
2.
tmtmoncon
24
.
.
tg*IIINIASMAUPhilift.
XIM11141%412P
-
utifOCIMAilfailiff
*MAINZ
ffi
ATEzigRa
Mit
,
PA5tithkEilio
3.
M*pkilMtling84,
NIPAStfilli*AftIMIPRZYMEME91*.
Alt:
AIMAIRDAI-TOtMtivITARN
,
11
,
II,V4VAttkTS-WX7ODA
.
J, ‘r
.1
t
_ft
y .
(.
.~rI
t„l„,..te;
!3•31,.1
.
r
ltas-j
.r
:
.
TS-ViD(70DA
t.tedp„,ili
e
e
x
t
Antes
de
instalar
el
altavoz
es
importante
que
lea
estas
instrucciones.
Leia este manual
de instrucoes
antes de instalar
o
alto-falante.
06R3aTellbRO
npoinarailTe
3T0 pykoaogcrao
nepeq
no/Alum-lel-mem
/*mamma.
IIIMOVEMENITIF.
i.i
ji
ast;
&ADVERTENCIA
1.
Antes
de
comenzar
la
instalaciOn,
asegurese
de
desconectar
el
cable
del
terminal
negativo
(—)
de
la
baton's.
Esto
evitara
posiblesgolpes
electricos.
2.
Al
conecter
esta
unidad
use
los
cables
de
conexion
suministrados.
NO
QUITE
los
fusibles,
ya
que
en
tal
caso
el
circuit°
de
protenccion
no
funcionara
en
caso
de
emergencia.
3.
El
TS-WX7ODA
instalado
en
el
compartimiento
de
los
pasajeros
ser
asegurado
apropiadamente
en
su
position.
4.
Antes
de
perforar
cualquier
orificio
de
montaje,
verifique
la
parte
posterior
pars
asegurarse
de
que
cuando
perfore
los
orificios
no
perfore
ningan
otro
componente
tal
como
Ifneas
de
gasoline,
lineal
de
freno
o
cables
electricos.
5.
No
intasle
el
TS-WX7ODA
en
ninguna
parte
donde
se
pueda
mojar.
6.
Instals
el
TS-WX7ODA
en
una
posici6n
con
buena
ventilaci6n.
No
ponga
nada
sobre
el
TS-WX7ODA
que
pueda
evitar
el
flujo
de
aire
a
traves
de
la
unidad.
7.
Mientras
conduce
mantenga
el
volumen
de
audition
a
un
nivel
tal
que
no
evite
escuchar
importantes
ruidos
de
trafico
extern,
tales
como
vehiculos
de
emergencia
u
otros.
8.
Altos
niveles
de
sonido
pueden
causar
parade
permanente
de
la
audici6n.
&ADVER'TENCIA
1.
Antes
de
iniciar
a
instalagao,
assegurar-se
de
desconectar
o
cabo
de
energia
da
batons
negativo
(—)
do
veinal°.
Into
evitara
possiveis
cheques
eletricos.
2.
Ao
conectar
esta
unidade,
favor
user
as
cabos
de
conexao
fomecidos.
Nero
remover
os
fusfveis.
0
circuito
de
protegao
nao
funcionara
em
caso
de
emergencia.
3.
0
TS-WX7ODA
instalado
no
compartimento
de
passageiros
deve
ester
seguramente
fi
xo
no
luger.
4.
Antes
de
fazer
buracos
pars
montagem,
verificar
atrits
os
locals
onde
se
deseja
faze-los,
pars
ter
certeza
de
que
linhas
de
gas,
tinkles
de
freio
ou
fi
amento
deltic°
nao
serao
perfurados.
5.
Nero
instalar
o
TS-WX7ODA
em
local
onde
posse
ser
molhado.
6.
Instalar
o
TS-WX7ODA
num
local
corn
boa
ventelaglio.
Nero
colocar
nada
sobrc
o
TS-WX7ODA
para
evitar
fluxo
dear
atrav6s
da
unidade.
7.
Enquanto
dirige,
manter
o
volume
de
escuta
num
nivel
que
nee
camufle
sons
importantes
do
ambiente
extemo,
come
de
veiculos
de
emergencia,
etc.
8.
Altos
niveis
de
sum
podem
causer
perda
permanents
de
audigeo.
DPEAYDPENCAEHHE
1.
ilepei
ycrarioadoia
obsaararibmo
OTCOO.WAHHTb
OTpIALlaTellbHbliol
H
Ka6arib
ammymynaropHoA
6arapem
awromo6mns.
3To
npen,oreparmr
nompeKqemin
WleKTplALIOCKHM
TOKOM.
2.
0pm
yCraHOBKe
ycrpoAcrea
npocb6a
HC00.0630BaTb
mmemminecn
B
momnneHre
coextimirenbHbre
Ha6enin.
He
CHIIMaTb
nnaemine
npenoxpaHmrenm.
B
flpOTHBHOM
cmyHae
B
aBapWAHOIA
cm
-
wawa
,
'
cxema
3aLWATbl
He
6yAer
cpa6arbiaarb.
3.
B
cnrae
yCTaHOBKI1
yorpoRcraa
TS-WX7ODA
B
canoHe
awromo6ians
OH
AOrDKOH
6bITb
HaAWKHO
sampenneH.
4.
flepen,
csepneHmem
oreeperidi
nposepwrb,
HOT
All
B
mecre
npeimonaraemoro
orseperiin
snewrponposomoi,
Tpy6
TOMO3HOiA
NAN
ronnmeHoii
CHCTOMbl.
5.
He
ycraHaenmearb
annapsi
TS-WX7ODA
B
mecrax,
fide
OH
MOHMT
noueeprHyrben
BO3EIOACTBIAK/
imam.
6.
YCTaHOBIATb
yorpoficreo
TS-WX7ODA
B
mecre
C
AOCTaTOHHOrl
BeHrmnsmmek
Bo
ms6excaHme
cosAaHmn
npennrcremil
noromy
BosAyxa
Liepea
yarporicreo
TS-WX7ODA
Hellb3fl
CTaBHTb
Ha
Hero
HHKaKIIX
noel:met
-
co.
7.
Bo
epemn
es,qm
fp0MKOCTb
AOMKHa
bblTb
Ha
ypoeme,
nom
KOTOpOM
He
sarnywaiorcs
CNrHanbl
MaWHH
caopoil
nomoum
IA
T.A.
8.
ipoMKNl
3ByK
MWKOT
Bbl3BaTb
nocrommylo
norepio
cnyxa.
1.
tEMAAVUZ
-
Iti,
FAXA•IPAKM*ft
(—)
tESCMCfgtflo
IffiatftP.th
rfffifttriciatf6.M.
2.
tiEff*61O
,
1*4O4,
MIMEiNgINIOMA.
?fitMEIVIA.
M-iittAfttai,
•REIP41(ff
-
tErr)11,,
3.
TS-WX7ODAIVIVIN6441ZREEIZ
6
(
J/in,.
4.
VENtE*Sin_EIESIFOR414.
Milml
,
KMTN
'NAM
•
Mi*O*44a.
5.
TNItiTs-wx7o0A*RtMA§mosA.
6.
VITs-wrioDAMMENIAffrihit
.
Oi;ETs-wx7oDA_ElksfEffOtautpuitiaggrKjitud.
7.
ilitair81,
13O4iltigiETAXT
-
fr
EX00941-:';
CRibiloiT,
51*409**.
8.
Algt*NuM*4NattA(Nittg*.
ZAJ-85
.,ll
J
-5
ASt
'-4)
31
Jr;
—
I
InJI>hLen;
.
.
-
TS-VVX7ODA
- r
tjUJI
Jai
I
o
a.s.,31
- t
.
„
t
ds,scl,'
TS-WX7ODA
e
at
-
o
.
TS-WX7ODA
ja
.,
s
:,
otS,..
TS-WX7ODA
-1
.
tli
,j).1;5")-
-v
-
A
.&WARNING
U.S.
and Canadian models only
/
Nur US-und Kanada- Meddle
/
Modeles americains
et canadiens
uniquement
Solo modelli
statunitensi
e
canadesi
/
Solo
los
modelos
de
EE.UU.
y
Canadienses
/
Modeles
apenas
dos
EUA
e
Canada
Tonbko
Ann
rdomenek
CWA
ii !WNW
/
filaNNIMMIttea
I
.1.1a
;i4.1aSIli
ic,S..u..jil
,:,l,.43..,,II
The Safety of Your Ears is in Your Hands
Get
the
most
out
of
your
equipment
by
playing
it
at
a
safe
level
-
a
level
that
lets
the
sound
come
through
clearly
without
annoying
blaring
or
distortion
and,
most
importantly,
without
affecting
your
sensitive
hearing.
Sound
can
be
deceiving.
Over
time,
your
hearing
"comfort
level"
adapts
to
higher
volumes
of
sound,
so
what
sounds
"normal"
can
actually
be
loud
and
harmful
to
your
hearing.
Guard
against
this
by
setting
your
equipment
at
a
safe
level
BEFORE
your
hearing
adapts.
ESTABLISH
A
SAFE LEVEL:
•
Set
your
volume
control
at
a
low
setting.
•
Slowly
increase
the
sound
until
you
can
hear
it
comfortably
and
clearly,
without
distortion.
•
Once
you
have
established
a
comfortable
sound
level,
set
the
dial
and
leave
it
them.
BE SURE TO OBSERVE THE FOLLOWING GUIDELINES:
•
Do
not
turn
up
the
volume
so
high
that
you
can't
hear
what's
around
you.
•
Use
caution
or
temporarily
discontinue
use
in
potentially
hazardous
situations.
•
Do
not
use
headphones
while
operating
a
motorized
vehicle
;
the
use
of
headphones
may
create
a
traffic
hazard
and
is
illegal
in
many
areas.
&
AVERTISSEMENT
La protection
de votre oule est entre vos mains
Pour
assurer
le
rendement
optimal
de
votre
materiel
et
-
plus important
encore
la protection
de
votre
°Me,
reglez
le
volume
a
un
univeau
raisonnable.
Pour
ne
pas
alterer
votre
sons
de
la perception, le son dolt etre clair mats ne produire aucun vacarme et
etre
exempt
de
toute
distorsion.
Votre
oule
pout
vous
jouer des tours.
Avec
le temps, votre systeme auditif pout en
effet
s'adapter
a
des
volumes
superieurs, et
ce
qui vous semble un
((niveau
de
confort
normal))
pourrait au contraire etre
excessif
et contribuer
it
endommager votre
mile
de
facon
permanente.
Le
reglage
de
votre
materiel
a
un
volume
securitaire
AVANT
que
votre
°Me
s'adapte
voile
permettra
de
mieux
voile
proteger.
CHOISISSEZ UN VOLUME SECURITAIRE:
•
Reglez
d'abord
le
volume
a
un
niveau
inferieur.
•
Montez
progressivement
le
volume
jusqu'a
un
niveau
d'ecoute
confortable
;
le
son dolt etre clair et exempt
de
distorsions.
•
Une
foie
que le son est
a
un niveau
confortable,
ne
touchez
plus au bouton du
volume.
N'OUBLIEZ
PAS DE RESPECTER
LES DIRECTIVES
SUIVANTES:
•
Lorsque
vous
montez
le
volume,
assurez-vous
de
pouvoir
quand
memo
entendre
ce
qui se passe autour
de
vous.
•
Faites tres attention ou
cessez
temporairement
]'utilisation
dans
les
situations
pouvant
s'averer
dangereuses.
•
N'utilisez pas des ecouteurs ou un casque
d'ecoute
lorsque vous
operez
im
vehicule
motorise
;
une
telle
utilisation
peut
creer
des dangers sur la route et est illegale
a
de
nombreux endroits.
Register your product at
/
Enregistrez votre produit au
U.S.
models only
/
Nur US-Modelle
/
Modeles americains
uniquement
Solo modelli degli Stati Uniti
/
Solo modelos de EE.UU.
/
Modeles
apenas
dos
EUA
TOrIbK0
rirIFI
MO
011M
CWA
/
fillailea
/
lai:L
i
s.
?
„.,
1
/
4
/1
,:_,N..,
A
.11
This
device
complies
with
Part
15
of
the
FCC
Rules.
Operation
is
subject
to
the
follwing
two
conditions
:
(1)
this
device
may
not
cause
harmful
interference,
and
(2)
this
device
must
accept
any
interference
received,
including
interference
that
may
cause
undesired
operation.
Information to User
Alteration
or
modifications
carried
out
without
appropriate
authorization
may
invalidate
the
user's
right
to
operate
the
equipment
Note
This
equipment
has
been
tested
and
found
to
comply
with
the
limits
for
a
Class
B
digital
device,
pursuant
to
Part
15
of
the
FCC
Rules.
These
limits
are
designed
to
provide
reasonable
protection
against
harmful
interference
in
a
residential
installation.
This
equipment
generates,
uses
and
can
radiate
radio
frequency
energy
and,
if
not
installed
and
used
in
accordance
with
the
instructions,
may
cause
harmful
interference
to
radio
communications.
However,
there
is
no
guarantee
that
interference
will
not
occur
in
a
particular
installation.
If
this
equipment
does
cause
harmful
interference
to
radio
or
television
reception,
which
can
be
determined
by
turning
the
equipment
off
and
on,
the
user
is
encouraged
to
try
to
correct
the
interference
by
one
or
more
of
the
following
measures
:
•
Reorient
or
relocate
the
receiving
antenna.
•
Increase
the
separation
between
the
equipment
and
receiver.
•
Connect
the
equipment
into
an
outlet
on
a
circuit
different
from
that
to
which
the
receiver
is
connected.
•
Consult
the
dealer
or
an
experienced
radio/TV
technician
for
help.
•FEATURES
1.
BACK
LOADED
HORN
DESIGN
FOR
NATURAL,
DEEP
BASS
2.
DYNAMIC
AND
CONTROLLED
BASS
OUTPUT
3.
2
-MODE
SELECTABLE
BASS
CURVE
4.
SHALLOW
AND
RIGID
SPACE
SAVING
DESIGN
FOR
INSTALLATION
FLEXIBILITY
•MERKMALE
1.
BACK
LOADED
HORN-KONSTRUKTION
FOR
NATORLICHEN,
TIEFEN
BASS
2.
DYNAMISCHE
UND
KONTROLLIERTE
BASSVVIEDERGABE
3.
2
VERSCHIEDENE
BASSMODI
SCHALTBAR
4.
STABILES,
FLACHES
GEHAUSE
FOR
MAXIMALE
EINBAUFLEXIBILITAT
•CARACTERISTIQUES
1.
CONCEPTION
PAR
PAVILLON
POUR
DES
BASSES
NATURELLES
ET
PUISSANTES
2.
BASSES
FREQUENCES
CONTROLEES
ET
DYNAMIQUES
3.
2
MODES
DE
REGLAGES
DE
BASSES
4.
CAISSON
ULTRA
-PLAT
POUR
UN MINIMUM
D'ESPACE
OCARATTERISTICHES
1.
DESIGN
A
TROMBA
CARICATO
POSTERIORMENTE
PER
BASSI
NATURAL!
E
PROFONDI
2.
USCITA
DINAMICA
E
DEI
BASSI
CONTROLLATA
3.
2
CURVE
DEI
BASSI
SELEZIONABILI
4.
DESIGN
COMPATTO
PER
UNA
FACILE
E
FLESSIBILE
INSTALLAZIONE
•CARACTERISTICAS
1.
DISEA
0
TROMPETA
POSTERIOR
PARA
UNOS
BAJOS
PROFUNDOS
Y
NATURALES
2.
SALIDA
DEL
GRAVE
DINAMICA
Y
CONTROLADA
3.
2
MODOS
SELECCIONABLES
DE
CURVA
DE
GRAVES
4.
DISEA
0
POCO
PROFUNDO
Y
RIGIDO
QUE
AHORRA
ESPACIO
PARA
UNA
INSTALACION
FLEXIBLE
•CARACTERISTICAS
1.
DESIGN
COM
ALTIFALANTES
TRASEIROS
PARA
GRAVES
NATURAIS
E
PROFUNDOS
2.
EMISSAO
DINAMICA
E
CONTROLADA
DE
GRAVES
3.
2
MODOS
DE
SELKAO
DA
CURVA
DE
GRAVES
4.
DESIGN
COMPACTO
PARA
FLEXIBILIDADE
DE
INSTALACAO
0000BEHHOCTH
1.
OAEOHHBEPTOPHAFI
TPYBA
CflELIMAIlbH0A
(00PM
bl
HATYPABbH010,
iJ1YBOKOi0
2.
BO3M0)KHOCTb
yn
PABTIEHIIR
YPOBHEM
BACA
3.
2
PEXPIMA
ABTOMATHLIECK00
HACTPOAKIel
3KBAJiAN3EPA
4.0LIEHb
npoi-mbliA
N
KOMDAKTHblA
KOPTIVC
fi
,J1R
COXPAHEHl4F1
HOTIESHOTO
BATAXHl4KA
11/44il
1.
BACK
LOADED
HORN
7,
-
FA,
7
ri
A.
{IN
09
a
2.
VISA.
u
7
SantifEekli
3.
2frITOA
u
7
BEICE
111
4.
AMA.14M19;1
111R.11
-
1471M±Priffitt
a
pa
l
•
4
81
.
11
Cr
k.
-
,1÷IIEp-
I
jtsti..W
-
r
y,.g.
-
2
BACA
I1
POCTPAHCTBA
X
Information
Note
for
Customers
in
Russia
and
CIS
countries.
X
Information
-
]'attention des clients de Russie et des pays de la CEI.
X
Nota
informative
per
i
consumatori
della
Russia
e
del
paesi
del
CIS.
X
Nota
de
informacao
para
consumidores
do
Rdssia
c
liaises
da
CEI.
X
Vluctropmaioin
will
00Tp961ITEMOR
B
Peseta
m
CHi.
nriNkieHaHNe
:
B
COOTBOTCTIMH
CO
CTaTbOA
5
3aKOHa
PoccmAcHoil
Oempaumm
(
0
3aIWATO
npae
norpe6mreneA
)
H
nocraHoeneHmem
npaewrenbcrea
PoccmlicHa
(Dempaymm
N2720
or
16.06.97
Homnarnin
Pioneer
Europe
NV
oroeapmeaer
cnen,yroula
cpom
cnymc6bi
mmenmii,
oilmumEuumb
nocraennembix
Ha
pOCCHACKHri
pblHOK.
ABTOMO6MbHall
alleKTp0HIAKa
:
6
ner
A
BHHMAHHE
Yorporicreo
npemHasHaHeHo
Ann
yeTaHOBKH
HCKIIKNIATEMbH0
B
rpamcnopmbie
cpemcrea.
lilcnonbsoearime
erf0
B
upyrsz
yCTIOBHFIX
MO)KOT
npmeecrm
K
BO3HHKHOBOHYIK)
AblMa,
mcapernuo,
nopaxermio
onearpuvecamm
TOKOM
H
K
mpyriam
TefleCHblet
noepemcmerminm.
npil
BO3HNKHOBeHNN
npoonem
nem
uenonaaaaz
B
pa6ore
3TOTO
113.0,8filill
CBFDICHTeCb
C
TOprOBbIM
npeacraam
-
renem
komnamm-npoinaBoawrenn
HMI
C
6retwaciwwm
cepawcubm
nyHmrom
PIONEER.
Awry
H310TOBAOHNFI
06°pp:it:maraca
MCOKHO
onpememirb
no
ceparromy
Homepy,
KOTOpkal
cooepxon
-
CIHIDOOMBLIHIO
0
ROMA
H
rime
npomseciAcrea.
(PyCCKMli)
Cep:Pll-ma
Homep
(Pyccmar)
12
1
mmcpp
1
umilDp
-ell
—
2
Limcl3p
—
IP-
Loml2p
-sl
6
mii(j2p
-Of
—
2
umcpp
—
MN-
►
D
E
W
P1
P2
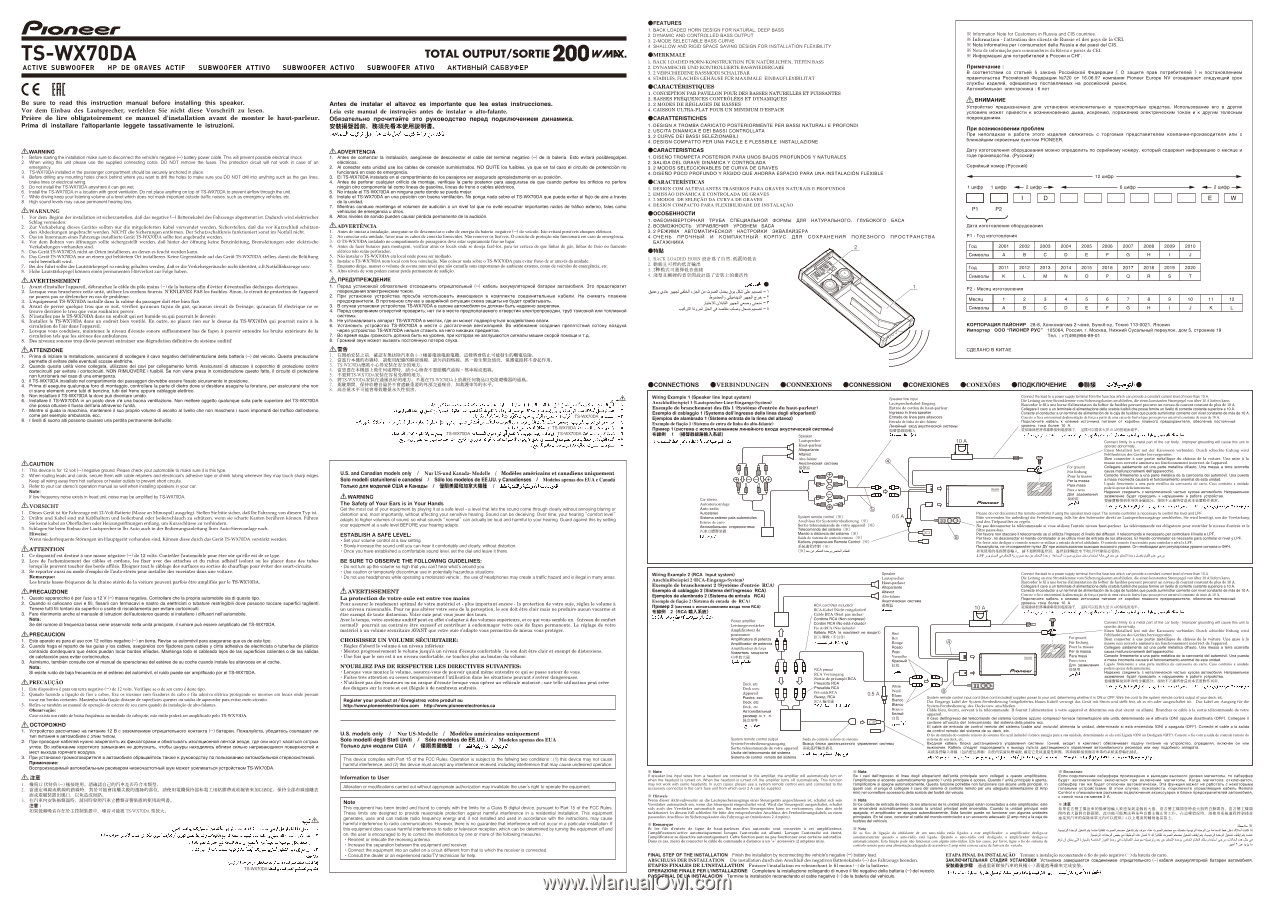
Aare
HefOTOBIleHHB
o6opymoearnin
P1
-
10A
H3f0TOWIEIHMR
roil
2001
2002
2003
2004
2005
2006
2007
2008
2009
2010
CHMBOnisi
A
B
C
D
E
F
G
H
J
roil
2011
2012
2013
2014
2015
2016
2017
2018
2019
2020
CIAMB011bl
K
L
M
N
o
P
Q
R
S
T
P2
-
Mem.'
Il3f0TOBABHIOR
Mecnm
1
2
3
4
5
6
7
8
9
10
11
12
CIAMBOIlbl
A
B
C
D
E
F
G
H
J
K
L
KOPNOPALIHFI
flAcIOHHP
28-8,
Xormomaromo
2
-Home,
Byrime-my,
TOKHO
113-0021,
FIFIOHIAIR
lirsnoprep
000
"f1HOHEP
PYC"
105064, Peseta,
r.
Mockea,
FIMICHIlil
CycanbHbrii
nepeynoK,
Aom
5,
crpoernie
19
Ten.
:
+7(495)956-89-01
C,4EJiAHO
B
KI.iTAE
*CONNECTIONS
OVERBINDUNGEN
*CONNEXIONS
OCONNESSIONI
OCONEXIONES
OCONEDUS
IIIIiOAKl1IO'IEHME
OW*
4.:J)k..
r
.oi.:J
I •
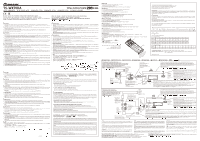
Wiring
Example
1
(Speaker
line
Input
system)
AnschluSbeispiel
1
(Lautsprecher-Line-Eingangs-System)
Exemple
de
branchement
des
Ms
1
(Systeme
d'entree
du
haut-parleur)
Esemplo
di
cablaggio
1
(Systeme
dell'ingresso
della
lines
degli
aitoparianti)
Ejemplos
de
alambrado
1
(Sistema
entrata
de
la
linea
del
altavoz)
Example
de
ante
1(Sistema
de
antra
de
linha
do
alto-falante)
flpmmep
1(cmcxersa
c
1101011b30BaHlIGIA
mmermoro
BX0A8
IlKyCTWIEICKOrl
ClICTESPAbl)
MUM
1
(4266111MitAnfl
Speaker
(
)
Lautsprecher
Haut-parleur
Altoparlante
Altavoz
Alto-falante
Asycnineckan
cHurema
MHO
Car
stereo
Autostereoardage
Auto
-radio
Autostereo
Sistema
estereo
pale
autom6viles
&term
de
carro
Aeroodoennatian
crepeoescrema
n*ADVERSI
e
e
0
System
remote
control
(A)
Anschluss
fur
Systemfembedienung
(M)
Sortie
telecommande
de
votre
appareil
(M)
Telecomando
del
sistema
(n)
Mande
a
distancia
del
sistema
(X)
Saida
do
sistema
de
controlo
remoto
(01)
Ka6en°
ynpaanesnin
Remote
Control
(Ill)
;MUMMA
(X)
Ot)au
if
e
Sedli
e
thall
Speaker
line
input
Lautsprecherkabel-Eirtgang
Entree
de
cordon
de
haut-parleur
Ingress°
in
lines
speaker
Entrada
de
lines
pare
altavoces
Entrada
de
linha
do
alto-fahmte
IlisHenHine
B50.a
akycnNeckon
esereps.
RIVIehl.A.
Connect
the
lead
to
a
power
supply
terminal
from
the
fuse
box
which
can
provide
a
constant
current
level
of
mom
than
10
A
Die
Leitung
an
eine
StromIdemme
vom
Sicherungskasten
anschliden,
die
einen
konstanten
Strompegel
von
Ober
10
A
liefern
kann.
Raccorder
le
fi
t
a
une
borne
d'alimentation
du
boftier
de
fusibles
pouvant
procurer
un
niveau
de
courant
constant
de
plus
de
10
A.
Collegare
cavo
a
un
terminals
di
alimentazione
della
scatola
fusibili
che
posse
fomire
un
avec,
di
correme
costante
superiors
a
10
A.
Conecte
el
conductor
a
un
terminal
de
alimentacien
de
la
caja
de
fusibles
que
pueda
suministrar
corriente
con
nivel
constants
de
mss
de
10
A.
Conecte
o
fi
o
a
um
terminal
dealimentacao
de
form
apaltir
de
uma
caixa
de
fusivel
que
posse
prover
um
nivel
contents
de
mats
de
10
A.
110AKMOLOITO
ka6en°
K
knemme
IICTO4HIIKa
erratum
OT
kopo6km
nnaakoro
npeqoxpaturrenn,
onecnesnie
flOCTOPHHMA
ypolieHn
TOKa
6onee
10
A.
M60*Pkt5(kiklOAScrilitiftt*.
10
A
.
\
•
Connect
fi
rmly
to
a
metal
part
of
the
car
body.
Improper
grounding
will
cause
this
unit
to
operate
abnormally.
Einen
Metallteil
fest
mit
der
Karosserie
verbinden.
Durch
schiethte
Erdung
wird
Fehlfunktion
des
Gerates
hervorgerufen.
Bien
connecter
a
une
partie
metallique
du
chassis
de
la
voiture.
Une
miss
a
is
4
masse
non
corrects
amenera
un
fonctionnement
incorrect
de
l'appareil.
For
ground
Collegare
saldamente
ad
una
parte
metallica
dll'auto.
Una
mesas
a
terra
scorretta
causa
malfunzionamenti
dell'apparecchio.
Piir
Erdung
Pour
la
masse
Per
la
massa
Conecte
fi
rmemente
a
una
parte
metalica
de
la
carroceria
del
autom6vil.
Una
puesta
a
masa
incorrecta
causare
el
funcionamiento
anormal
de
este
unidad.
Para
masa
Para
o
term
Ann
sasemnemin
Ligado
fi
rmemente
a
uma
parte
metilica
da
canosseria
do
carro.
Cass
mmtntrio
a
unidade
poderi
operar
deficientemente.
Hanexam
COORPIHNTb
C
merannwmckon
4aCTMO
icymnia
ammonium.
HenpaaannHoe
sasemnemse
6yqur
npaBggNrb
K
eapyweeiis
e
pafkrre
yerpoecrea.
HAM
HifiliVOM21**2221MOW.
MitTEMPftr3122*AfffltfrA14.,
•
jJ!S>
t-
0,
,,,
,
kutd
,
•
0.5
A
8
Please
do
not
disconnect
the
remote
-controller
f
using
the
speaker
level
input
The
remote
-controller
is
necessary
to
control
the
level
and
LPF.
Bitte
verwenden
Sie
unbedingt
die
Fembedienung,
falls
Sie
den
Subwoofer
direkt
an
Lautsprecherausgange
anschlieRen.
Sie
wird
bertaligt,
um
die
VerstArkung
and
den
Tiefpassffiter
zu
regeln.
Ne
pea
deconnecter
la
telecommande
si
vous
utilises
]'entree
niveau
bout-parleur.
La
telecommande
est
obligatoire
pour
contr0ler
le niveau
d'entree
et
le
Sites
passe
-bas.
Per
favors
non
sta.ccare
t1
telecomando
se
si
utilizza
l'ingresso
di
livello
del
diffused.
telecomando
a
necessario
per
centralism
livello
e
LPF.
Por
favor,
no
desconectar
el
mando-controlador
si
se
utilize
nivel
de
entrada
de
los
altavoces.
El
mando-controlador
es
necesario
para
controlar
el
nivel
y
LPF.
Pm
favor,
th
o
desligueocontrolo
remote
se
utilizer
a
entrada
do
nivel
altifalante.
0
controlo
re
mote
a
necesshio
para
controlar
o
nivel
e
LPF.
flostanyacra,
KB
urcoednumere
nynot
AY
nren
iscnoncsomuom
maxonoe
stomeoro
ypoase.
OH
Heo6xopeed
Ann
peryntspoesas
ypoe.n
ear.ana
N
cDHLI.
al/Miff..)finAMEIRNIA,
M
Hilfi6IIStEIRR.
SEINUitatli**411LPFEISI1A.61E09.
.LPF
I
ill.
.1,6s
si,,
L
L—L
Wiring
Example
2
(RCA
Input
system)
AnschluBbeispiel
2
(RCA-Eingangs-System)
Example de branchement
2
(Systeme d'entree
RCA)
Esemplo
dl
cablagglo
2
(Slstema
dell'Ingresso
RCA)
Ejemplos
de
alambrado
2
(Sistema
de
entrata
RCA)
Exemplo
de
fiacio
2
(Sistema
de
enrada
do
RCA)
Speaker
Lautsprecher
Haut-parleur
msurema
Attoparlante
Allavoz
Alto-falante
Aicycnisieckan
rIpainap
2
(cmcmme
c
mcnonbsoessuem
exam
nine
RCA)
RCA
cord
(Not
included)
01
iNgpi
2
(RCA
MAMA)
RCA-Kabel
(Nicht
mitgeliefern
Cable
RCA
(Nest
pas
inclus)
Power
amplifier
RCA
(Non
compreso)
Leistungsverstiirker
Carden
RCA
(No
este
incluido)
Amplificateur
de
Pio
do
RCA
(Nao
incluido)
/
Cordons
Hanel%
RCA
(a
KOMMEIKT
se
BX0AHT)
pouissance
Red
RCA
aalk
(
(g*)
Amplificatore
di
potenza
Rot
Amplificador
de
potencia
(
)RCAJ.
:
S
Rouge
Amplificadoar
de
form
Rosso
YOW1ITTBab
MOWHOCTI1
Rojo
VAAN(MA
Vermelho
Kpactinifi
jaA.I
RCA
preout
RCA
Vorausgang
Sortie
de
preampli
RCA
Deck,
etc
•Ci
Preuscha
RCA
Deck
usw.
Presalida
RCA
While
Appareil
Pre-saida
RCA
Weill
0.5
A
Blanc
Piastre,
ecc.
Bisecoq
RCA
Bianco
Deck,
etc
RCA
*WI
Deck,
etc
RCA
Blanco
ABTOMO6Nablikal
Branco
pecHatip
is
T.
n.
Bennin
Oft
Nag%
'j
•
t
3
!
System
remote
control
output
System-Fembedienungsausgang
Sortie
telecommande
de
votre
apparel]
Uscita
del
telecomando
del
sistema
Sistema
de
control
re
mote
del
sistema
Saida
do
commie
re
mora
do
sistema
Bbaop
Anoka
plACTaHLMOHHOM
ynpaanemm
CIACTeMbl
(U.••
C-C...-JV.1..."
10
A
1
Connect
the
lead
to
a
power
supply
terminal
from
the
fuse
box
which
can
provide
a
constant
current
level
of
more
than
10
A
Die
Leitung
an
eine
Stromidemme
vom
Sicherungskasten
anschliden,
die
einen
konstanten
Strompegel
von
Ober
10
A
li
efem
kann.
Raccorder
le
Si
a
une
borne
d'alimentation
du
loftier
de
fusibles
pouvant
procurer
an
niveau
de
courant
constant
de
plus
de
10
A.
Collegare
cave
a
un
terminate
di
aftnentazione
della
acetate
fusibili
che
possa
fomire
un
livello
di
corrente
costante
superiors
a
10
A.
Conecte
el
conductor
a
un
terminal
de
alimentacien
de
la
caja
de
fusibles
que
pueda
suministrar
corriente
con
nivel
constants
de
Ines
de
10
A.
Conecte
o
fi
o
a
um
terminal
dealimentagio
de
form
a
partir
de
uma
caixa
de
fusivel
que
posse
prover
um
nivel
constants
de
main
de
10
A.
110aKOKNYITB
Ka6Bah
K
KIIBMMB
PICTOLIBYIKa
rotramsn
OT
kopo6kH
OftaBKOr0
npendMpaterrenn,
ceeene.ce
nocron...re
yypp
OBBHb
TOKB
Sones
10
A.
tniNtaillffittlattaktIMIlattlenT,
itlitWatma*o.ioAftWatittk*.
.
\
•
ip,...111.1
j
8
(I
)
Connect
fi
rmly
to
a
metal
part
of
the
car
bolt,.
Improper
grounding
will
cause
this
unit
to
operate
abnormally.
Damn
Metallteil
fest
mit
der
Karosserie
verbinden
Much
schiechte
Erdung
wird
Fehlfunktion
des
Gerates
hervorgerufen.
Bien
connecter
a
une
partie
metallique
du
chassis
de
la
voiture.
Une
miss
a
Is
manse
non
corrode
amenera
un
fonctionnement
incorrect
de
l'appareil.
Collegare
saldamente
ad
una
parte
metallica
dll'auto.
Una
mesas
a
terra
scorretta
cause
malfunzionamenti
dell'apparecchio.
Conecte
fi
rmemente
a
una
parte
metalica
de
la
carroceria
del
automovil.
Una
puesta
a
masa
incorrecta
causare
el
funcionamiento
anormal
de
esta
unidad.
Ligado
fi
rmemente
a
uma
pane
metalica
da
camusseria
do
carro.
Case
contrino
a
unidade
poderi
opera
deficientemente.
HaaB)KHO
COBAPIHNTb
C
M8Tailalf.MCK0r1
LiaCTI310
eyaosa
aBTOM0611111:1.
H8OpaBliabHOB
3a3BMOBHIle
6yaBT
flplIBOAKTb
K
Hapywesomm
B
paSore
yerpoecrea.
glielfeteffl*PlaqiitNi$3)
..
11A+MfaMftilka*UfailfMn.
•
to
,
,,,
,
kutd
,
•
For
ground
Fier
Erdung
Pour
7ria
la
masse
manna
P
Para
masa
Para
o
terra
Aaa
admemnemsn
1016111
System
remote
control
input
cord
(blue
cord
included)
supplies
power
to
your
unit,
determining
whether
k
is
ON
or
OFF.
Wire
the
cord
to
the
system
remote
control
output
of
your
deck
etc.
Das
Eingangs
kabel
der
System-Fembedienung
(mitgelkiettes
blaues
Kabel)
versorgt
das
Gerat
mit
Strom
and
stellt
fest,
ob
es
ein-oder
ansgeschaltet
ist.
Das
kabel
am
Ausgang
far
die
System-Fernbedienung
des
Decks
usw.
anschliellert
Cable
bleu,
fourth,
servant
a
la
telecommande.
B
fournit
]'alimentation
a
votre
apparel]
et
determine
son
etat,eteint
ou
allume.
Branches
ce
cable
a
la
sortie
telecommande
de
votre
appareil.
cavo
dell'ingresso
del
telecomando
del
sistema
(cordone
azzurro
compreso)
fomisce
l'alimentazione
ails
unite,
determinando
se
6
attivata
(ON)
oppure
disattivata
(OFF).
Collegare
it
cordone
all'uscita
del
telecomando
del
sistema
della
piastre.
ecc.
El
cable
de
entrada
de
control
remoto
del
sistema
(cable
azul
incluido)
aliments
la
unidad,
determinado
si
esti
encendida
(ON)
0
apagada
(OFF).
Conecte
el
cable
a
la
salida
de
control
remoto
del
sistema
de
su
deck,
etc.
O
fi
o
de
entrada
do
controle
remote
do
sistema
(fio
scut
incluido)
fornece
energia
pasta=
unidade,
determinando
se
eta
esti
Ligada
(ON)
ou
Desligeda
(OFF).
Conecteofio
coma
saida
de
controle
remote
do
sistema
de
seu
deck,
etc.
BX0.11H0A
0.36en.
6110Ka
AWCTaHLMOHHOr0
ynpaene.on
cocremka
55011IT
B
mamma)
onecnemmaar
ninny
nwraHHH
Ha
yorpotturao,
onpeasnan,
eznio.e.
OH
elm
ainarnosieH.
Ka6en°
waiver
flOACOBANHNTb
K
auxoqy
nynnta
LOICTEIHLBIOHH01
-
0
ynpaartemin
FIBTOM06101bH01
-
0
pectiaepa
N0IN
emy
noqo6Horo
annapara.
Hitt14
,
146.74)6
eatNESMJNO
Aft(OHtlatitalkili,
liSZLAMINAMIL
Af#44WINNallia
,HIsfOHNESEtadit241.,.
6lj
c
.‘
,1
J.,
,1
cUidi
j,S
Si
Note
f
speaker
line
input
wires
from
a
headunit
am
connected
to
this
amplifier,
the
amplifier
will
automatically
turn
on
when
the
headunit
is
turned
on.
When
the
headunit
is
turned
off,
the
amplifier
turns
off
automatically.
This
function
may
not
work
with
some
headunits.
In
such
cases,
please
use
a
system
remote
control
wire
and
connected
to
the
accessory
connector
in
the
car's
fuse
unit
from
which
over
2
A
can
be
supplied.
il
k
Hinweis
Wenn
dieser
Aktivsubwoofer
an
die
Lautsprecherausganw
eines
Steuergerats
angesthlossen
fi
st,
schaltet
sick
nein
Verstarker
automatisch
ein,
wemt
dos
Steuergerat
eingesthaltet
wird.
Wird
des
Steuergerat
ausgeschaltet,
schaltet
sick
such
der
Verstarker
automatisch
sus.
Bei
manchen
Steuergeraten
kann
es
vorkommen,
doss
dies
nicht
funktioniert
In
diesem
Fall
sthlithen
Sie
bitte
den
entsprechenden
Anschluss
des
Fembedienungskabels
an
einen
passenden
Anschluss
im
Sicherungskasten
des
Fahrzeugs
an
(mindestens
2
Ampere).
00
Remarque
Si
les
fits
d'entree
de
ligne
de
haut-parleurs
d'un
autoradio
sont
co
nnecter
a
cet
amplificateur,
l'amplificateurs'active
automatiquement
lorsque
l'autoradio
est
allume.
Lorsque
l'autoradio
eat
eteint,
famplificateur
se
desactive
automatiquement.
Cette
function
peut
ne
pee
fonctMnner
avec
certaina
autoradios.
Dana
ce
cas,
merci
de
connecter
le
cable
de
commande
a
distance
a
un
"+"
accesaoire
(2
amperes
min).
aF
Note
Se
i
cavi
dell'ingresso
di
lines
degli
altoparlanti
dell'unita
principals
sono
collegati
a
questo
amplificatore,
l'amplificatore
si
accende
automaticamente
quando
unite
principals
6
access.
Quando
unite
principale
A
spenta,
l'amplificatore
si
spegne
automaticamente.
Questa
funzione
potrebbe
non
turmionare
con
alcune
unite
principali.
In
questi
cast,
si
prega
di
collegare
cavo
del
sistema
di
controllo
remoto
per
una
adeguata
alimentazione
(2
Amp
min)
eel
connettore
accessorio
della
acetate
del
fusibili
del
veicolo.
Note
Si
los
cables
de
entrada
de
lines
de
los
anavoces
de
la
unidad
principal
estan
conectados
a
este
ampltlicador,
este
se
encendera
automaticamente
cuando
la
unidad
principal
este
encendida.
Cuando
la
unidad
principal
este
apagada,
el
amplificador
se
apagara
automaticamente.
Esta
funcian
puede
no
funcionar
con
algunas
unidades
principales.
En
tal
can,
conectar
el
cable
del
mando-controlador
a
un
accesorio
adecuado
(2
amp
min)
a
la
caja
de
fusibles
del
vehlculo.
Nets
Se
os
fi
bs
de
ligactio
do
altifalante
de
um
auto
-radio
estao
ligados
a
este
amplificador,
o
amplificador
desliga-se
automaticamente
quando
o
auto
-radio
esti
ligado.
Quando
o
auto
-radio
esti
desligado,
o
amplificador
desliga-se
automaticamente.
Este
funcao
pode
nab
funcionar
com
alguns
auto
-radios.
Em
tale
cases,
per
favor,
ligueofio
do
sistema
de
controlo
remote
para
uma
alimentagao
adequada
do
acesserio
(2
amp
min)
com
na
caixa
de
fusiveis
do
veiculo.
FINAL
STEP
OF
THE
INSTALLATION
Finish
the
installation
by
reconnecting
the
vehicle's
negative
(—)
battery
lead.
ABSCHLUSS
DER
INSTALLATION
Die
installation
durch
den
Anschlu8
des
negativen
Batteriekabels
(—)
des
Fahrzeugs
beenden.
ETAPES FINALES DE L'INSTALLATION
Finissez
]'installation en rebranchant le
fi
t
moins
(—)
de
la batterie.
OPERAZIONE
FINALE
PER
L'INSTALLAZIONE
Completare
la
installazione
collegando
di
nuovo
it
fib
negativo
della
battens
(—)
del
veicolo.
PASO
FINAL
DE
LA
INSTALACION
Termine
la
instalacion
reconectando
el
cable
negativo
(—)
de
la
bateria
del
vehiculo.
X
BilliMaHNB
ECIM
nonknicnieHme
caner:Pepe
nposmeeneHo
K
BblX0,14aM
BMCOK0f0
ypoeHn
MarHLITO.Obl,
TO
caner:Imp
6yner
aBTOMaTaLleCKII
BKMOLlaTbCfl
not
BK/HOLIBHIMI
MarHaT0abl.
KOraa
MarHNTOrla
OTKMOLIaBTCH,
ca6aytttep
TaK
ate
6VIBT
OTKOKPIBB
aBTOMaTNLIEICKB.
3Ta
Mysnumn
MOXBT
se
pa60TaTh
C
FIBKOTOpMMIrl
fOTIBHIAMM
yurpoiricraamm.
B
3TOM
cnyvae,
noskanyeura,
OOAKOKNMTB
ynpaannioutsul
Ka6B1113
Remote
ControlIcCneyNBnbHbIM
paxLemans
nommioneHisn
akceccyapoe
B
6noke
npeqoxpaHicrenen
arcromontinn,
C
Mina
TOK0
Ha
meHee
2
A.
ME
110
t:EvItilili3artalaaffia*at4A4fIlMtlalirWa.
5
,
I6/(INOFI*JAMRIS
NJA
ff. 210
001
rell6kt
iRIII
WM
ge.
tEA121a6M,
1811f1810181
18
01
1
AliKtle(*a96AlatiWrIANIANftt2
t'ateMittliA4111$
h.
alsn.N.s
t..iktiltib
c
.
.,..di
e
d..a.sjadd
e
s,
t_s_
t
a
ci•
j
enll
ces
let...di
la di]
un
n,
e
.
ty6,ll
sin
J..d
'I
al
.141.0
dikla
dons
t_10,1
I
.y
Laic
cl
odd,
4
,5111,tettIL
,umn
tan
L
as
,,,i
Jost
t
dc—nitt.
ETAPA
FINAL
DA
INSTALACAO
Terrains
a
instalagao
reconectando
o
fi
o
do
polo
negative
(—)da
bateria
do
cane.
3AKINOLINTEMHAS
CiAANR
YCTAHOBKII
YcraHoema
sasepwaercn
COOAHHOHHOM
orpH6arenbmoro
(—)
Ha6enn
ammymynnropHoil
6arapem
aoromo6mnn.
MIRROR
313,RA4CP40
1014E
(-)
4tftalituIC7oXMC.
(-)
at.,