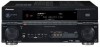
Pioneer VSX-1017TXV-K Owner's Manual
Pioneer VSX-1017TXV-K - iPod Ready, XM Satellite Manual
 |
UPC - 000411865816
View all Pioneer VSX-1017TXV-K manuals
Add to My Manuals
Save this manual to your list of manuals |
Pioneer VSX-1017TXV-K manual content summary:
- Pioneer VSX-1017TXV-K | Owner's Manual - Page 1
AUDIO/VIDEO MULTI-CHANNEL RECEIVER VSX-1017TXV-K Register your product at http://www.pioneerelectronics.com (US) http://www.pioneerelectronics.ca (Canada) • Protect your new investment The details of your purchase will be - Pioneer VSX-1017TXV-K | Owner's Manual - Page 2
-CHANNEL RECEIVER Model Number: VSX-1017TXV-K Responsible Party Name: PIONEER ELECTRONICS SERVICE, and used in accordance with the instructions, may cause harmful interference to radio different from that to which the receiver is connected. - Consult the dealer or an experienced radio/TV - Pioneer VSX-1017TXV-K | Owner's Manual - Page 3
servicing) instructions in the literature accompanying the appliance. D1-4-2-3_En IMPORTANT SAFETY INSTRUCTIONS READ INSTRUCTIONS - All the safety and operating instructions power supply to your home, consult your product dealer or local power company. the mast and supporting structure, grounding - Pioneer VSX-1017TXV-K | Owner's Manual - Page 4
finished reading the instructions, put them away in a safe place for future reference. Contents 01 Before you start Features 6 Checking what's in the box 7 Ventilation 7 Installing the receiver 7 Loading the batteries 7 02 5 minute guide Introduction to home theater 8 Listening to Surround - Pioneer VSX-1017TXV-K | Owner's Manual - Page 5
for other components 60 Operating other Pioneer components with this unit's sensor 61 12 Additional information Troubleshooting 62 Power 62 No sound 62 Other audio problems 63 Video 64 Settings 64 Display 65 Remote control 66 HDMI 66 iPod messages 66 XM radio messages 67 SIRIUS - Pioneer VSX-1017TXV-K | Owner's Manual - Page 6
discrete design unique to Pioneer for high-power drivability, low distortion and stable imaging. Through symmetrical placement of power amplification units, this receiver generates equal amplifier power to all channels, eliminating the possibility of one channel dominating a particular sound field - Pioneer VSX-1017TXV-K | Owner's Manual - Page 7
box Please check that you've received the following supplied accessories: • Setup microphone (cable: 5 m (16.4 ft.)) • Remote control unit • AA/IEC R6P dry cell batteries x2 • AM loop antenna • FM wire antenna • Warranty card • These operating instructions Ventilation When installing this unit, make - Pioneer VSX-1017TXV-K | Owner's Manual - Page 8
Setup are output at high volume. RECEIVER INPUT SELECT SYSTEM OFF SOURCE XM RADIO DVD CD-R/TAPE CD SIRIUS TV iPod DVR 2 DVR 1 TV CTRL TUNER RECEIVER DIALOG E PHASE S.RETRIEVER D.ACCESS +10 CLASS DISC ENTER TOP MENU TUNE ST SETUP ENTER MENU ST T.EDIT RETURN GUIDE TUNE TV CONTROL - Pioneer VSX-1017TXV-K | Owner's Manual - Page 9
RETRY doesn't fix the problem, turn off the power and check the speaker connections. 7 Make sure 'OK' is selected, then press ENTER. A progress report is displayed on-screen while the receiver outputs more test tones to determine the optimum receiver settings for channel level, speaker distance, and - Pioneer VSX-1017TXV-K | Owner's Manual - Page 10
CONTROL OFF Front speaker Listening position ? Playing a source Here are the basic instructions for playing a source (such as a DVD disc) with your home theater system. RECEIVER INPUT SELECT SYSTEM OFF SOURCE GUIDE TV CONTROL TV VOL INPUT SELECT TV CH VOL Sound source Subwoofer PHASE - Pioneer VSX-1017TXV-K | Owner's Manual - Page 11
receiver provides you with many connection possibilities, but it doesn't have to be difficult. This page explains the kinds of components you can connect to make up your home theater Pioneer components so that you can control all your equipment from a single IR remote sensor. Operating other Pioneer - Pioneer VSX-1017TXV-K | Owner's Manual - Page 12
page 13. 13 Multichannel analog audio inputs 7.1 channel inputs for connection to a DVD player with home and other limited consumer uses only unless otherwise authorized by Macrovision. Reverse engineering or disassembly is prohibited. Note 1 You must connect your monitor/TV to the receiver's HDMI - Pioneer VSX-1017TXV-K | Owner's Manual - Page 13
PR ASSIGNABLE 1 3 OUT HDMI ASSIGNABLE 12 XM IN ASSIGNABLE 13 S-VIDEO CONTROL OUT IN iPod IN IN IN OUT IN VIDEO AUDIO IN L IN 1 (DVD/LD) R IN 2 (DVR/VCR2) CD COAXIAL ASSIGNABLE 12 OUT IN IN IN OUT IN CD-R/TAPE/MD DVD/LD TV/SAT DVR/VCR1 VSX-1017TXV AM LOOP L OUT PR - Pioneer VSX-1017TXV-K | Owner's Manual - Page 14
and VCRs. VSX-1017TXV OPTICAL DIGITAL ANTENNA IN 1 (DVD/LD) IN 2 (TV/SAT) OUT IN 1 (DVR/ VCR1) IN 2 (TV/SAT) IN 3 (CD) COMPONENT VIDEO Y PB PR IN 1 Y PB PR IN 2 Y PB PR Y PB PR ASSIGNABLE 1 3 OUT HDMI ASSIGNABLE 12 XM IN ASSIGNABLE 13 S-VIDEO CONTROL OUT IN iPod IN IN - Pioneer VSX-1017TXV-K | Owner's Manual - Page 15
equipment 03 VSX-1017TXV OPTICAL DIGITAL ANTENNA IN 1 (DVD/LD) IN 2 (TV/SAT) OUT IN 1 (DVR/ VCR1) IN 2 (TV/SAT) IN 3 (CD) COMPONENT VIDEO Y PB PR IN 1 Y PB PR IN 2 Y PB PR Y PB PR ASSIGNABLE 1 3 OUT HDMI ASSIGNABLE 12 XM IN ASSIGNABLE 13 S-VIDEO CONTROL OUT IN iPod IN - Pioneer VSX-1017TXV-K | Owner's Manual - Page 16
received by DVI-compliant displays. HDMI has the capability to support standard, enhanced, or high-definition video plus standard to multi-channel surround-sound audio. HDMI these too. VSX-1017TXV OPTICAL DIGITAL OUT HDMI ASSIGNABLE 12 XM IN ASSIGNABLE 13 S-VIDEO CONTROL OUT IN iPod IN - Pioneer VSX-1017TXV-K | Owner's Manual - Page 17
This receiver features two PR ASSIGNABLE 1 3 OUT HDMI ASSIGNABLE 12 XM IN ASSIGNABLE 13 S-VIDEO CONTROL OUT IN iPod IN IN IN OUT IN VSX-1017TXV VIDEO OUTPUT DIGITAL OUT TV game, video camera, etc. • Select these inputs by pressing VIDEO/GAME or using INPUT SELECT (remote problems may occur depending - Pioneer VSX-1017TXV-K | Owner's Manual - Page 18
PR ASSIGNABLE 1 3 OUT HDMI ASSIGNABLE 12 XM IN ASSIGNABLE 13 S-VIDEO CONTROL OUT IN iPod IN IN IN OUT IN INSTRUCTION MANUAL SELECTABLE VSX-1017TXV Surround left Surround right Surround back left Surround back right Connecting the speakers Each speaker connection on the receiver - Pioneer VSX-1017TXV-K | Owner's Manual - Page 19
• Please refer to the manual that came with your speakers for so that the sound of the center channel is localized at the TV screen. behind the listener than for home theater playback. • Try not the floor (except the subwoofer), or mounting them very high on a wall is not recommended. • For the - Pioneer VSX-1017TXV-K | Owner's Manual - Page 20
GAMES MODE. See also THX Audio Setting on page 42 to make the settings that will give you the best sound experience when using the Home THX modes (page 28). 3 ANTENNA 5 FM UNBAL 75 Ω AM LOOP 4 1 2 1 Pull off the protective shields of both AM antenna wires. 2 Push open the tabs, then - Pioneer VSX-1017TXV-K | Owner's Manual - Page 21
find it damaged, ask your nearest Pioneer authorized independent service company for a replacement. • The receiver should be disconnected by removing the mains cause the receiver to malfunction. • Since a subwoofer or power amplifier can exceed the 100 W maximum when playing sources at a high volume, - Pioneer VSX-1017TXV-K | Owner's Manual - Page 22
12 3 4 56 7 8 9 10 AUDIO/VIDEO MULTI-CHANNEL RECEIVER VSX-1017TXV STANDBY/ON PHASE CONTROL PHASE ACOUSTIC LISTENING CONTROL EQ MODE DIGITAL See Display on page 24. 8 Remote sensor Receives the signals from the remote control (see Operating range of remote control unit on page 23). 9 - Pioneer VSX-1017TXV-K | Owner's Manual - Page 23
recall (page 33). 21 SPEAKERS Use to change the speaker system (page 48). Operating range of remote control unit The remote control may not work properly if: • There are obstacles between the remote control and the receiver's remote sensor. • Direct sunlight or fluorescent light is shining onto the - Pioneer VSX-1017TXV-K | Owner's Manual - Page 24
receiver is set to select the input signal automatically (page 30). 2 Program format indicators These change according to which channels are active in digital sources. L - Left front channel C - Center channel R - Right front channel SL - Left surround channel S - Surround channel too high. ATT Home - Pioneer VSX-1017TXV-K | Owner's Manual - Page 25
iPod TUNER RECEIVER 14 SLEEP SB ch ANALOG ATT SR+ DIMMER MIDNIGHT/ LOUDNESS 4 DIALOG E PHASE S.RETRIEVER D.ACCESS +10 CLASS DISC ENTER TOP MENU 5 TUNE MENU 6 ST SETUP ENTER ST T.EDIT RETURN GUIDE EFFECT/CHSEL LEVEL 16 17 RECEIVER The remote has been conveniently color-coded - Pioneer VSX-1017TXV-K | Owner's Manual - Page 26
34). 9 Receiver controls THX - Press to select a Home THX listening mode remote control presets on page 57. READ ID - See Confirming preset codes on page 57. 14 RECEIVER Switches the remote to control the receiver and LEVEL +/- Press repeatedly to select a channel, then use +/- to adjust the level - Pioneer VSX-1017TXV-K | Owner's Manual - Page 27
DTS 96 kHz (24 bit) or WMA9 Pro), settings and status of the receiver. See Listening modes with different input signal formats on page 70 for more on adjust them. 6 When listening to 2-channel sources in Neo:6 Music mode, you can also adjust the center image effect (see Setting the effect options on - Pioneer VSX-1017TXV-K | Owner's Manual - Page 28
channel playback with DTS encoded sources Using the Home THX modes THX and Home THX are technical standards created by THX Ltd. for cinema and home theater sound. Home THX is designed to make home theater EQ SIGNAL SEL SHIFT EFFECT/CHSEL LEVEL RECEIVER • Press ADV.SURR repeatedly to select - Pioneer VSX-1017TXV-K | Owner's Manual - Page 29
you want to adjust. Depending on the current status / mode of the receiver, certain options may not appear. Check the table below for notes on image to create a wider stereo effect with vocals. Adjust the effect from 0 (all center channel sent to front right and left speakers) to 10 (center channel - Pioneer VSX-1017TXV-K | Owner's Manual - Page 30
analog sources, only Channel Level can be set. All other digital processing can not be set. MULTI OPE AUTOSURR ACOUSTIC EQ SIGNAL SEL SHIFT EFFECT/CHSEL LEVEL RECEIVER • Press SIGNAL SEL 't output DTS signals. For more details, refer to the instruction manual supplied with your DVD player. 30 En - Pioneer VSX-1017TXV-K | Owner's Manual - Page 31
The table below indicates when you will hear the surround back channel when playing various kinds of sources (ì=Sound plays through surround back speaker(s)). XM RADIO DVD CD-R/TAPE CD SIRIUS TV iPod DVR 2 DVR 1 TV CTRL TUNER RECEIVER SLEEP SR+ DIALOG E SB ch DIMMER PHASE ANALOG ATT MIDNIGHT - Pioneer VSX-1017TXV-K | Owner's Manual - Page 32
AAC compression process, sound quality often suffers from an uneven sound image. The Sound Retriever feature employs new DSP technology that helps bring dialog in the center channel to make it stand out from other background sounds in a TV or movie soundtrack. • Press RECEIVER then press DIALOG E - Pioneer VSX-1017TXV-K | Owner's Manual - Page 33
iPod DVR 2 DVR 1 TV CTRL TUNER RECEIVER DIALOG E PHASE S.RETRIEVER D.ACCESS +10 CLASS DISC ENTER TOP MENU TUNE ST SETUP ENTER MENU ST T.EDIT RETURN GUIDE Manual tuning To change the frequency one step at a time, press TUNE / . High speed tuning Press and hold TUNE / for high remote - Pioneer VSX-1017TXV-K | Owner's Manual - Page 34
Choose from the following characters for a name up to four characters long. ABCDEFGHIJKLMNOPQRSTUVWXYZ abcdefghijklmnopqrstuvwxyz 0123456789 space] • Use the ST / buttons (remote) to select characters. • Press ENTER to confirm a character. If no character is input, a space is input. • The name is - Pioneer VSX-1017TXV-K | Owner's Manual - Page 35
to reflect how you are using the receiver (see The Other Setup menu on page 53). Surround back speaker setting • Default setting: Normal (SB) There are several ways you can use the surround back speaker channels with this system. In addition to a normal home theater setup where they are used for - Pioneer VSX-1017TXV-K | Owner's Manual - Page 36
to the Auto MCACC setup menu. See Problems when using the Auto MCACC Setup on page output at high volume. 1 Select 'Manual MCACC' from the System Setup menu. See Making receiver settings from the overall balance of your speaker system (see Fine Channel Level below). • Fine SP Distance - Make precise - Pioneer VSX-1017TXV-K | Owner's Manual - Page 37
, simply use / to select it. 4 When you're finished, press RETURN. You return to the Manual MCACC setup menu. Listen to the reference speaker and use it to measure the target channel. From the listening position, face the two speakers with your arms outstretched pointing at each speaker. Try to - Pioneer VSX-1017TXV-K | Owner's Manual - Page 38
EQ Setup' from the Manual MCACC setup menu. 3.Manual MCACC a.Fine Ch Level Problems when using the Auto MCACC Setup on page 10 for notes regarding high [ ] :Cancel As the receiver outputs test tones, the frequency multi-channel audio sources, the localization of the reproduced sound image - Pioneer VSX-1017TXV-K | Owner's Manual - Page 39
test tones with the TRIM feature. Use / to select TRIM then use / to raise or lower the channel level for the current speaker. 4 When you're finished, press RETURN. You return to the Manual MCACC setup menu. Checking your Acoustic Calibration EQ settings After you have completed an automatic or - Pioneer VSX-1017TXV-K | Owner's Manual - Page 40
System Setup menu Manual speaker setup This receiver allows you to high volume. 1 Select 'Manual SP Setup' then press ENTER. System Setup 1.Surr Back System 2.Auto MCACC 3.Manual MCACC 4.Manual SP Setup 5.Input Assign 6.Other Setup 4.Manual SP Setup a.Speaker Setting b.Crossover Network c.Channel - Pioneer VSX-1017TXV-K | Owner's Manual - Page 41
problems, Manual SP Setup menu. Channel Level Using the channel level settings, you can adjust the overall balance of your speaker system, an important factor when setting up a home theater system. Tip • You can change the channel levels at any time by using EFFECT/CH SEL and +/- on the remote - Pioneer VSX-1017TXV-K | Owner's Manual - Page 42
receiver can then add the proper delay needed for effective surround sound. 1 Select 'Speaker Distance' from the Manual the Manual SP Setup menu. 4.Manual SP Setup a.Speaker Setting b.Crossover Network c.Channel Level THX MusicMode listening modes (see Using the Home THX modes on page 28) with the - Pioneer VSX-1017TXV-K | Owner's Manual - Page 43
. For supported versions, consult your local Pioneer dealer. 2 • This product is the Pioneer Control Dock for iPod (IDK-90C) for use with an iPod® (third generation and above), iPod mini, iPod nano or iPod Photo. • For detailed instructions on using the iPod, please refer to the manual supplied with - Pioneer VSX-1017TXV-K | Owner's Manual - Page 44
digital radio service to receive broadcasts.3 Note 1 If you're in the song category, you can also press ENTER to start playback. 2 Your iPod nano currently restricts viewing of photo images stored. 3 Hardware and required basic monthly subscription sold separately. Premium Channel available at - Pioneer VSX-1017TXV-K | Owner's Manual - Page 45
VSX-1017TXV SATELLiTE RADiO SATELLiTE RADiO XM Mini-Tuner 1 Connect an XM Mini-Tuner to the XM Radio jack on the rear of this receiver. You will also need to activate the XM Radio service Press / to display the XM Channel Guide then / and ENTER to select the channel of the XM radio broadcast you - Pioneer VSX-1017TXV-K | Owner's Manual - Page 46
activate your SIRIUS Connect tuner.1 VSX-1017TXV OPTICAL DIGITAL IN 1 (DVD/LD) IN 2 (TV/SAT) OUT IN 1 (DVR/ VCR1) IN 2 (TV/SAT) IN 3 (CD) COMPONENT VIDEO Y PB PR IN 1 IN 2 Y PB PR OUT HDMI ASSIGNABLE 12 XM IN ASSIGNABLE 13 S-VIDEO CONTROL OUT IN iPod IN IN VIDEO ANTENNA Y PB - Pioneer VSX-1017TXV-K | Owner's Manual - Page 47
manual for the SiriusConnect Home to enter the SIRIUS Channel Guide, then navigate through the channels one at time with stop blinking and the receiver stores the SIRIUS channel.4 Tip • You can channel preset you want. • You can also use the number buttons on the remote control to recall the channel - Pioneer VSX-1017TXV-K | Owner's Manual - Page 48
supports surround back channels).1 Make sure that the player is set to output multichannel analog audio. 1 Connect the front, surround, center and subwoofer outputs on your DVD player to the corresponding MULTI CH input jack on this receiver page 18. Make sure to review Placing the speakers on page - Pioneer VSX-1017TXV-K | Owner's Manual - Page 49
system A (multichannel sources will be downmixed to 2 channels). • SP (off) - No sound is output (Single) Front left speaker SEE INSTRUCTION MANUAL SELECTABLE High Low Since both front and surround speaker cords to the speaker terminal on the receiver. Using a banana plug for the second - Pioneer VSX-1017TXV-K | Owner's Manual - Page 50
receiver with a Pioneer plasma display If you have a Pioneer plasma display, you can use an SR+ cable1 to connect it to this unit and take advantage of various convenient features, such as automatic video input switching of the plasma display when the input is changed.2 CONTROL OUT VSX-1017TXV - Pioneer VSX-1017TXV-K | Owner's Manual - Page 51
Pioneer plasma display VIDEO INPUT 2 DVD player Satellite receiver, etc. DVD/LD AUDIO IN TV/SAT AUDIO IN AUDIO/VIDEO MULTI-CHANNEL RECEIVER VSX-1017TXV for Pioneer plasma displays on page 54 for more on setting up the receiver. Important • The additional SR+ features do not work when the iPod, - Pioneer VSX-1017TXV-K | Owner's Manual - Page 52
if you have connected equipment using component video cables. 1 Press RECEIVER on the remote control, then press the SETUP button. An on-screen display ( 2.Auto MCACC 3.Manual MCACC 4.Manual SP Setup 5.Input Assign 6.Other Setup 5.Input Assign a.Digital Input b.Component Input c.HDMI Input : Exit - Pioneer VSX-1017TXV-K | Owner's Manual - Page 53
TV connected to this receiver's HDMI output. 4 When you're finished, press RETURN. You return to the Input Assign menu. The Other Setup menu The Other Setup menu is where you can make customized settings to reflect how you are using the receiver. 1 Press RECEIVER on the remote control, then press - Pioneer VSX-1017TXV-K | Owner's Manual - Page 54
OFF - No sound from LFE channel 3 When you're finished, press RETURN. You return to the Other Setup menu. SR+ Setup for Pioneer plasma displays • Default setting: OFF (all settings) Make the following settings if you have connected a Pioneer plasma display to this receiver using an SR+ cable. Note - Pioneer VSX-1017TXV-K | Owner's Manual - Page 55
set the audio recording level automatically-check the component's instruction manual if you're unsure. 4 Start recording, then start receiver being left on all night. Use the remote control to set the sleep timer. XM RADIO DVD CD-R/TAPE CD SIRIUS TV iPod DVR 2 DVR 1 TV CTRL TUNER RECEIVER - Pioneer VSX-1017TXV-K | Owner's Manual - Page 56
selecting sources, the display automatically brightens for a few seconds. CD-R/TAPE CD iPod TUNER RECEIVER SLEEP SR+ DIALOG E SB ch DIMMER PHASE ANALOG ATT MIDNIGHT/ LOUDNESS S.RETRIEVER D ACCESS • Press RECEIVER then press DIMMER repeatedly to change the brightness of the front panel display - Pioneer VSX-1017TXV-K | Owner's Manual - Page 57
listen to a CD on the receiver and then use the remote control to rewind a tape in your VCR while you continue to listen to your CD player. Note 1 You can't assign the RECEIVER, TUNER, XM RADIO, SIRIUS or iPod buttons. 2 • When using a Pioneer HDD recorder, please select PIONEER DVR 487, 488, 489 - Pioneer VSX-1017TXV-K | Owner's Manual - Page 58
XM RADIO DVD CD-R/TAPE CD SIRIUS TV iPod DVR 2 DVR 1 TV CTRL TUNER RECEIVER SLEEP SB ch ANALOG ATT TOP MENU TUNE ST SETUP ENTER MENU ST T.EDIT RETURN GUIDE TUNE TV CONTROL BAND 1 While pressing the RECEIVER button, press SETUP. The remote LCD display shows SETUP. 2 Use / to select - Pioneer VSX-1017TXV-K | Owner's Manual - Page 59
Pioneer components will switch off1, followed by this receiver. Controls for TVs This remote possible with all models.) Cable TV/Satellite TV/TV/DTV TV CH +/- Selects channels. Cable TV/ previously selected channel. DTV Cable TV/Satellite TV/TV/DTV GUIDE Use as the GUIDE button for navigating - Pioneer VSX-1017TXV-K | Owner's Manual - Page 60
This remote control can control these components after entering the proper codes or teaching the receiver the commands (see Setting the remote to . DVD/DVR & ENTER player GUIDE Press to access the DVD player DVD/DVR setup screen. player CH +/- Selects channels. VCR/DVD/DVR player AUDIO - Pioneer VSX-1017TXV-K | Owner's Manual - Page 61
control, refer to Setting the remote to control other components on page 57. If you have connected a remote control to the CONTROL IN jack (using a mini-plug cable), you won't be able to control this unit using the remote sensor. • See Using this receiver with a Pioneer plasma display on page 50 if - Pioneer VSX-1017TXV-K | Owner's Manual - Page 62
the power automatically switches off. The MCACC blinks and the power does not turn on. • The receiver may have a serious problem. Do not try switching the receiver on. Contact a Pioneer authorized independent service company for help. OVERHEAT blinks in the display • Allow the unit to cool down in - Pioneer VSX-1017TXV-K | Owner's Manual - Page 63
is set to SBch ON (see Using surround back channel processing on page 30). • If the source is Dolby sure this is not turned down. Other audio problems Symptom Remedy Broadcast stations cannot be For FM • This is not a malfunction of the receiver. The scan function of your player alters the - Pioneer VSX-1017TXV-K | Owner's Manual - Page 64
If the levels in Channel Level on page 41 Video Symptom Remedy No image is output when an want to record) to this receiver. Noisy, intermittent, or high. Keep the noise level in the room as low as possible (see also Problems manually in Speaker Setting on page 40 if this is a recurring problem - Pioneer VSX-1017TXV-K | Owner's Manual - Page 65
on the remote control repeatedly to select a different brightness. After making an adjustment the • Press DIMMER on the remote control repeatedly • The disc may not contain 5.1/6.1 channel material. Check the disc packaging for more on what audio of the receiver's format tracks are recorded on the - Pioneer VSX-1017TXV-K | Owner's Manual - Page 66
cable, making sure it's connected to the right jack (see Using this receiver with a Pioneer the connected components can't plasma display on page 50). be operated with the remote. • Make sure that there is an analog or HDMI connection between the units. This is necessary for the SR feature to work - Pioneer VSX-1017TXV-K | Owner's Manual - Page 67
or program information. Wait until the information has been received. The channel currently selected has stopped broadcasting. Select another channel. You have selected a channel that does not exist, The receiver will automatically switch to channel 001 (or the or that you have not subscribed - Pioneer VSX-1017TXV-K | Owner's Manual - Page 68
(with two channel sources, the ".1" subwoofer channel is generated by bass management in the receiver). Two modes (Cinema and Music) are available using DTS Neo:6 with two channel sources. DTS 96/24 DTS 96/24 is an extension of the original DTS Digital Surround which offers high quality 96 kHz - Pioneer VSX-1017TXV-K | Owner's Manual - Page 69
site at www.dolby.com. Only receiver and controller products bearing the THX Surround EX logo, when in the THX Surround EX mode, faithfully reproduce this new technology in the home. This product may also engage the "THX Surround EX" mode during the playback of 5.1 channel material that is not Dolby - Pioneer VSX-1017TXV-K | Owner's Manual - Page 70
sound experience. When you set up your home theater system using all eight speaker outputs ( is encoded in Surround EX, you can manually select the THX Surround EX playback mode, LOGIC a.2 PRO LOGIC has a maximum of 5.1 channel playback. b.Unavailable with only one surround back speaker connected - Pioneer VSX-1017TXV-K | Owner's Manual - Page 71
Logic IIx MOVIE+THXa THX Select2 CINEMAa THX MUSICMODEa THX GAMES MODEa Straight decoding Dolby Digital EX 2 Pro Logic IIx MOVIEa DTS-ES (6.1 channel sources/ 6.1 channel flagged) DTS-ES (Matrix/Discrete) DTS+2 Pro Logic IIx MOVIEa DTS+2 Pro Logic IIx MUSIC DTS-ES+THX (Matrix/Discrete) DTS+2 Pro - Pioneer VSX-1017TXV-K | Owner's Manual - Page 72
dBf) Stereo: 70 dB (at 85 dBf) Distortion Stereo: 0.5 % (1 kHz) Alternate Channel Selectivity 60 dB (400 kHz) Stereo Separation 40 dB (1 kHz) Frequency Response 30 Hz batteries 2 Remote control unit 1 AM loop antenna 1 FM wire antenna 1 Warranty card 1 These operating instructions Note • - Pioneer VSX-1017TXV-K | Owner's Manual - Page 73
Additional information 12 Selecting fine audio equipment such as the unit you've just purchased is only the start of your musical enjoyment. Now it's time to consider how you can maximize the fun and excitement your equipment offers. This manufacturer and the Electronic Industries Association's - Pioneer VSX-1017TXV-K | Owner's Manual - Page 74
or if you wish to purchase replacement parts, operating instructions, service manuals, or accessories, please call the number shown below. 8 0 0 - 4 2 1 - 1 4 0 4 Please do not ship your product to Pioneer without first calling the Customer Support Division at the above listed number for assistance
-
 1
1 -
 2
2 -
 3
3 -
 4
4 -
 5
5 -
 6
6 -
 7
7 -
8
-
9
-
10
-
11
-
12
-
13
-
14
-
15
-
16
-
17
-
18
-
19
-
20
-
21
-
22
-
23
-
24
-
25
-
26
-
27
-
28
-
29
-
30
-
31
-
32
-
33
-
34
-
35
-
36
-
37
-
38
-
39
-
40
-
41
-
42
-
43
-
44
-
45
-
46
-
47
-
48
-
49
-
50
-
51
-
52
-
53
-
54
-
55
-
56
-
57
-
58
-
59
-
60
-
61
-
62
-
63
-
64
-
65
-
66
-
67
-
68
-
69
-
70
-
71
-
72
-
73
-
74
 |
 |

AUDIO/VIDEO MULTI-CHANNEL
RECEIVER
VSX-1017TXV
-K
Operating Instructions
• Protect your new investment
The details of your purchase will be on file for reference in the event of an
insurance claim such as loss or theft.
• Improve product development
Your input helps us continue to design products that meet your needs.
• Receive a free Pioneer newsletter
Registered customers can opt in to receive a monthly newsletter.
• Receive free tips, updates and service bulletins on
your new product
Register your product at
http://www.pioneerelectronics.ca (Canada)