Pioneer VSX-1122-K Owner's Manual
Pioneer VSX-1122-K Manual
 |
View all Pioneer VSX-1122-K manuals
Add to My Manuals
Save this manual to your list of manuals |
Pioneer VSX-1122-K manual content summary:
- Pioneer VSX-1122-K | Owner's Manual - Page 1
. • Receive free tips, updates and service bulletins on your new product • Improve product development Your input helps us continue to design products that meet your needs. • Receive a free Pioneer newsletter Registered customers can opt in to receive a monthly newsletter. Operating Instructions - Pioneer VSX-1122-K | Owner's Manual - Page 2
operating and maintenance (servicing) instructions in the literature accompanying of the obsolete outlet. 10) Protect the power cord from being walked on or pinched particularly or relocate the receiving antenna. - Increase the separation between the equipment and receiver. - Connect the - Pioneer VSX-1122-K | Owner's Manual - Page 3
IMPORTANT NOTICE THE MODEL NUMBER AND SERIAL NUMBER OF THIS EQUIPMENT ARE ON THE REAR OR your equipment at a safe level BEFORE your hearing adapts. ESTABLISH A SAFE LEVEL: • Set your volume control at a low setting. • Slowly increase the sound until you can hear it comfortably and clearly, without - Pioneer VSX-1122-K | Owner's Manual - Page 4
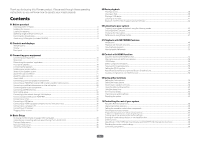
operating instructions so you will know how to operate your model properly. Contents 01 Before you start Checking what's in the box...8 Installing the receiver...8 Loading the batteries...8 Operating range of remote control unit...8 Canceling the demo display...8 About using AVNavigator (included - Pioneer VSX-1122-K | Owner's Manual - Page 5
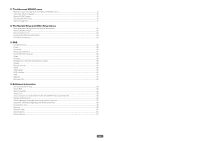
Other Setup menus Making receiver settings from the System Setup menu 80 Manual speaker setup...80 Network Setup menu...82 Checking the Network Information...83 The Other Setup menu...83 13 FAQ Troubleshooting...86 Power...86 No sound...86 Other audio problems...87 ADAPTER PORT terminal...88 Video - Pioneer VSX-1122-K | Owner's Manual - Page 6
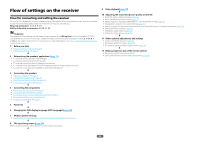
19 ! Bi-amping your speakers on page 20 j 4 Connecting the components ! About the audio connection on page 21 ! About the video converter on page 22 ! Connecting your TV and playback components on page 23 ! Connecting AM/FM antennas on page 27 ! Plugging in the receiver on page 31 j 5 Power On - Pioneer VSX-1122-K | Owner's Manual - Page 7
Before you start Checking what's in the box...8 Installing the receiver...8 Loading the batteries...8 Operating range of remote control unit 8 Canceling the demo display...8 About using AVNavigator (included CD-ROM 9 7 - Pioneer VSX-1122-K | Owner's Manual - Page 8
that you've received the following supplied accessories: ! Setup microphone (cable: 5 m (16.4 ft.)) ! Remote control unit ! AAA size IEC R03 dry cell batteries (to confirm system operation) x2 ! AM loop antenna ! FM wire antenna ! iPod cable ! CD-ROM ! Quick start guide ! Safety Brochure ! Warranty - Pioneer VSX-1122-K | Owner's Manual - Page 9
(delete) this receiver's AVNavigator, then install the AVNavigator of the other model. Deleting the AVNavigator You can use the following method to uninstall (delete) the AVNavigator from your PC. % Delete from the Control Panel of the PC. From the Start menu, click "Program" d "PIONEER CORPORATION - Pioneer VSX-1122-K | Owner's Manual - Page 10
Controls and displays Remote control...11 Display...13 Front panel...14 10 - Pioneer VSX-1122-K | Owner's Manual - Page 11
the remote control for the receiver. 1 2,3 4 5 6 7 8 5 5 9 10 RECEIVER ALL ZONE STBY SOURCE DISCRETE ON RCU SETUP BDR BD DVD DVR HDMI TV CD NET ADPT USB iPod CBL OPTION SAT TUNER INPUT SELECT STATUS RECEIVER INPUT VOLUME TV CONTROL CH VOL MUTE AUDIO PARAMETER VIDEO PARAMETER - Pioneer VSX-1122-K | Owner's Manual - Page 12
codes of desired devices can be registered in the remote control and button operations can be registered using the learning mode. 13 Switches the remote to control the receiver (used to select the white commands). Switch to perform operations in the main zone. Also use this button to set up surround - Pioneer VSX-1122-K | Owner's Manual - Page 13
45). ! Neo:6 - When one of the Neo:6 modes of the receiver is on, this lights to indicate Neo:6 processing (page 45). 19 Character display Displays various system information. 20 Remote control mode indicator Lights to indicate the receiver's remote control mode setting. (Not displayed when set to - Pioneer VSX-1122-K | Owner's Manual - Page 14
sensor Receives the signals from the remote control (page 8). 8 MASTER VOLUME dial 9 SPEAKERS Use to change the speaker terminal (page 62). 10 PHONES jack Use to connect headphones. When the headphones are connected, there is no sound output from the speakers. 11 Listening mode buttons ! AUTO - Pioneer VSX-1122-K | Owner's Manual - Page 15
23 Connecting an HDD/DVD recorder, BD recorder and other video sources 25 Connecting a satellite/cable receiver or other set-top box 26 Connecting other audio components 27 Connecting AM/FM antennas...27 MULTI-ZONE setup...28 Connecting to the network through LAN interface 29 Connecting - Pioneer VSX-1122-K | Owner's Manual - Page 16
receiver provides you with many connection possibilities, but it doesn't have to be difficult. This chapter explains the kinds of components you can connect to make up your home theater system. CAUTION ! Before making or changing the connections, switch off the power COMPONENT VIDEO AUDIO L ZONE 2 - Pioneer VSX-1122-K | Owner's Manual - Page 17
increases the bass sound to achieve more powerful sound reproduction. In this case, different depending on the input signal or listening mode. [A] 7.2 channel surround system (Front height) *Default setting can simultaneously enjoy 5.2-channel surround sound in the main zone with stereo playback of - Pioneer VSX-1122-K | Owner's Manual - Page 18
) ! Speaker System setting: Front Bi-Amp Bi-amping connection of the front speakers for high sound quality with 5.2-channel surround sound. Front Bi-Amp R L SW 1 SW 2 C SR SL [E] 5.2 channel surround system & ZONE 2 connection (Multi Zone) ! Speaker System setting: ZONE 2 With these connections you - Pioneer VSX-1122-K | Owner's Manual - Page 19
receiver comprises a positive (+) and negative (-) terminal. Make sure to match these up with the terminals on the speakers themselves. This unit supports back panel it may cause the power to cut off as a safety ZONE 2 R L (Single) FRONT HEIGHT / WIDE / R L B Note ! Please refer to the manual - Pioneer VSX-1122-K | Owner's Manual - Page 20
on the kind of speakers you're using. Front right High Bi-amp compatible speaker Bi-amp compatible speaker Front left High Low Low Bi-wiring your speakers Your speakers can also be bi-wired if they support bi-amping. ! With these connections, the Speaker System setting makes no difference - Pioneer VSX-1122-K | Owner's Manual - Page 21
back speaker terminals. See Bi-amping your speakers on page 20. 2 Select 'Front Bi-Amp' from the Speaker System menu. See Speaker system setting on page 80 to do this. ZONE 2 setup With these connections you can simultaneously enjoy 5.1-channel surround sound in the main zone with stereo playback on - Pioneer VSX-1122-K | Owner's Manual - Page 22
as there is no problem with displaying video this is not a malfunction. ! Depending on the component you have connected, using a DVI connection may result in unreliable signal transfers. ! This receiver supports SACD, Dolby Digital Plus, Dolby TrueHD and DTS-HD Master Audio. To take advantage of - Pioneer VSX-1122-K | Owner's Manual - Page 23
output on page 24). ! If you want to listen to the sound of the TV over the receiver, connect the receiver and TV with audio cables. - When the TV and receiver are connected by HDMI connections, if the TV supports the HDMI ARC (Audio Return Channel) function, the sound of the TV can be input to the - Pioneer VSX-1122-K | Owner's Manual - Page 24
(SAT/CBL) ! If you want to listen to the sound of the TV over the receiver, connect the receiver and TV with audio cables (page 23). - When the TV and receiver are connected by HDMI connections, if the TV supports the HDMI ARC (Audio Return Channel) function, the sound of the TV can be input to the - Pioneer VSX-1122-K | Owner's Manual - Page 25
digital input you connected the player to (see The Input Setup menu on page 35). Connecting an HDD/DVD recorder, BD recorder and other video sources This receiver has audio/video inputs suitable for connecting analog or digital video devices, including HDD/DVD recorders and BD recorders. When you - Pioneer VSX-1122-K | Owner's Manual - Page 26
examples of so-called 'set-top boxes'. When you set up the receiver you'll need to tell the receiver which input you connected the set-top box to (see The Input Setup menu on page 35). STB VIDEO OUT VIDEO Select one AUDIO OUT DIGITAL OUT R ANALOG L OPTICAL COAXIAL ! If your set-top box is - Pioneer VSX-1122-K | Owner's Manual - Page 27
audio components for playback. When you set up the receiver you'll need to tell the receiver which input you connected the component to (see also The Input Setup menu on page 35). CD player, etc. Select one AUDIO -amp best reception. 5 Connect the FM wire antenna into the FM antenna socket. For best - Pioneer VSX-1122-K | Owner's Manual - Page 28
the supplied AM loop antenna. For the best possible reception, suspend horizontally outdoors. Outdoor antenna ANTENNA AM LOOP Indoor antenna (vinyl-coated wire) 5 m to 6 m (16 ft. to 20 ft.) FM UNBAL 75 MULTI-ZONE setup This receiver can power up to two independent systems in separate rooms - Pioneer VSX-1122-K | Owner's Manual - Page 29
receiver to the network via the LAN terminal, you can listen to Internet radio stations. To listen to Internet radio stations, you must sign a contract with an ISP (Internet Service Provider) beforehand. When connected in this way, you can play audio manually. For details, see Network Setup menu - Pioneer VSX-1122-K | Owner's Manual - Page 30
's power is turned on.) ! For instructions on playing the iPod, see Playing an iPod on page 39. Connecting a USB device It is possible to play audio and photo files by connecting USB devices to this receiver. 5V 2.1 A iPod MCACC iPhone SETUP MIC VIDEO iPad USB HDMI 5 INPUT CONTROL - Pioneer VSX-1122-K | Owner's Manual - Page 31
the manual supplied with your IR receiver for the type of cable necessary for the connection. DC 5V Ethernet WPS Wireless LAN converter (AS-WL300) Connecting an IR receiver If you keep your stereo components in a closed cabinet or shelving unit, or you wish to use the sub zone remote control in - Pioneer VSX-1122-K | Owner's Manual - Page 32
Basic Setup Changing the OSD display language (OSD Language 33 Automatically conducting optimum sound tuning (Full Auto MCACC 33 The Input Setup menu...35 Operation Mode Setup...36 About the Home Menu...36 32 - Pioneer VSX-1122-K | Owner's Manual - Page 33
, if you connected this receiver to the VIDEO jacks on your TV, make sure that the VIDEO input is now selected). 2 Press on the remote control, then press HOME MENU. A Graphical User Interface (GUI) screen appears on your TV. Use i/j/k/l and ENTER to navigate through the screens and select - Pioneer VSX-1122-K | Owner's Manual - Page 34
Setup procedure is completed and the Home Menu menu reappears automatically. Be sure to disconnect the microphone from this receiver upon completion of the Full Auto MCACC Setup manually. Problems when using the Auto MCACC Setup If the room environment is not optimal for the Auto MCACC Setup - Pioneer VSX-1122-K | Owner's Manual - Page 35
on the remote control, then press HOME MENU. A Graphical User Interface (GUI) screen appears on your TV. Use i/j/k/l and ENTER to navigate through the screens and select menu items. Press RETURN to exit the current menu. 2 Select 'System Setup' from the Home Menu. 3 Select 'Input Setup' from the - Pioneer VSX-1122-K | Owner's Manual - Page 36
the remote control, then press HOME MENU. HOME MENU A/V RECEIVER 1. Advanced MCACC 2. MCACC Data Check 3. Data Management 4. System Setup 5. Network Information 6. Operation Mode Setup Exit Return A Graphical User Interface (GUI) screen appears on your TV. Use i/j/k/l and ENTER to navigate - Pioneer VSX-1122-K | Owner's Manual - Page 37
Basic playback Playing a source...38 Playing an iPod...39 Playing a USB device...40 Listening to the radio...41 Bluetooth ADAPTER for Wireless Enjoyment of Music 42 37 - Pioneer VSX-1122-K | Owner's Manual - Page 38
the front panel or by pressing HDMI on the remote control repeatedly. ! Set the HDMI parameter in Setting the Audio options on page 58 to THROUGH if you want to hear HDMI audio output from your TV (no sound will be heard from this receiver). ! If the video signal does not appear on your TV, try - Pioneer VSX-1122-K | Owner's Manual - Page 39
you can play all the songs by a particular artist. Basic playback controls This receiver's remote control buttons can be used for basic playback of files stored on an iPod. ! Press iPod USB to switch the remote control to the iPod/USB operation mode. TOP MENU ENTER RETURN DISP Switching the iPod - Pioneer VSX-1122-K | Owner's Manual - Page 40
this receiver. ! DRM-protected audio files cannot be played back on this receiver. Basic playback controls This receiver's remote control buttons can be used for basic playback of files stored on USB memory devices. ! Press iPod USB to switch the remote control to the iPod/USB operation mode. TOP - Pioneer VSX-1122-K | Owner's Manual - Page 41
receiver supports the following file formats. Note that some file formats are not available for playback although they are listed as playable file formats. Music files Category MP3 WAV WMA AAC FLAC Extension .mp3 MPEG-1 Audio to switch the receiver into mono reception mode. This should - Pioneer VSX-1122-K | Owner's Manual - Page 42
with Bluetooth wireless technology: Digital music player + Bluetooth audio transmitter (sold commercially) Remote control operation Music data This receiver Bluetooth® ADAPTER ! About one minute is required between turning the power on and completion of startup. Wireless music play When - Pioneer VSX-1122-K | Owner's Manual - Page 43
playlist directly on a supported device to play in your home theater through the unit. You and your friends can add songs from your devices to the playlist. Also Air Jam lets you delete the song before anyone has to hear it. 1 Press ADPT on the remote control to switch the receiver to ADAPTER PORT - Pioneer VSX-1122-K | Owner's Manual - Page 44
Listening to your system Enjoying various types of playback using the listening modes 45 Selecting MCACC presets...46 Choosing the input signal...46 Better sound using Phase Control 47 44 - Pioneer VSX-1122-K | Owner's Manual - Page 45
them. ! When listening to 2-channel sources in Neo:6 Cinema or Neo:6 Music mode, you can also adjust the center image effect (see Setting the Audio options on page 58). ! The stereo mode can also be selected by pressing the STEREO button on the remote control. ! When listening through headphones - Pioneer VSX-1122-K | Owner's Manual - Page 46
Auto level control mode (page 45 video game close to the TV). 1 Press to the receiver operation mode instruction manual supplied with your DVD player. 1 Press to the receiver operation mode audio output parameter is set to THROUGH, the sound will be heard through your TV, not from this receiver - Pioneer VSX-1122-K | Owner's Manual - Page 47
. ! For discs created with standards other than Phase Control, the LFE channel is delayed upon recording in the first place. Phase Control Plus function corrects for phase shifting on such discs. For instructions on setting the Phase Control Plus, see Setting the Audio options on page 58. ! If your - Pioneer VSX-1122-K | Owner's Manual - Page 48
Playback with NETWORK features Introduction...49 Playback with Network functions 50 About network playback...51 About playable file formats...53 48 - Pioneer VSX-1122-K | Owner's Manual - Page 49
Media Renderers). This receiver supports this DMR function. When in the DMR mode, such operations as playing and stopping files can be performed from the external controller. Volume adjustment and the muting control are also possible. The DMR mode is canceled if the remote control unit is operated - Pioneer VSX-1122-K | Owner's Manual - Page 50
remote control to the network operation mode. TOP MENU ENTER TOOLS +Favorite DISP RETURN / CLR Listening to Internet radio stations Internet radio is an audio broadcasting service not on the vTuner list from the special Pioneer site With the receiver, broadcast stations not included on the list - Pioneer VSX-1122-K | Owner's Manual - Page 51
disposing of the product, we recommend you reset it to delete the data. See Resetting the system on page 63. Pandora®, the leading internet radio service, gives people music they love anytime, anywhere, through personalized radio stations. Playing back audio files stored on components on the network - Pioneer VSX-1122-K | Owner's Manual - Page 52
home. supported depending on the server type or version used. ! Supported file formats vary by server. As such, files not supported PIONEER OR ITS CUSTOMER SERVICES REPRESENTATIVES WILL CREATE ANY SUCH WARRANTY. IN NO EVENT WILL PIONEER If there are problems within the network ). For best performance, - Pioneer VSX-1122-K | Owner's Manual - Page 53
About playable file formats The NETWORK feature of this receiver supports the following file formats. Note that some file .wav .wma .m4a .aac .3gp .3g2 .flac Stream MPEG-1 Audio Layer-3 Sampling frequency Quantization bitrate Channel Bitrate VBR/CBR LPCM WMA2/7/8/9 MPEG-4 AAC LC MPEG-4 HE AAC - Pioneer VSX-1122-K | Owner's Manual - Page 54
with HDMI function 55 Making Control with HDMI connections 55 HDMI Setup...55 Before using synchronization...55 About synchronized operations...56 Setting the PQLS function...56 About Auto Sound Retriever Link and Stream Smoother Link 56 Cautions on the Control with HDMI function 56 54 - Pioneer VSX-1122-K | Owner's Manual - Page 55
of this receiver as well as the connected Control with HDMI-compatible components in order to make use of the Control with HDMI function. For more information see the operating instructions for each component. 1 Press on the remote control, then press HOME MENU. 2 Select 'System Setup', then - Pioneer VSX-1122-K | Owner's Manual - Page 56
in the synchronized amp mode, you can adjust the receiver's volume or mute the sound using the TV's remote control. ! When in the synchronized amp mode, the synchronized amp mode is canceled when the receiver's power is turned off. To turn the synchronized amp mode back on, set audio to be played - Pioneer VSX-1122-K | Owner's Manual - Page 57
Using other functions Setting the Audio options...58 Setting the Video options...60 Switching the speaker terminals 62 Using the MULTI-ZONE controls...62 Using the sleep timer...63 Dimming the display...63 Checking your system settings...63 Resetting the system...63 57 - Pioneer VSX-1122-K | Owner's Manual - Page 58
and modulation. Also, when a player supporting the Auto Sound Retriever Link function is connected to the receiver by HDMI, by setting this to ON, the bitrate information of the compressed audio file being played on the ON player is acquired using the Control with HDMI function, and the sound is - Pioneer VSX-1122-K | Owner's Manual - Page 59
amp mode must be turned on in order to play the receiver's HDMI audio and video input signals from the TV with the receiver's power in the standby mode. See About synchronized operations on page 56. g This feature is only available when the connected display supports the automatic audio/video - Pioneer VSX-1122-K | Owner's Manual - Page 60
the receiver operation mode, then press VIDEO PARAMETER. 2 Use i/j to select the setting you want to adjust. Depending on the current status/mode of the receiver, player supporting Stream Smoother Link and connected to this unit by HDMI (assuming that integrated operation with the Control with - Pioneer VSX-1122-K | Owner's Manual - Page 61
CONTRAST HUE CHROMA (Chroma Level) BLK SETUP (Black Setup) What it does Adjusts the overall brightness. Option(s) c c -6 the signals are output with the same resolution as when input (see About the video converter on page 22). c ! This setting is valid for HDMI output. ! - Pioneer VSX-1122-K | Owner's Manual - Page 62
feature for a while, turn off the power in both the sub and main rooms so that this receiver is in standby. MULTI-ZONE remote controls Press the remote control's ZONE 2 to operate the ZONE 2. The following table shows the possible MULTI-ZONE remote controls: Button(s) u INPUT SELECT Input function - Pioneer VSX-1122-K | Owner's Manual - Page 63
See Input function default and possible settings on page 35. HDMI HDMI Audio Control Control Mode ARC (Audio Return Channel) PQLS Standby Through DSP Power On Level Volume Limit Mute Level Phase Control Auto Sound Retriever iPod/USB, INTERNET RADIO, SiriusXM, PANDORA, MUSIC SERVER - Pioneer VSX-1122-K | Owner's Manual - Page 64
Options Center Width Dimension Panorama Neo:6 Options Center Image 2 PL IIz Options Height Gain All Inputs Listening Mode (2 ch/multi ch) Listening Mode (Headphones) See also Setting the Audio options on page 58 for other default DSP settings. MCACC MCACC Position Memory Channel Level (M1 - Pioneer VSX-1122-K | Owner's Manual - Page 65
rest of your system About the Remote Setup menu...66 Operating multiple receivers...66 Setting the remote to control other components 66 Selecting preset codes directly...66 Programming signals from other remote controls 67 Erasing one of the remote control button settings 67 Erasing all learnt - Pioneer VSX-1122-K | Owner's Manual - Page 66
when using multiple receivers, provided they are of the same model as this receiver. The receiver to be operated is switched by inputting the preset code to set the remote control setting. ! Set the remote modes on the receivers before using this function (see Remote Control Mode Setup on page 84 - Pioneer VSX-1122-K | Owner's Manual - Page 67
other components (this has been tested with codes of Pioneer format only). Certain buttons represent operations that cannot be learned from other remote controls. The buttons available are shown below: RECEIVER ALL ZONE STBY SOURCE DISCRETE ON RCU SETUP BDR BD DVD DVR HDMI TV CD NET ADPT - Pioneer VSX-1122-K | Owner's Manual - Page 68
/receivers connected to sub zones to the standby mode, the connected amplifiers/receivers must be installed or connected in such a way that they can receive remote control signals. ! The power of the amplifiers/receivers can be switched to standby with this operation even when using multiple Pioneer - Pioneer VSX-1122-K | Owner's Manual - Page 69
TV to the TV button. RECEIVER ALL ZONE STBY SOURCE DISCRETE ON RCU SETUP BDR BD DVD DVR HDMI TV CD NET ADPT USB iPod CBL OPTION SAT TUNER INPUT SELECT STATUS RECEIVER INPUT VOLUME TV CONTROL CH VOL MUTE AUDIO PARAMETER VIDEO PARAMETER TOP MENU HOME MENU ENTER TOOLS MENU RETURN - Pioneer VSX-1122-K | Owner's Manual - Page 70
10 Audio/Video components Button(s) u SOURCE Number buttons LD POWER ON/OFF numerics !/CLR +10 ENTER (CLASS) i/j/k/l ENTER d e g m n o p AUDIO ENTER TOP MENU - i/j/k/l ENTER - RETURN d e g m n o p AUDIO DISP DISPLAY/INFO a Controls for MD. b Controls for SACD. CD/CD-R/SACD POWER ON/OFF - Pioneer VSX-1122-K | Owner's Manual - Page 71
The Advanced MCACC menu Making receiver settings from the Advanced MCACC menu 72 Automatic MCACC (Expert)...72 Manual MCACC setup...74 Checking MCACC Data...76 Data Management...77 71 - Pioneer VSX-1122-K | Owner's Manual - Page 72
field data manually. 1 Press u RECEIVER to switch on the receiver and your TV. Make sure that the TV's video input is set to this receiver. 2 Press on the remote control, then press HOME MENU. A Graphical User Interface (GUI) screen appears on your TV. Use i/j/k/l and ENTER to navigate through - Pioneer VSX-1122-K | Owner's Manual - Page 73
. 4 When you're finished setting the options, select START then press ENTER. 5 Follow the instructions on-screen. 6 Wait for the Auto MCACC Setup to finish outputting test tones. A progress report is displayed on-screen while the receiver outputs test tones to determine the speakers present in your - Pioneer VSX-1122-K | Owner's Manual - Page 74
Press HOME MENU to display the Home Menu before you connect the microphone to this receiver. ! See Problems when using the Auto MCACC Setup on you may not achieve using the Manual speaker setup on page 80. 1 Select 'Fine Channel Level' from the Manual MCACC setup menu. The volume increases to the - Pioneer VSX-1122-K | Owner's Manual - Page 75
settings cannot be changed during playback of sources using the HDMI connection. 1 Select 'Standing Wave' from the Manual MCACC setup menu. 2 Adjust the parameters for the Standing Wave Control. ! Filter Channel - Select the channel to which you will apply the filter(s): MAIN (all except center - Pioneer VSX-1122-K | Owner's Manual - Page 76
receiver best applied to all channels during calibration. Manual MCACC setup on page 74, you can check your calibrated settings using the GUI screen. 1 Press on the remote control, then press HOME MENU. A Graphical User Interface (GUI) screen appears on your TV. Use i/j/k/l and ENTER to navigate - Pioneer VSX-1122-K | Owner's Manual - Page 77
various channels set a video game close remote control, then press HOME MENU. A Graphical User Interface (GUI) screen appears on your TV. Use i/j/k/l and ENTER to navigate setup menu. Copying MCACC preset data If you want to manually adjust the Acoustic Calibration EQ (see Manual MCACC setup - Pioneer VSX-1122-K | Owner's Manual - Page 78
the MCACC presets stored in memory, you can choose to clear the calibration settings of that preset. 1 Select 'MCACC Memory Clear' from the Data Management setup menu. 2 Select the MCACC preset you want to clear. Make sure you don't clear an MCACC preset you're currently using (this can't be undone - Pioneer VSX-1122-K | Owner's Manual - Page 79
The System Setup and Other Setup menus Making receiver settings from the System Setup menu 80 Manual speaker setup...80 Network Setup menu...82 Checking the Network Information 83 The Other Setup menu...83 79 - Pioneer VSX-1122-K | Owner's Manual - Page 80
with this receiver. In addition to a normal home theater setup where they are used for the front height speakers or front wide speakers, they can be used for bi-amping the front speakers or as an independent speaker system in another room. 1 Select 'Speaker System' from the Manual SP Setup menu - Pioneer VSX-1122-K | Owner's Manual - Page 81
didn't connect surround back speakers choose NO. - If you selected ZONE 2 or Front Bi-Amp (in Speaker system setting on page 80) you can't adjust the Manual SP Setup menu. Note ! You can change the channel levels by press then using k/l on the remote control. to the receiver operation mode - Pioneer VSX-1122-K | Owner's Manual - Page 82
and Other Setup menus Network Setup menu Make the settings for connecting the receiver to the Internet and using the network functions. 1 Press on the remote control, then press HOME MENU. A Graphical User Interface (GUI) screen appears on your TV. Use i/j/k/l and ENTER to navigate through the - Pioneer VSX-1122-K | Owner's Manual - Page 83
settings in order: ! Auto Power Down - Sets the power to turn off automatically when the receiver is not being used. ! Volume Setup - Sets up the volume-related operations of this receiver (page 83). ! Remote Control Mode Setup - Sets this receiver's remote control mode (page 84). ! Software Update - Pioneer VSX-1122-K | Owner's Manual - Page 84
being used. 1 Select 'Remote Control Mode Setup' from the Other Setup menu. 2 Select the Remote Control Mode setting you want. 3 Select 'OK' to change the remote control mode. 4 Follow the instructions on the screen to change the remote control's setting. See Operating multiple receivers on page 66 - Pioneer VSX-1122-K | Owner's Manual - Page 85
FAQ Troubleshooting...86 Power...86 No sound...86 Other audio problems...87 ADAPTER PORT terminal...88 Video...88 Settings...88 Professional Calibration EQ graphical output 89 Display...89 Remote control...89 HDMI...89 AVNavigator...90 USB interface...90 iPod...91 Network...91 Wireless LAN...92 - Pioneer VSX-1122-K | Owner's Manual - Page 86
strands. The receiver may have a serious problem. Disconnect from the power and call a Pioneer authorized independent service company. During loud playback the power sud- Turn down the volume. denly switches off. Lower the 63 Hz and 125 Hz equalizer levels in the Manual MCACC setup on page 74 - Pioneer VSX-1122-K | Owner's Manual - Page 87
components connected to the same power source are not causing interference. Can't select some Input functions by the INPUT SELECTOR on the front panel or the INPUT SELECT button on the remote control. Check the Input Skip settings in the Input Setup menu (see The Input Setup menu on page 35 - Pioneer VSX-1122-K | Owner's Manual - Page 88
. Turn off all zones before pulling out the power cord.) When Operation Mode is set to Basic, the Pioneer-recommended settings are made and not all of the functions can be used. To use all of the functions without restrictions, set Operation Mode to Expert (see Operation Mode Setup on page 36). 88 - Pioneer VSX-1122-K | Owner's Manual - Page 89
Symptom Remedy Cannot be remote controlled. Set the remote control unit's remote control mode so that it matches the setting on the main unit (see Operating multiple receivers on page 66). Check whether the receiver's remote control mode is properly set (see Remote Control Mode Setup on page 84 - Pioneer VSX-1122-K | Owner's Manual - Page 90
damaged. Select ON for the Control Mode with HDMI setting (see HDMI Setup on page 55). Turn the TV's power on before turning on this receiver's power. Set the TV side Control with HDMI setting to on (see TV's operating instructions). AVNavigator Symptom AVNavigator cannot be installed. Causes An - Pioneer VSX-1122-K | Owner's Manual - Page 91
on the network. When in the DMR mode, depending on the external controller being used, playback may be interrupted when a volume operation is performed from the controller. In this case, adjust the volume from the receiver or remote control. There is a connection routed through There may - Pioneer VSX-1122-K | Owner's Manual - Page 92
Internet radio stations on this receiver (page 50). Press NET to set the remote control to the Network function mode (page 50). Wireless LAN Network cannot be accessed via wireless LAN. Wireless LAN converter's power is not on. (Wireless LAN converter's "Power", "WPS" and "Wireless" indicators - Pioneer VSX-1122-K | Owner's Manual - Page 93
set the SSID, etc., by making the wireless LAN converter settings on the receiver manually. The access point's security settings use WEP 152-bit length code key or shared key authentication. ! The receiver does not support WEP 152-bit length code key or shared key authentication. Network connections - Pioneer VSX-1122-K | Owner's Manual - Page 94
iPod...95 About SiriusXM...95 About FLAC...95 Auto Surround, ALC and Stream Direct with different input signal formats 96 Speaker Setting Guide...96 About messages displayed when using network functions 97 Important information regarding the HDMI connection 98 Cleaning the unit...98 Preset code - Pioneer VSX-1122-K | Owner's Manual - Page 95
broadcasts, and video cassettes. Dolby The patents issued & pending. DTS and the Symbol are registered trademarks, & DTS-HD, DTS-HD Master Audio, and terms at www.siriusxm.com. Canadian service available at www.sirius.ca or affect wireless performance. Apple, AirPlay, the AirPlay logo, iPad, iPhone, - Pioneer VSX-1122-K | Owner's Manual - Page 96
mode (see Using Stream Direct on page 46) you have selected. Stereo (2 channel As above As above Speaker Setting Guide In order to achieve an even receiver it is pos- sible to automatically correct the speaker distance electrically to a precision of 1 cm (0.5 inch) using the Full Auto MCACC Setup - Pioneer VSX-1122-K | Owner's Manual - Page 97
, even if standing waves are generated, their influence on the sound quality can be prevented using the Auto MCACC's standing wave control function (page 75). Step 5: Default settings with the Auto MCACC Setup (auto sound field correction) function It is more effective to perform the Full Auto MCACC - Pioneer VSX-1122-K | Owner's Manual - Page 98
convert the analog component video signal to a digital HDMI signal for transmission to the display. For this configuration, use the most convenient connection (digital is recommended) for sending audio to the receiver. See the operating instructions for more on audio connections. Note ! The picture - Pioneer VSX-1122-K | Owner's Manual - Page 99
channel audio coding system from DTS Inc. now widely used for DVD-Video, DVDAudio, 5.1 music discs, digital broadcasts, and video games. DTS-HD Master Audio DTS-HD Master Audio is a technology that delivers master audio Level Control) In the Auto level control (ALC) mode, this receiver equalizes - Pioneer VSX-1122-K | Owner's Manual - Page 100
the TV's remote control. ! The receiver's input switches over automatically when the TV's input is changed or a Control with HDMI- compatible component is played. ! The receiver's power is also set to standby, when the TV's power is set to standby. ARC (Audio Return Channel) When a TV supporting the - Pioneer VSX-1122-K | Owner's Manual - Page 101
, mobile phones, smartphones, text and audio information for PDAs, etc. Pairing " details, see also the operating instructions of your Bluetooth wireless technology device Receiver function Operation Mode This receiver is equipped with a great number of functions and settings. The Operation Mode - Pioneer VSX-1122-K | Owner's Manual - Page 102
(Expert) on page 72. Manual MCACC setup See Manual MCACC setup on page 74. PQLS See Setting the PQLS function on page 56. Phase Control See Better sound using Phase Control on page 47. Standing Wave See Setting the Audio options on page 58. Phase Control Plus See Setting the Audio options on page 58 - Pioneer VSX-1122-K | Owner's Manual - Page 103
W (HDMI Setup - Control : OFF) 0.3 W (HDMI Setup - Control : ON) Dimensions...435 mm (W) x 168 mm (H) x 362.5 mm (D) (17 3/16 in. (W) x 6 5/8 in. (H) x 14 5/16 in. (D)) Weight (without package)...9.9 kg (22 lb) Number of Furnished Parts MCACC Setup microphone...1 Remote control unit...1 AAA - Pioneer VSX-1122-K | Owner's Manual - Page 104
work for the model that you are using. There are also cases where only certain functions may be controllable after assigning the control, you can still teach the remote individual commands from another remote control (see Programming signals from other remote controls on page 67). TV Pioneer - Pioneer VSX-1122-K | Owner's Manual - Page 105
Fisher 2083 Funai 2091 GE 2016, 2077, 2080 GFM 2043 Go Video 2087 Gradiente 2068 Greenhill 2080 Haier 2094 Harman/Kardon 2030, 2084 Hitachi 2263, 2269 2276 VCR Pioneer 1035, 1108 ABS 1017 Adventura 1005 Aiwa 1005 Alienware 1017 American High 1004 Asha 1002 Audio Dynamics 1000 Audiovox 1003 Bang - Pioneer VSX-1122-K | Owner's Manual - Page 106
6074, 6073, 6072, 6029, 6122, 6094 MTS 6094 Myrio 6077, 6078 Noos 6040 Cassete Deck Pioneer 5058, 5059 Digital Tape Pioneer 5057 MD Pioneer 5056 Network Audio Player Pioneer 5063 Game X-Box 2313 AV Receiver Pioneer 5096 (ID 1), 5097 (ID 2), 5098 (ID 3), 5099 (ID 4), 106 United Cable 6072, 6122 US - Pioneer VSX-1122-K | Owner's Manual - Page 107
instructions, or accessories, please go to one of following URLs : Pour enregistrer votre produit, trouver le service après-vente agréé le plus proche et pour acheter des pièces de rechange, des modes PIONEER EUROPE NV Haven 1087, Keetberglaan 1, B-9120 Melsele, Belgium TEL: 03/570.05.11 PIONEER
-
 1
1 -
 2
2 -
 3
3 -
 4
4 -
 5
5 -
 6
6 -
 7
7 -
8
-
9
-
10
-
11
-
12
-
13
-
14
-
15
-
16
-
17
-
18
-
19
-
20
-
21
-
22
-
23
-
24
-
25
-
26
-
27
-
28
-
29
-
30
-
31
-
32
-
33
-
34
-
35
-
36
-
37
-
38
-
39
-
40
-
41
-
42
-
43
-
44
-
45
-
46
-
47
-
48
-
49
-
50
-
51
-
52
-
53
-
54
-
55
-
56
-
57
-
58
-
59
-
60
-
61
-
62
-
63
-
64
-
65
-
66
-
67
-
68
-
69
-
70
-
71
-
72
-
73
-
74
-
75
-
76
-
77
-
78
-
79
-
80
-
81
-
82
-
83
-
84
-
85
-
86
-
87
-
88
-
89
-
90
-
91
-
92
-
93
-
94
-
95
-
96
-
97
-
98
-
99
-
100
-
101
-
102
-
103
-
104
-
105
-
106
-
107
 |
 |

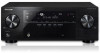
AV Receiver
VSX-1122
-K
Operating Instructions
Register your product on
http://www.pioneerelectronics.ca (Canada)
•
Protect your new investment
The details of your purchase will be on file for reference in the event of an insurance claim such as loss or theft.
•
Improve product development
Your input helps us continue to design products that meet your needs.
•
Receive a free Pioneer newsletter
Registered customers can opt in to receive a monthly newsletter.
•
Receive free tips, updates and service bulletins on your new product