Pioneer VSX-43 Owner's Manual - Page 28
to select a folder, then press - hdmi flashing
 |
View all Pioneer VSX-43 manuals
Add to My Manuals
Save this manual to your list of manuals |
Page 28 highlights
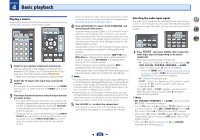
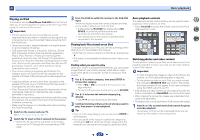
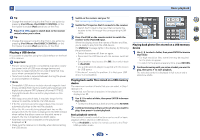
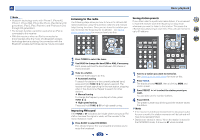
4 Basic playback Tip • Change the receiver's input to the iPod in one action by pressing iPod iPhone iPad DIRECT CONTROL on the front panel to enable iPod operations on the iPod. 2 Press iPod CTRL again to switch back to the receiver controls when you're done. Tip • Change the receiver's input to the iPod in one action by pressing iPod iPhone iPad DIRECT CONTROL on the front panel to enable iPod operations on the iPod. Playing a USB device It is possible to play files using the USB interface on the front of this receiver. Important • Pioneer cannot guarantee compatibility (operation and/or bus power) with all USB mass storage devices and assumes no responsibility for any loss of data that may occur when connected to this receiver. • About one minute is required between turning the power on and completion of startup. Note • Compatible USB devices include external magnetic hard drives, portable flash memory (particularly keydrives) and digital audio players (MP3 players) of format FAT16/32. • Copyrighted audio files cannot be played back on this receiver. • With large amounts of data, it may take longer for the receiver to read the contents of a USB device. • If the file selected cannot be played back, this receiver automatically skips to the next file playable. • When the file currently being played back has no title assigned to it, the file name is displayed in the OSD instead; when neither the album name nor the artist name is present, the row is displayed as a blank space. • Note that non-roman characters in the playlist are displayed as '#'. • Make sure the receiver is in standby when disconnecting the USB device. 1 Switch on the receiver and your TV. See Connecting a USB device on page 21. 2 Switch the TV input so that it connects to the receiver. • Switch the TV input to the input that connects this receiver to the TV through the corresponding HDMI cable. 3 Press iPod/USB on the remote control to switch the receiver to the iPod/USB input. When the display shows the names of folders and files, you're ready to play from the USB device. If a USB Error message lights in the display, try following the points below: • Switch the receiver off, then on again. • Reconnect the USB device with the receiver switched off. • Select another input source (like BD), then switch back to iPod/USB. • Use a dedicated AC adapter (supplied with the device) for USB power. If this doesn't remedy the problem, it is likely your USB device is incompatible. Playing back audio files stored on a USB memory device The maximum number of levels that you can select in Step 1 (below) is 9. • Note that non-Roman characters in the playlist are displayed as '#'. 1 Use / to select a folder, then press ENTER to browse that folder. • To return to the previous level any time, press RETURN. 2 Continue browsing until you arrive at what you want to play, then press to start playback. Basic playback controls This receiver's remote control buttons can be used for basic playback of files stored on USB devices. • Press iPod/USB to switch the remote control to the iPod/ USB operation mode. AUDIO PARAMETER TOP MENU TUNE TOOLS MENU PRESET PRESET ENTER HOME MENU PTY iPod CTRL TUNE BAND RETURN MUTE 1 2 3 DISP 4 5 6 CH 7 8 9 CH SHIFT 4 7 62 Playing back photo files stored on a USB memory device 1 Use / to select a folder, then press ENTER to browse that folder. • For high resolution files, some time may be required for the photo to appear. • To return to the previous level any time, press RETURN. 2 Continue browsing until you arrive at what you want to play, then press to start playback. The selected content is displayed in full screen and a slideshow starts. 28
-
 1
1 -
2
-
3
-
4
-
5
-
6
-
7
-
8
-
9
-
10
-
11
-
12
-
13
-
14
-
15
-
16
-
17
-
18
-
19
-
20
-
21
-
22
-
 23
23 -
 24
24 -
 25
25 -
 26
26 -
 27
27 -
 28
28 -
 29
29 -
 30
30 -
 31
31 -
 32
32 -
 33
33 -
34
-
35
-
36
-
37
-
38
-
39
-
40
-
41
-
42
-
43
-
44
-
45
-
46
-
47
-
48
-
49
-
50
-
51
-
52
-
53
-
54
-
55
-
56
-
57
-
58
-
59
-
60
-
61
-
62
-
63
-
64
-
65
-
66
-
67
-
68
 |
 |