Pioneer VSX-521-K Owner's Manual
Pioneer VSX-521-K Manual
 |
UPC - 884938133043
View all Pioneer VSX-521-K manuals
Add to My Manuals
Save this manual to your list of manuals |
Pioneer VSX-521-K manual content summary:
- Pioneer VSX-521-K | Owner's Manual - Page 1
us continue to design products that meet your needs. • Receive a free Pioneer newsletter Registered customers can opt in to receive a monthly newsletter. http://www.pioneerelectronics.com (US) http://www.pioneerelectronics.ca (Canada) Operating Instructions Mode d'emploi Manual de instrucciones - Pioneer VSX-521-K | Owner's Manual - Page 2
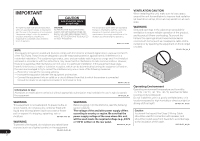
is intended to alert the user to the presence of important operating and maintenance (servicing) instructions in the literature accompanying the appliance. D3-4-2-1-1_A1_En NOTE: This equipment has been tested and found to comply with the limits for a Class B digital device, pursuant to Part - Pioneer VSX-521-K | Owner's Manual - Page 3
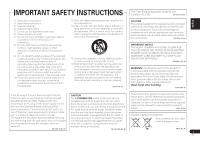
openings. Install in accordance with the manufacturer's instructions. 8) Do not install near servicing to qualified service personnel. Servicing is required when the apparatus has been damaged in any way, such as power cables and connectors for connections. D8-10-3a_A1_En IMPORTANT NOTICE THE MODEL - Pioneer VSX-521-K | Owner's Manual - Page 4
30 Manual speaker setup 30 Speaker Setting 30 Crossover Network 31 Channel Level 31 Speaker Distance 32 The Input Assign menu 32 The Pre Out Setting 33 The Auto Power Down menu 33 The FL Demo Mode menu 33 07 Control with HDMI function Making Control with HDMI connections 34 HDMI Setup 34 - Pioneer VSX-521-K | Owner's Manual - Page 5
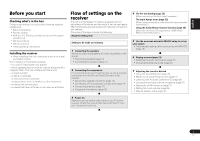
check that you've received the following supplied accessories: • Setup microphone • Remote control • AAA size IEC R03 dry cell batteries (to confirm system operation) x2 • AM loop antenna • FM wire antenna • These operating instructions Installing the receiver • When installing this unit, make sure - Pioneer VSX-521-K | Owner's Manual - Page 6
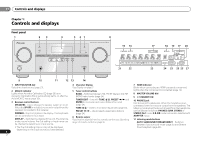
/ VIDEO MULTI- CHANNEL RECEIVER VSX-521 HDMI INPUT SELECTOR STANDBY /ON SPEAKERS DIMMER DISPLAY BAND TUNER EDIT TUNE PRESET AUTO SURROUND/ ALC/ STREAM DIRECT STANDARD SURR ADVANCED SURROUND SOUND RETRIEVER AIR SOUND RETRIEVER ENTER PHONES PORTABLE / MCACC SETUP MIC MASTER VOLUME - Pioneer VSX-521-K | Owner's Manual - Page 7
ADAPTER and the listening mode is automatically set to S.R AIR (page 23). 13 SOUND RETRIEVER Press to restore CD quality sound to compressed audio sources (page 26). 14 PORTABLE/MCACC SETUP MIC jack Use to connect an auxiliary component using a stereo minijack cable (page 18) or connect a microphone - Pioneer VSX-521-K | Owner's Manual - Page 8
3 DISP SB CH CH SELECT EQ 4 5 6 CH MIDNIGHT SPEAKERS LEV 7 8 9 DIMMER CLR 0 +10 LEV ENTER PHASE CH SHIFT 17 18 RECEIVER 8 En As for operating other devices, the remote control codes for the Pioneer products are preset. The settings cannot be changed. 1 SLEEP Press to change the - Pioneer VSX-521-K | Owner's Manual - Page 9
is selected, no sound is output from the speakers connected to this receiver. 30° 30° PHASE - Press to switch on/off Phase Control (page 27). DIMMER - Dims or brightens the display. The brightness can be controlled in four steps. 12 SOURCE Turns on or off the power of the Pioneer DVD/DVR units - Pioneer VSX-521-K | Owner's Manual - Page 10
be more directly behind the listener than for home theater playback. • If the surround speakers cannot be set directly to the side of the listening position with a 7.1-channel system, the surround effect can be enhanced by turning off the Up Mix function (see Setting the Up Mix function on page 27 - Pioneer VSX-521-K | Owner's Manual - Page 11
English Français Español Connecting the speakers The receiver will work with just two stereo speakers (the front speakers in the diagram) but using at least three speakers is recommended, and a complete setup is best for surround sound. Make sure you connect the speaker on the right to the right - Pioneer VSX-521-K | Owner's Manual - Page 12
power into standby. HDMI cables Both video and sound signals can be transmitted simultaneously with one cable. If connecting the player and the TV via this receiver, for both connections, use HDMI cables. HDMI Be careful to connect the terminal in the proper direction. Note • Set the HDMI parameter - Pioneer VSX-521-K | Owner's Manual - Page 13
distinguish them from cables for audio. Yellow VIDEO Component video cables Use component video cables to get the best possible color reproduction receiver is not loaded with a video converter. When you use component video cables or HDMI cables for connecting to the input device, the same cables - Pioneer VSX-521-K | Owner's Manual - Page 14
connect the receiver and TV with audio cables (as shown). - If the TV supports the HDMI Audio Return Channel function, the sound of the TV is input to the receiver via the HDMI terminal, so there is no need to connect an audio cable. In this case, set ARC at HDMI Setup to ON (see HDMI Setup on page - Pioneer VSX-521-K | Owner's Manual - Page 15
IN 2 (DVR/ BDR) L IN IN MONITOR OUT Y PB PR COMPONENT VIDEO TV/SAT BD R SUBWOOFER DVD PRE OUT Class 2 Wiring SPEAKERS A Connecting a satellite receiver or other digital set-top box Satellite and cable receivers, and terrestrial digital TV tuners are all examples of so-called 'settop boxes - Pioneer VSX-521-K | Owner's Manual - Page 16
. See the manuals that came with your TV and source component to check whether they are compatible with progressive-scan video. • For the audio connection, refer to Connecting your component with no HDMI terminal on page 15. Important • If you connect any source component to the receiver using - Pioneer VSX-521-K | Owner's Manual - Page 17
is connected to this receiver using a coaxial cable, first, switch to the CD-R input, then press SIGNAL SEL to choose the audio signal C1 (COAXIAL1) (see Selecting the audio input signal on page 21). Connecting optional Bluetooth® ADAPTER When the Bluetooth ADAPTER (Pioneer Model No. AS-BT100 or - Pioneer VSX-521-K | Owner's Manual - Page 18
via the front panel using the INPUT SELECTOR or PORTABLE button on the remote control. Use a stereo mini-jack cable to connect a digital audio player, etc. PRESET ENTER SOUND RETRIEVER MASTER VOLUME PORTABLE / MCACC SETUP MIC This receiver AUDIO OUT Digital audio player, etc. Plugging in the - Pioneer VSX-521-K | Owner's Manual - Page 19
Setting 5.HDMI Setup 6.Auto Power Down 7.FL Demo Mode Return • MIC IN blinks when the microphone is not connected to MCACC SETUP MIC jack. Try to be as quiet as possible after pressing ENTER. The system outputs a series of test tones to establish the ambient noise level. 6 Follow the instructions - Pioneer VSX-521-K | Owner's Manual - Page 20
does not need to be changed. Other problems when using the Auto MCACC setup If the room environment is not optimal for the Auto MCACC setup (too much background noise, echo off the walls, obstacles blocking the speakers from the microphone) the final settings may be incorrect. Check for household - Pioneer VSX-521-K | Owner's Manual - Page 21
Basic playback 04 Chapter 4: Basic playback Playing a source Here are the basic instructions for playing a source (such as a DVD disc) with your home theater system. RECEIVER SLEEP TV SOURCE CONTROL RECEIVER INPUT SELECT BD DVD TV DTV/TV INPUT AUTO/ ALC/ BD MENU DIRECT STEREO STANDARD - Pioneer VSX-521-K | Owner's Manual - Page 22
, refer to the instruction manual supplied with your DVD player. Tip • In order to enjoy the picture and/or sound from devices connected to DVD COMPONENT VIDEO 22 En This receiver Remote control operation Wireless music play When the Bluetooth ADAPTER (Pioneer Model No. AS-BT100 or AS-BT200 - Pioneer VSX-521-K | Owner's Manual - Page 23
Bluetooth ADAPTER. • To enable Bluetooth communication, pairing should be done with both of your system and Bluetooth wireless technology device. • If the Bluetooth wireless technology device's security code is "0000", there is no need to make the security code setting on the receiver. Press ADAPTER - Pioneer VSX-521-K | Owner's Manual - Page 24
can memorize up to 30 stations. RECEIVER SLEEP TV SOURCE CONTROL RECEIVER INPUT SELECT DTV/TV INPUT BD DVD TV DVR/BDR CD CD-R CH AUDIO PARAMETER TOP MENU TUNE TUNER EDIT MASTER TOOLS VOLUME MENU ENTER HOME MENU SETUP TUNE BAND RETURN MUTE ADAPTER TUNER PORTABLE BASS TRE VIDEO - Pioneer VSX-521-K | Owner's Manual - Page 25
settings and status of the receiver. sound. However, the options available will depend on your speaker setup Level Control stereo mode), this unit equalizes playback sound levels if each sound left and right speakers (and possibly your subwoofer depending on your speaker settings). Dolby Digital - Pioneer VSX-521-K | Owner's Manual - Page 26
are heard according to the settings made in the Manual SP Setup (speaker setting, channel level, speaker distance), as well as with dual mono settings. You will hear sources according to the number of channels in the signal. Phase Control, Acoustic Calibration EQ, Sound Delay, Auto Delay, LFE - Pioneer VSX-521-K | Owner's Manual - Page 27
' and an unreliable sound image will be produced. • If your subwoofer has a phase control switch, set it to the plus (+) sign (or 0°). However, the effect you can actually feel when Phase Control is set to ON on this receiver depends on the type of your subwoofer. Set your subwoofer to maximize the - Pioneer VSX-521-K | Owner's Manual - Page 28
with an HDMI cable. The video delay time is automatically adjusted according to the audio delay time. C.WIDTH (Center Width)h (Applicable only when using a center speaker) Spreads the center channel between the front right and left speakers, making it sound wider (higher settings) or narrower - Pioneer VSX-521-K | Owner's Manual - Page 29
You shouldn't have any problems using this with most SACD discs, but if the sound distorts, it is best to switch the gain setting back to 0 dB. g. This feature is only available when the connected display supports the automatic audio/video synchronizing capability ('lip-sync') for HDMI. If you find - Pioneer VSX-521-K | Owner's Manual - Page 30
(see The Pre Out Setting on page 33). • HDMI Setup - Sets synchronized operations when connected to a device/TV that supports the Control with HDMI function (see HDMI Setup on page 34). • Auto Power Down - Sets to automatically turn off the power when the receiver has not operated for several - Pioneer VSX-521-K | Owner's Manual - Page 31
factor when setting up a home theater system. 1 Select 'Manual SP Setup' from the System Setup menu. 2 Select 'Channel Level' from the Manual SP Setup menu. 2.Manual SP Setup a.Speaker Setting b.Crossover Network c.Channel Level d.Speaker Distance 2c.Channel Level Test Tone Manual Return ENTER - Pioneer VSX-521-K | Owner's Manual - Page 32
Manual SP Setup menu. Tip • You can change the channel levels at any time by press RECEIVER , then press CH SELECT and LEV +/- on the remote control. You can also press CH SELECT and use / to select the channel, and then use / to adjust the channel levels. 32 En Speaker Distance For good sound - Pioneer VSX-521-K | Owner's Manual - Page 33
turn off the receiver after a specified time has passed (when the power has been on with no operation for several hours. • Default setting: OFF 1 Select 'Auto Power Down' from the System Setup menu. System Setup 1 . Auto MCACC 2 . Manual SP Setup 3 . Input Assign 4 . Pre Out Setting 5 . HDMI Setup - Pioneer VSX-521-K | Owner's Manual - Page 34
component of another make that supports the Control with HDMI functions are possible when the component is connected to the receiver using an HDMI cable. • Synchronized amp mode The receiver's volume can be set and the sound can be muted using the TV's remote control. • Power synchronization with TV - Pioneer VSX-521-K | Owner's Manual - Page 35
is connected to a TV of a brand other than Pioneer that supports the Control with HDMI function. (Depending on the TV, however, some of the Control with HDMI functions may not work.) • When the TV's power is set to standby, the receiver's power is also set to standby. (Only when the input for - Pioneer VSX-521-K | Owner's Manual - Page 36
instruction manual supplied with the TV. No sound from subwoofer. Make sure the subwoofer is switched on. If the subwoofer has a volume knob, make sure it's turned up. The Dolby Digital or DTS source you are listening to may not have an LFE channel. Switch the subwoofer setting in Speaker - Pioneer VSX-521-K | Owner's Manual - Page 37
HDMI function. Check the HDMI connections. The cable may be damaged. Select ON for the Control with HDMI setting (see HDMI Setup on page 34). Turn the TV's power on before turning on this receiver's power. Set the TV side Control with HDMI setting to on (see TV's operating instructions - Pioneer VSX-521-K | Owner's Manual - Page 38
in the display to indicate that the receiver has been reset to the factory default settings. Cleaning the unit • Use a Microphone (for Auto MCACC setup 1 Remote control 1 Dry cell batteries (AAA size IEC R03 2 AM loop antenna 1 FM wire antenna 1 These operating instructions Note • Specifications - Pioneer VSX-521-K | Owner's Manual - Page 39
of Dolby Laboratories. Published by Pioneer Corporation. Copyright © 2010 Pioneer Corporation. All rights reserved. Manufactured setting your equipment at a safe level BEFORE your hearing adapts. ESTABLISH A SAFE LEVEL: • Set your volume control at a low setting. • Slowly increase the sound - Pioneer VSX-521-K | Owner's Manual - Page 40
NE PAS ENLEVER LE COUVERCLE (NI LE PANNEAU ARRIÈRE). AUCUNE PIÈCE RÉPARABLE PAR L'UTILISATEUR NE SE TROUVE À L'INTÉRIEUR. forte lumière artificielle). D3-4-2-1-7c*_A1_Fr PRÉCAUTION DE VENTILATION Lors de l'installation de l'appareil, veillez à laisser un espace suffisant autour de ses parois de - Pioneer VSX-521-K | Owner's Manual - Page 41
és par un personnel de service qualifié. En cas de tension. Par conséquent, veillez à installer l'appareil de telle manière que son votre système auditif peut en effet s'adapter à des volumes supérieurs, et ce qui utilisation dans les situations pouvant s'avérer dangereuses. N'utilisez pas des - Pioneer VSX-521-K | Owner's Manual - Page 42
l'ADAPTATEUR Bluetooth et du périphérique à technologie sans fil Bluetooth 23 Écoute de contenus Bluetooth d'un périphérique à technologie sans fil Bluetooth avec Auto Power Down 33 Le menu FL Demo Mode 33 07 Fonction Control HDMI Connexions pour la fonction Control HDMI 34 Menu HDMI Setup 34 - Pioneer VSX-521-K | Owner's Manual - Page 43
: • Microphone de configuration Installation du récepteur • Lors de l'installation de est un récepteur AV à part entière Channel (page 34) (Lorsque le téléviseur connecté prend en charge la fonction HDMI Audio Return Channel Sound Retriever (page 26) • Un meilleur son grâce à la fonction Phase Control - Pioneer VSX-521-K | Owner's Manual - Page 44
CHANNEL RECEIVER VSX-521 HDMI INPUT SELECTOR STANDBY /ON SPEAKERS DIMMER DISPLAY BAND TUNER EDIT TUNE PRESET AUTO SURROUND/ ALC/ STREAM DIRECT STANDARD SURR ADVANCED SURROUND SOUND RETRIEVER AIR SOUND RETRIEVER ENTER PHONES PORTABLE / MCACC SETUP l'entrée ADAPTER est utilisée). - Pioneer VSX-521-K | Owner's Manual - Page 45
SOUND RETRIEVER AIR Cette touche permet de commuter vers l'entrée ADAPTER section PORTABLE/MCACC SETUP MIC activé. Permet tectée. microphone pendant la touche Phase Control est HDMI - S'allume lorsqu'un signal HDMI est sélectionné. Clignote lorsqu'un signal HDMI est sélectionné et que l'entrée HDMI - Pioneer VSX-521-K | Owner's Manual - Page 46
MENU SETUP ENTER TUNE BAND RETURN MUTE 10 BASS TRE 14 15 16 11 HDD 1 DVD 2 VCR 3 DISP SB CH CH SELECT EQ 4 5 6 CH MIDNIGHT SPEAKERS LEV 7 8 9 DIMMER CLR 0 +10 LEV ENTER PHASE CH SHIFT 17 18 RECEIVER Les codes de la télécommande sont préréglés pour les produits Pioneer si - Pioneer VSX-521-K | Owner's Manual - Page 47
Hz, le niveau du canal de subwoofer peut être ajusté à l'aide fonctions après avoir appuyé sur la touche RECEIVER . (Par exemple, MIDNIGHT, etc.) HDD*, Loudness (page 28). SPEAKERS - Utilisez cette touche CONTROL Ces touches de commande peuvent être utilisées uniquement avec les téléviseurs Pioneer - Pioneer VSX-521-K | Owner's Manual - Page 48
Installation des enceintes Un système surround de type 5.1 peut être obtenu en connectant les enceintes avant gauche et droite (L/R), l'enceinte centrale (C), les enceintes surround gauche et droite (SL/SR) et le subwoofer d'installation des enceintes L'emplacement des enceintes dans la pièce - Pioneer VSX-521-K | Owner's Manual - Page 49
LEVEL INPUT English Français Español HDMI DVR/BDR IN DVD IN BD IN IN OUT DVR/ BDR OUT IN 1 (DVD) ASSIGNABLE IN DVD IN IN L ADAPTER PORT (Single) (OUTPUT 5 V PRE OUT 0.1 A MAX) R ANTENNA FM CD TV/SAT BD R DVD SUBWOOFER PRE OUT Class 2 Wiring SPEAKERS A SURROUND RL Surround droite - Pioneer VSX-521-K | Owner's Manual - Page 50
synchronisé avec les équipements dotés de la fonction d'Control HDMI (voir la section Fonction Control HDMI à la page 34) Remarque • Utilisez un câble High Speed HDMI®. L'utilisation d'un câble HDMI de type autre que High Speed HDMI® peut causer des dysfonctionnements. • L'utilisation d'un câble - Pioneer VSX-521-K | Owner's Manual - Page 51
À propos du raccordement des sorties vidéo 02 Ce récepteur ne comporte pas de convertisseur vidéo. Les câbles vidéo en composantes ou les câbles HDMI que vous utilisez pour le raccordement à l'appareil d'entrée doivent également servir pour le raccordement au téléviseur. Les signaux des entrées vid - Pioneer VSX-521-K | Owner's Manual - Page 52
IN L ADAPTER PORT (Single) (OUTPUT 5 V PRE OUT 0.1 A MAX) R ANTENNA FM CD UNBAL 75 L AM LOOP IN R FRONT L R CEN IN 2 (DVR/ BDR) L IN IN MONITOR OUT Y PB PR COMPONENT VIDEO TV/SAT BD R SUBWOOFER DVD PRE OUT Class 2 Wiring SPEAKERS A Lecteur Blu-ray Disc compatible HDMI/DVI - Pioneer VSX-521-K | Owner's Manual - Page 53
en composantes à la page 16. HDMI DVR/BDR IN DVD IN BD IN DVR/ BDR OUT IN 1 (DVD) ASSIGNABLE IN DVD IN IN L ADAPTER PORT (Single) (OUTPUT 5 V PRE OUT 0.1 A MAX) R ANTENNA COMPONENT VIDEO TV/SAT BD R SUBWOOFER DVD PRE OUT Class 2 Wiring SPEAKERS A Raccordement d'un récepteur satellite - Pioneer VSX-521-K | Owner's Manual - Page 54
sortis au niveau de la borne analogique. HDMI DVR/BDR IN DVD IN BD IN VIDEO DVR/ BDR OUT IN 1 (DVD) ASSIGNABLE IN DVD IN IN L ADAPTER PORT (Single) (OUTPUT 5 V PRE OUT 0.1 A MAX) R ANTENNA VIDEO TV/SAT BD R SUBWOOFER DVD PRE OUT Class 2 Wiring SPEAKERS A R L ANALOG AUDIO IN - Pioneer VSX-521-K | Owner's Manual - Page 55
l'ADAPTATEUR Bluetooth (modèle Pioneer nº ASBT100 ou AS-BT200) est raccordé à cet appareil, un produit équipé de la technologie sans fil Bluetooth (téléphone portable, lecteur de musique numérique, etc.) peut être utilisé pour écouter de la musique sans fil. Connectez la clé Bluetooth ADAPTER à la - Pioneer VSX-521-K | Owner's Manual - Page 56
SOUND RETRIEVER MASTER VOLUME PORTABLE / MCACC SETUP le remplacement auprès du service après-vente agréé Pioneer le plus proche. • Control HDMI est réglée sur OFF, vous pouvez sauter cette procédure. Pour plus d'informations sur la fonction d'Control HDMI, voir la section Fonction Control HDMI - Pioneer VSX-521-K | Owner's Manual - Page 57
'Auto MCACC' dans le System Setup, puis appuyez sur ENTER. System Setup 1.Auto MCACC 2.Manual SP Setup 3.Input Assign 4.Pre Out Setting 5.HDMI Setup 6.Auto Power Down 7.FL Demo Mode Return • MIC IN clignote lorsque le microphone n'est pas raccordé à la prise MCACC SETUP MIC. Veillez à faire le - Pioneer VSX-521-K | Owner's Manual - Page 58
illustré cidessous. 1.Auto MCACC Now Analyzing Surround Analyzing Speaker System Speaker Distance Channel Level Acoustic Cal EQ Return Un rapport de progression apparaît à l'écran pendant que le récepteur émet davantage de tonalités de test afin de déterminer les réglages optimum du récepteur - Pioneer VSX-521-K | Owner's Manual - Page 59
home cinéma. RECEIVER SLEEP TV SOURCE CONTROL RECEIVER INPUT SELECT BD DVD TV DTV/TV INPUT AUTO/ ALC/ BD MENU DIRECT STEREO STANDARD ADV SURR AUDIO PARAMETER TOP MENU TUNER EDIT MASTER TOOLS VOLUME TUNE MENU ENTER PRESET DVR/BDR CD CD-R CH ADAPTER TUNER PORTABLE HOME MENU SETUP - Pioneer VSX-521-K | Owner's Manual - Page 60
Les signaux compatibles via les bornes HDMI sont les suivants : Dolby Digital IN OUT L ADAPTER PORT (Single) (OUTPUT 5 V PRE OUT 0.1 A MAX) ADAPTER R FM Bluetooth (modèle Pioneer nº ASBT100 ou Bluetooth de type SCMS-T. • Il peut s'avérer nécessaire que le périphérique optimis - Pioneer VSX-521-K | Owner's Manual - Page 61
l'aide de la touche SOUND RETRIEVER AIR du panneau avant. Dans ce cas, le mode d'écoute optimale S.R AIR est automatiquement sélectionné. 2 Effectuez la procédure de connexion du périphérique sans fil Bluetooth vers la clé l'ADAPTATEUR Bluetooth. • Si la clé Bluetooth ADAPTER n'est pas branchée sur - Pioneer VSX-521-K | Owner's Manual - Page 62
mémoriser jusqu'à 30 stations. RECEIVER SLEEP TV SOURCE CONTROL RECEIVER INPUT SELECT BD DVD TV DTV/TV INPUT DVR/BDR CD CD-R CH AUDIO PARAMETER TOP MENU TUNE TUNER EDIT MASTER TOOLS VOLUME MENU ENTER HOME MENU SETUP TUNE BAND RETURN MUTE ADAPTER TUNER PORTABLE BASS TRE VIDEO - Pioneer VSX-521-K | Owner's Manual - Page 63
SURROUND/ ALC/ STREAM DIRECT STANDARD SURR ADVANCED SURROUND SOUND RETRIEVER AIR SOUND RETRIEVER • Le mode d'écoute sélectionné est affich sur les formats de décodage). • Lorsque la source sélectionnée est ADAPTER, la fonction S.R AIR est sélectionnée automatiquement (pour plus d'informations, - Pioneer VSX-521-K | Owner's Manual - Page 64
enceintes avant gauche et droite. Enceinte avant Enceinte avant gauche droite S.R AIR (Sound Retriever AIR) PHONES SURR Cette option est adaptée à l'écoute d'un contenu audio à partir d'un périphérique sans fil Bluetooth. Le mode d'écoute S.R AIR peut seulement être sélectionné avec la source - Pioneer VSX-521-K | Owner's Manual - Page 65
RECEIVER SLEEP TV SOURCE CONTROL HDD 1 4 DVD 2 VCR 3 DISP SB CH CH SELECT EQ 5 6 CH RECEIVER INPUT SELECT DTV/TV INPUT MIDNIGHT SPEAKERS LEV 7 8 9 PHASE CH S Appuyez sur la touche RECEIVER exemple, avec les supports 5.1 encodés). Avec les La fonction Up Mix s'avère d'une grande - Pioneer VSX-521-K | Owner's Manual - Page 66
RECEIVER SLEEP TV SOURCE CONTROL AUDIO PARAMETER TOP MENU TUNER EDIT MASTER TOOLS VOLUME TUNE MENU PRESET PRESET RECEIVER INPUT SELECT DTV/TV INPUT BD DVD TV ENTER HOME MENU SETUP TUNE BAND RETURN 1 Appuyez sur RECEIVER MIDNIGHT LOUDNESS S.RTV (Sound Retriever)b Lorsque des donn - Pioneer VSX-521-K | Owner's Manual - Page 67
Sound Retriever à l'aide de la touche S.RETRIEVER. c. Le réglage par défaut lorsque l'entrée ADAPTER est éo automatique ('synchronisation labiale') pour HDMI. Si le délai d'attente param RECEIVER SLEEP TV SOURCE CONTROL RECEIVER INPUT SELECT BD DVD TV DTV/TV INPUT DVR/BDR CD CD-R CH ADAPTER - Pioneer VSX-521-K | Owner's Manual - Page 68
'Manual SP Setup' sur le menu System Setup. 2 Sélectionnez 'Speaker Setting' sur le menu Manual SP Setup. 2.Manual SP Setup a.Speaker Setting b.Crossover Network c.Channel Level d.Speaker Distance 2a.Speaker Setting Front SMALL Center [ SMALL ] Surr [ SMALL ] Surr. Back [ NO ] Subwoofer - Pioneer VSX-521-K | Owner's Manual - Page 69
graves sont envoyées vers le subwoofer. • Si les enceintes surround Manual SP Setup' sur le menu System Setup. 2 Sélectionnez 'Channel Level' sur le menu Manual SP Setup. 2.Manual SP Setup a.Speaker Setting b.Crossover Network c.Channel Level d.Speaker Distance 2c.Channel Level Test Tone Manual - Pioneer VSX-521-K | Owner's Manual - Page 70
sur le menu System Setup. 2 Sélectionnez 'Speaker Distance' sur le menu Manual SP Setup. 2.Manual SP Setup a.Speaker Setting b.Crossover Network c.Channel Level d.Speaker Distance Return 2d.Speaker Distance Front L Center Front R Surround R Surr. Back R Surr. Back L Surround L Subwoofer 10.0 ft - Pioneer VSX-521-K | Owner's Manual - Page 71
é, appuyez sur RETURN. Vous retournez au menu de configuration du système. System Setup 1 . Auto MCACC 2 . Manual SP Setup 3 . Input Assign 4 . Pre Out Setting 5 . HDMI Setup 6 . Auto Power Down 7 . FL Demo Mode 4.Pre Out Setting Pre Out Surr. Back Le menu FL Demo Mode Permet de définir si les - Pioneer VSX-521-K | Owner's Manual - Page 72
sur RECEIVER , puis sur SETUP. SETUP à tout moment pour sortir du menu System Setup. 4 Sélectionnez 'HDMI Setup' sur le menu System Setup. System Setup 1 . Auto MCACC 2 . Manual SP Setup 3 . Input Assign 4 . Pre Out Setting 5 . HDMI Setup 6 . Auto Power Down 7 . FL Demo Mode 5.HDMI Setup Control - Pioneer VSX-521-K | Owner's Manual - Page 73
Pioneer. English Français Español Recommandations concernant la fonction 07 Control HDMI • Connectez le téléviseur et les autres équipements (lecteur Blu-ray Disc, etc.) directement à votre récepteur. L'interruption d'un raccordement direct avec d'autres amplificateurs ou un convertisseur AV - Pioneer VSX-521-K | Owner's Manual - Page 74
l'appareil, rallumez le récepteur. Si le message persiste, appelez le service après-vente agréé Pioneer. L'appareil se met soudainement sous tension ou hors tension, ou l'entrée permute soudainement (lorsque la fonction Control HDMI est activée). Ceci est causé par le mode de fonctionnement - Pioneer VSX-521-K | Owner's Manual - Page 75
érations synchronisées ne fonctionnent pas avec la fonction Control HDMI. Vérifiez les liaisons HDMI. Le câble est peut-être endommagé. Activez la fonction d'Control HDMI sur l'appareil en sélectionnant ON (consultez la section Menu HDMI Setup à la page 34). Mettez le téléviseur sous tension - Pioneer VSX-521-K | Owner's Manual - Page 76
. 3 Lorsque RESET? apparaît à HDMI 5 V, 100 mA Prise ADAPTER PORT 5 V, 100 mA Divers Alimentation 120 V c.a., 60 Hz Consommation électrique 415 W En veille 0,4 W (Contol HDMI désactivé) Dimensions 435 mm (L) x 168 mm (H) x 362,5 mm (P) Poids (sans emballage 9,0 kg Pièces fournies Microphone - Pioneer VSX-521-K | Owner's Manual - Page 77
08 39 Fr English Français Español - Pioneer VSX-521-K | Owner's Manual - Page 78
ni en lugares expuestos a alta humedad o a la luz directa del sol (o de otra luz artificial potente). D3-4-2-1-7c*_A1_Es PRECAUCIÓN PARA LA VENTILACIÓN Cuando instale este aparato, asegúrese de dejar espacio en torno al mismo para la ventilación con el fin de mejorar la disipación de calor (por lo - Pioneer VSX-521-K | Owner's Manual - Page 79
se adapta a la toma de corriente de CA que usted desea utilizar, deberá cambiar la clavija por otra que se adapte apropiadamente. El reemplazo y montaje de una clavija del cable de alimentación de CA sólo deberá realizarlos personal de servicio técnico cualificado. Si se enchufa la clavija cortada - Pioneer VSX-521-K | Owner's Manual - Page 80
ón de la señal de entrada de audio 21 Bluetooth® ADAPTER para el disfrute inalámbrico de la música 22 Reproducción inalámbrica de música Out 33 El menú Auto Power Down 33 El menú FL Demo Mode 33 07 Función de Control con HDMI Conexiones de Control con HDMI 34 HDMI Setup 34 Antes de usar la - Pioneer VSX-521-K | Owner's Manual - Page 81
manual de instrucciones Organigrama de ajustes del receptor Este equipo es un receptor AV Return Channel (página 34) (Cuando el televisor soporta la función HDMI Audio Return Channel.) del sonido • Uso de Sound Retriever (página 26) • Sonido mejorado con Phase Control (página 27) • Reproducción - Pioneer VSX-521-K | Owner's Manual - Page 82
CHANNEL RECEIVER VSX-521 HDMI INPUT SELECTOR STANDBY /ON SPEAKERS DIMMER DISPLAY BAND TUNER EDIT TUNE PRESET AUTO SURROUND/ ALC/ STREAM DIRECT STANDARD SURR ADVANCED SURROUND SOUND RETRIEVER AIR SOUND RETRIEVER ENTER PHONES PORTABLE / MCACC SETUP Botones de control del ADAPTER - Pioneer VSX-521-K | Owner's Manual - Page 83
pulsa el botón, la entrada cambia a ADAPTER (ADAPTADOR) y el modo de escucha se ajusta automáticamente a S.R AIR (página 23). 13 SOUND RETRIEVER Púlselo para restaurar el sonido con calidad de CD a fuentes de audio comprimidas (página 26). 14 Conector PORTABLE/MCACC SETUP MIC Úselo para conectar un - Pioneer VSX-521-K | Owner's Manual - Page 84
TUNE MENU PRESET PRESET 9 HOME MENU SETUP ENTER TUNE BAND RETURN MUTE 10 BASS TRE 14 15 16 11 HDD 1 DVD 2 VCR 3 DISP SB CH CH SELECT EQ 4 5 6 CH MIDNIGHT SPEAKERS LEV 7 8 9 DIMMER CLR 0 +10 LEV ENTER PHASE CH SHIFT 17 18 RECEIVER En cuanto al funcionamiento de - Pioneer VSX-521-K | Owner's Manual - Page 85
subwoofer se ajustará pulsando BASS -/+ (página 31). 11 Botones numéricos y otros controles RECEIVER . (Por ejemplo MIDNIGHT, etc.) HDD*, DVD*, VCR* - Estos botones alternan entre los controles 28). SPEAKERS - Ú CONTROL Estos botones de control sólo se pueden emplear con televisores Pioneer Instale - Pioneer VSX-521-K | Owner's Manual - Page 86
6.1 canales. Para obtener el mejor sonido envolvente posible, instale los altavoces como se indica a continuación. Sistema de la altura del oído. No se recomienda colocar los altavoces en el suelo (excepto el subwoofer) ni instalarlos a gran altura en la pared. • Para optimizar el efecto estéreo, - Pioneer VSX-521-K | Owner's Manual - Page 87
IN DVD IN IN L ADAPTER PORT (Single) (OUTPUT 5 V PRE OUT 0.1 A MAX) R ANTENNA FM CD UNBAL 75 L AM LOOP IN R FRONT L R CENTER IN 2 (DVR/ BDR) L IN IN MONITOR OUT Y PB PR COMPONENT VIDEO TV/SAT BD R DVD SUBWOOFER PRE OUT Class 2 Wiring SPEAKERS A SURROUND RL Sonido - Pioneer VSX-521-K | Owner's Manual - Page 88
• Funcionamiento sincronizado con componentes utilizando el Control con función HDMI (consulte Función de Control con HDMI en la página 34) Nota • Utilice un cable High Speed HDMI®. Si utiliza un cable HDMI distinto de un cable High Speed HDMI®, es posible que no funcione correctamente. • Cuando - Pioneer VSX-521-K | Owner's Manual - Page 89
ón de salidas de vídeo 02 Este receptor no incorpora un conversor de vídeo. Si utiliza cables de vídeo de componentes o cables HDMI para conectar el equipo al dispositivo de entrada, utilice los mismos cables para conectar el equipo al televisor. La entrada de señales de las entradas de vídeo - Pioneer VSX-521-K | Owner's Manual - Page 90
- Si el televisor soporta la función HDMI Audio Return Channel, el sonido del televisor se transmite al receptor a través del terminal HDMI, de modo que no hay necesidad de conectar un cable de audio. En este caso, ajuste ARC en HDMI Setup a ON (consulte HDMI Setup en la página 34). Importante • Si - Pioneer VSX-521-K | Owner's Manual - Page 91
DVD IN IN L ADAPTER PORT (Single) (OUTPUT cable y los sintonizadores de televisor digital terrestre son todos ejemplos de los llamados 'módulos de conexión'. • Si el descodificador de Internet o el componente de vídeo también constan de una salida HDMI SUBWOOFER DVD PRE OUT Class 2 Wiring SPEAKERS - Pioneer VSX-521-K | Owner's Manual - Page 92
/ BDR OUT IN 1 (DVD) ASSIGNABLE IN DVD IN IN L ADAPTER PORT (Single) (OUTPUT 5 V PRE OUT 0.1 A MAX) R TV/SAT BD R SUBWOOFER DVD PRE OUT Class 2 Wiring SPEAKERS A Uso de conectores de manuales correspondientes. • Para la conexión de audio, consulte Conexión de un componente sin terminal HDMI - Pioneer VSX-521-K | Owner's Manual - Page 93
ía inalámbrica Bluetooth, consulte Cómo emparejar el Bluetooth ADAPTER y el aparato de tecnología inalámbrica Bluetooth en la página 23. Importante • Cuando el ADAPTADOR Bluetooth esté conectado, no mueva el receptor. Ello podría dañar el equipo o provocar un contacto defectuoso. HDMI DVR/BDR IN - Pioneer VSX-521-K | Owner's Manual - Page 94
cable de miniconector para conectar un reproductor de audio digital, etc. PRESET ENTER SOUND RETRIEVER MASTER VOLUME PORTABLE / MCACC SETUP Control con HDMI en OFF, puede pasar por alto este proceso. Para conocer más detalles sobre el Control con función HDMI, véase Función de Control con HDMI - Pioneer VSX-521-K | Owner's Manual - Page 95
RECEIVER SLEEP TV SOURCE CONTROL PARAMETER TOP MENU TUNE TOOLS VOLUME MENU PRESET RECEIVER INPUT SELECT DTV/TV INPUT ENTER BD DVD TV HOME MENU SETUP System Setup y luego pulse ENTER. System Setup 1.Auto MCACC 2.Manual SP Setup 3.Input Assign 4.Pre Out Setting 5.HDMI Setup 6.Auto Power - Pioneer VSX-521-K | Owner's Manual - Page 96
MCACC Now Analyzing Surround Analyzing Speaker System Speaker Distance Channel Level Acoustic Cal EQ Return ajustar esta configuración manualmente mediante el menú System Setup (a partir de la página 30). Nota gina 30. • El ajuste de distancia del subwoofer puede ser mayor que la distancia real que - Pioneer VSX-521-K | Owner's Manual - Page 97
CONTROL RECEIVER INPUT SELECT BD DVD TV DTV/TV INPUT AUTO/ ALC/ BD MENU DIRECT STEREO STANDARD ADV SURR AUDIO PARAMETER TOP MENU TUNER EDIT MASTER TOOLS VOLUME TUNE MENU ENTER PRESET DVR/BDR CD CD-R CH ADAPTER TUNER PORTABLE HOME MENU SETUP Cuando se selecciona H (HDMI) o C1/O1/O2 - Pioneer VSX-521-K | Owner's Manual - Page 98
compatibles a través de los terminales HDMI son: Dolby Digital, DTS, SACD consulte el manual de instrucciones Bluetooth® ADAPTER para el disfrute inalámbrico de la música Dispositivo habilitado de tecnología Bluetooth inalámbrica: teléfono móvil Dispositivo habilitado de tecnología Bluetooth - Pioneer VSX-521-K | Owner's Manual - Page 99
Bluetooth con su sistema English Français Español 1 Pulse ADAPTER para cambiar el receptor a la entrada del ADAPTER. La entrada del ADAPTER también puede seleccionarse pulsando SOUND Bluetooth® son marcas registradas propiedad de Bluetooth SIG, Inc., y cualquier uso de dichas marcas por Pioneer - Pioneer VSX-521-K | Owner's Manual - Page 100
otras emisoras. Sintonización manual Para cambiar la frecuencia un RECEIVER SLEEP TV SOURCE CONTROL RECEIVER INPUT SELECT BD DVD TV DTV/TV INPUT DVR/BDR CD CD-R CH AUDIO PARAMETER TOP MENU TUNE TUNER EDIT MASTER TOOLS VOLUME MENU ENTER HOME MENU SETUP TUNE BAND RETURN MUTE ADAPTER - Pioneer VSX-521-K | Owner's Manual - Page 101
VOLUME • Mientras escuche la entrada ADAPTER, la función S.R AIR se SOUND RETRIEVER AIR SOUND RETRIEVER pantalla. NEO:6 CINEMAd Película - - Cuando selecciona STEREO ALC (modo estéreo Auto Level Control del receptor. posiblemente a través del subwoofer, dependiendo de la configuración de - Pioneer VSX-521-K | Owner's Manual - Page 102
frontal izquierdo Altavoz frontal derecho S.R AIR (Sound Retriever AIR) PHONES SURR Adecuado para escuchar el sonido de un dispositivo de tecnología inalámbrica Bluetooth. El modo de audición S.R AIR sólo puede seleccionarse con la entrada ADAPTER. También puede obtener un efecto de sonido - Pioneer VSX-521-K | Owner's Manual - Page 103
RECEIVER INPUT SELECT DTV/TV INPUT MIDNIGHT SPEAKERS LEV 7 8 9 PHASE CH S Pulse RECEIVER , luego pulse PHASE para activar o desactivar P.CTL (Phase Control una imagen de sonido poco fiable. • Si su subwoofer cuenta con un interruptor de control de fase, ajústelo al signo más (+) (o 0°). - Pioneer VSX-521-K | Owner's Manual - Page 104
RECEIVER SLEEP TV SOURCE CONTROL AUDIO PARAMETER TOP MENU TUNER EDIT MASTER TOOLS VOLUME TUNE MENU PRESET PRESET RECEIVER INPUT SELECT BD DVD TV DTV/TV INPUT ENTER HOME MENU SETUP TUNE BAND RETURN 1 Pulse RECEIVER . La función Sound Retriever utiliza la un cable HDMI. El tiempo - Pioneer VSX-521-K | Owner's Manual - Page 105
un cable HDMI, un cable de vídeo por componentes o un cable de audio digital (para más información sobre conexiones, consulte Conexión de otros componentes de audio en la página 17). RECEIVER SLEEP TV SOURCE CONTROL RECEIVER INPUT SELECT BD DVD TV DTV/TV INPUT DVR/BDR CD CD-R CH ADAPTER - Pioneer VSX-521-K | Owner's Manual - Page 106
'Manual SP Setup' desde el menú System Setup. 2 Seleccione 'Speaker Setting' desde el menú Manual SP Setup. 2.Manual SP Setup a.Speaker Setting b.Crossover Network c.Channel Level d.Speaker Distance 2a.Speaker Setting Front SMALL Center [ SMALL ] Surr [ SMALL ] Surr. Back [ NO ] Subwoofer - Pioneer VSX-521-K | Owner's Manual - Page 107
bajas a otros altavoces o al subwoofer. Si no ha conectado un altavoz Manual SP Setup' desde el menú System Setup. 2 Seleccione 'Channel Level' desde el menú Manual SP Setup. 2.Manual SP Setup a.Speaker Setting b.Crossover Network c.Channel Level d.Speaker Distance 2c.Channel Level Test Tone Manual - Pioneer VSX-521-K | Owner's Manual - Page 108
Setup' desde el menú System Setup. 2 Seleccione 'Speaker Distance' desde el menú Manual SP Setup. 2.Manual SP Setup a.Speaker Setting b.Crossover Network c.Channel Level d.Speaker Distance Return 2d.Speaker Distance Front L Center Front R Surround R Surr. Back R Surr. Back L Surround L Subwoofer - Pioneer VSX-521-K | Owner's Manual - Page 109
varias demos en la pantalla del panel frontal. 1 Seleccione 'FL Demo Mode' desde el menú System Setup. System Setup 1 . Auto MCACC 2 . Manual SP Setup 3 . Input Assign 4 . Pre Out Setting 5 . HDMI Setup 6 . Auto Power Down 7 . FL Demo Mode 7.FL Demo Mode FL Demo ON Return 2 Elija ON u OFF para - Pioneer VSX-521-K | Owner's Manual - Page 110
cualquier momento para salir del menú System Setup. 4 Seleccione 'HDMI Setup' desde el menú System Setup. System Setup 1 . Auto MCACC 2 . Manual SP Setup 3 . Input Assign 4 . Pre Out Setting 5 . HDMI Setup 6 . Auto Power Down 7 . FL Demo Mode 5.HDMI Setup Control ARC ON [ OFF ] Return Return - Pioneer VSX-521-K | Owner's Manual - Page 111
(Si el televisor no soporta la función HDMI Audio Return Channel, precisará la conexión de un cable óptico digital, etc., además del cable HDMI.) English Français Español Las operaciones sincronizadas siguientes pueden utilizarse cuando el Control con función HDMI del receptor se conecta 07 a un - Pioneer VSX-521-K | Owner's Manual - Page 112
, debido al Control con función HDMI. Si no se precisa el funcionamiento sincronizado, ajuste el Control con HDMI a OFF (consulte HDMI Setup en la manual de instrucciones suministrado con el televisor. El subwoofer no emite sonido. Asegúrese de que el subwoofer está conectado. Si el subwoofer - Pioneer VSX-521-K | Owner's Manual - Page 113
ADAPTADOR Bluetooth y el ADAPTER PORT de la unidad estén correctamente conectados. Puede que el dispositivo de tecnología inalámbrica Bluetooth Control con HDMI. Compruebe las conexiones HDMI. El cable puede estar dañado. Seleccione ON para el ajuste de Control con HDMI, consulte HDMI Setup - Pioneer VSX-521-K | Owner's Manual - Page 114
mensaje RESET?, HDMI Tipo A (19 clavijas) Tipo de salida HDMI 5 V, 100 mA Terminal de ADAPTER PORT 5 V, 100 mA Otros Requisitos de potencia CA 120 V, 60 Hz Consumo 415 W En espera 0,4 W (Control Pioneer Corporation. Copyright © 2010 Pioneer Corporation. Reservados todos los derechos. 38 Es - Pioneer VSX-521-K | Owner's Manual - Page 115
08 39 Es English Français Español - Pioneer VSX-521-K | Owner's Manual - Page 116
08 40 Es - Pioneer VSX-521-K | Owner's Manual - Page 117
08 41 Es English Français Español - Pioneer VSX-521-K | Owner's Manual - Page 118
NOT CONFORMING TO THOSE SPECIFIED IN THE OWNER'S MANUAL. THIS WARRANTY DOES NOT COVER THE COST OF PARTS OR LABOR WHICH WOULD BE OTHERWISE PROVIDED WITHOUT CHARGE UNDER THIS WARRANTY OBTAINED FROM ANY SOURCE OTHER THAN A PIONEER AUTHORIZED SERVICE COMPANY OR OTHER DESIGNATED LOCATION. THIS WARRANTY - Pioneer VSX-521-K | Owner's Manual - Page 119
INSTALLATION DU PRODUIT. PUSA OU POC, LE CAS ÉCHÉANT, PAIERA POUR VOUS RETOURNER LE PRODUIT RÉPARÉ OU REMPLACÉ, À L'INTÉRIEUR DU PAYS OÙ L'ACHAT A ÉTÉ EFFECTUÉ. PÉRIODE DE GARANTIE DES PRODUITS Pi QUALITÉ MARCHANDE OU D'ADAPTATION À UN USAGE DE SERVICE OU AUTRE AUTORISÉE OU DÉSIGNÉE PAR PIONEER. - Pioneer VSX-521-K | Owner's Manual - Page 120
product, find the nearest authorized service location, to purchase replacement parts, operating instructions, or accessories, please go to one of following URLs : Pour enregistrer votre produit, trouver le service après-vente agréé le plus proche et pour acheter des pièces de rechange, des modes
-
 1
1 -
 2
2 -
 3
3 -
 4
4 -
 5
5 -
 6
6 -
 7
7 -
8
-
9
-
10
-
11
-
12
-
13
-
14
-
15
-
16
-
17
-
18
-
19
-
20
-
21
-
22
-
23
-
24
-
25
-
26
-
27
-
28
-
29
-
30
-
31
-
32
-
33
-
34
-
35
-
36
-
37
-
38
-
39
-
40
-
41
-
42
-
43
-
44
-
45
-
46
-
47
-
48
-
49
-
50
-
51
-
52
-
53
-
54
-
55
-
56
-
57
-
58
-
59
-
60
-
61
-
62
-
63
-
64
-
65
-
66
-
67
-
68
-
69
-
70
-
71
-
72
-
73
-
74
-
75
-
76
-
77
-
78
-
79
-
80
-
81
-
82
-
83
-
84
-
85
-
86
-
87
-
88
-
89
-
90
-
91
-
92
-
93
-
94
-
95
-
96
-
97
-
98
-
99
-
100
-
101
-
102
-
103
-
104
-
105
-
106
-
107
-
108
-
109
-
110
-
111
-
112
-
113
-
114
-
115
-
116
-
117
-
118
-
119
-
120
 |
 |
Register your product on
http://www.pioneerelectronics.ca (Canada)
http://www.pioneerelectronics.ca (Canada)
•
Protect your new investment
The details of your purchase will be on file for reference in the event of an
insurance claim such as loss or theft.
•
Improve product development
Your input helps us continue to design products that meet your needs.
•
Receive a free Pioneer newsletter
Registered customers can opt in to receive a monthly newsletter.
•
Receive free tips, updates and service bulletins on
your new product
AUDIO/VIDEO MULTI-CHANNEL RECEIVER
RECEPTEUR AUDIOVISUEL A VOIES MULTI-CANAUX
RECEPTOR AUDIO-VIDEO MULTICANAL
VSX-521
-K
Operating Instructions
Mode d
’
emploi
Manual de instrucciones