Pioneer VSX-521-K Owner's Manual - Page 9
TV CONTROL buttons - remote control
 |
UPC - 884938133043
View all Pioneer VSX-521-K manuals
Add to My Manuals
Save this manual to your list of manuals |
Page 9 highlights
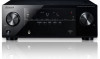
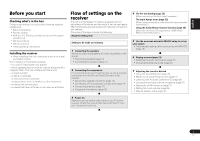
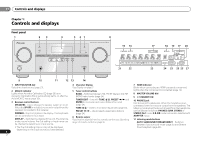
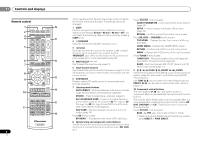
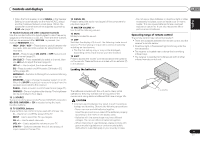
Controls and displays 01 English Français Español • When the front speaker is set at SMALL in the Speaker Setting (or automatically via the Auto MCACC setup) and the Crossover Network is set above 150 Hz, the subwoofer channel level will be adjusted by pressing BASS -/+ (page 31). 11 Number buttons and other component controls Use the number buttons to directly select a radio frequency (page 24) or the tracks on a CD, etc. There are other buttons that can be accessed after RECEIVER is pressed. (For example MIDNIGHT, etc.) HDD*, DVD*, VCR* - These buttons switch between the hard disk, DVD and VCR controls for HDD/DVD/VCR recorders. SB CH - Press to select ON, AUTO or OFF the surround back channel (page 27). CH SELECT - Press repeatedly to select a channel, then use LEV +/- to adjust the level (page 31). LEV +/- - Use to adjust the channel level. 14 SIGNAL SEL Press to select the audio input signal of the component to play back (page 21). 15 MASTER VOLUME +/- Use to set the listening volume. 16 MUTE Mutes/unmutes the sound. 17 DISP Switches the display of this unit. The listening mode, sound volume, Pre Out setting or input name can be checked by selecting an input source. • The Pre Out setting may or may not be displayed, depending on the input source you have selected. 18 SHIFT Press to access the 'boxed' commands (above the buttons) on the remote. These buttons are marked with an asterisk (*) in this section. - Do not use or store batteries in direct sunlight or other excessively hot place, such as inside a car or near a heater. This can cause batteries to leak, overheat, explode or catch fire. It can also reduce the life or performance of batteries. Operating range of remote control The remote control may not work properly if: • There are obstacles between the remote control and the receiver's remote sensor. • Direct sunlight or fluorescent light is shining onto the remote sensor. • The receiver is located near a device that is emitting infrared rays. • The receiver is operated simultaneously with another infrared remote control unit. EQ - Press to switch on/off Acoustic Calibration EQ setting (page 26). Loading the batteries MIDNIGHT - Switches to Midnight or Loudness listening (page 28). SPEAKERS - Use to change the speaker system on or off. When the SP OFF is selected, no sound is output from the speakers connected to this receiver. 30° 30° PHASE - Press to switch on/off Phase Control (page 27). DIMMER - Dims or brightens the display. The brightness can be controlled in four steps. 12 SOURCE Turns on or off the power of the Pioneer DVD/DVR units when BD, DVD, DVR/BDR or CD is selected using the input function buttons. 13 TV CONTROL buttons These buttons can control only be used with Pioneer TVs. - Use to turn on/off the power of the TV. INPUT - Use to select the TV input signal. CH +/- - Use to select channels. VOL +/- - Use to adjust the volume on your TV. DTV/TV* - Switches between the DTV and analog TV input modes for Pioneer TVs. The batteries included with the unit are to check initial operations; they may not last over a long period. We recommend using alkaline batteries that have a longer life. CAUTION • Incorrect use of batteries may result in such hazards as leakage and bursting. Observe the following precautions: - Never use new and old batteries together. - Insert the plus and minus sides of the batteries properly according to the marks in the battery case. - Batteries with the same shape may have different voltages. Do not use different batteries together. - When disposing of used batteries, please comply with governmental regulations or environmental public instruction's rules that apply in your country or area. 7 m (23 ft.) 9 En
-
 1
1 -
2
-
3
-
 4
4 -
 5
5 -
 6
6 -
 7
7 -
 8
8 -
 9
9 -
 10
10 -
 11
11 -
 12
12 -
 13
13 -
 14
14 -
15
-
16
-
17
-
18
-
19
-
20
-
21
-
22
-
23
-
24
-
25
-
26
-
27
-
28
-
29
-
30
-
31
-
32
-
33
-
34
-
35
-
36
-
37
-
38
-
39
-
40
-
41
-
42
-
43
-
44
-
45
-
46
-
47
-
48
-
49
-
50
-
51
-
52
-
53
-
54
-
55
-
56
-
57
-
58
-
59
-
60
-
61
-
62
-
63
-
64
-
65
-
66
-
67
-
68
-
69
-
70
-
71
-
72
-
73
-
74
-
75
-
76
-
77
-
78
-
79
-
80
-
81
-
82
-
83
-
84
-
85
-
86
-
87
-
88
-
89
-
90
-
91
-
92
-
93
-
94
-
95
-
96
-
97
-
98
-
99
-
100
-
101
-
102
-
103
-
104
-
105
-
106
-
107
-
108
-
109
-
110
-
111
-
112
-
113
-
114
-
115
-
116
-
117
-
118
-
119
-
120
 |
 |