Pioneer VSX-820-K Owner's Manual - Page 46
Speaker Distance, The Input Assign menu
 |
UPC - 884938109277
View all Pioneer VSX-820-K manuals
Add to My Manuals
Save this manual to your list of manuals |
Page 46 highlights
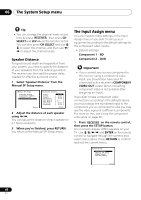
06 The System Setup menu Tip • You can change the channel levels at any time by press RECEIVER , then press CH SELECT and LEV +/- on the remote control. You can also press CH SELECT and use / to select the channel, and then use / to adjust the channel levels. Speaker Distance For good sound depth and separation from your system, you need to specify the distance of your speakers from the listening position. The receiver can then add the proper delay needed for effective surround sound. 1 Select 'Speaker Distance' from the Manual SP Setup menu. 2.Manual SP Setup a.Speaker Setting b.Crossover Network c.Channel Level d.Speaker Distance Return 2d.Speaker Distance Front L Center Front R Surround R Surr. Back R Surr. Back L Surround L Subwoofer 10.0 ft [ 10.0 ft ] [ 10.0 tt ] [ 10.0 ft ] [ ---- ] [ ---- ] [ 10.0 ft ] [ 10.0 ft ] Return 2 Adjust the distance of each speaker using /. You can adjust the distance of each speaker in 0.1 feet increments. 3 When you're finished, press RETURN. You return to the Manual SP Setup menu. The Input Assign menu You only need to make settings in the Input Assign menu if you didn't hook up your equipment according to the default settings for the component video inputs. • Default settings: Component 1 - BD Component 2 - DVD Important • If you connect any source component to the receiver using a component video input, you should also have your TV connected to this receiver's COMPONENT VIDEO OUT output (down converting component video is not possible after assigning an input). If you didn't make component video connections according to the defaults above, you must assign the numbered input to the component you've connected (or else you may see the video signal of a different component). For more on this, see Using the component video jacks on page 26. 1 Press RECEIVER on the remote control, then press the SETUP button. An on-screen display (OSD) appears on your TV. Use and ENTER on the remote control to navigate through the screens and select menu items. Press RETURN to confirm and exit the current menu. System Setup 1.Auto MCACC 2.Manual SP Setup 3.Input Assign 4.Pre Out Setting Return 46 En
-
 1
1 -
2
-
3
-
4
-
5
-
6
-
7
-
8
-
9
-
10
-
11
-
12
-
13
-
14
-
15
-
16
-
17
-
18
-
19
-
20
-
21
-
22
-
23
-
24
-
25
-
26
-
27
-
28
-
29
-
30
-
31
-
32
-
33
-
34
-
35
-
36
-
37
-
38
-
39
-
40
-
 41
41 -
 42
42 -
 43
43 -
 44
44 -
 45
45 -
 46
46 -
 47
47 -
 48
48 -
 49
49 -
 50
50 -
 51
51 -
52
-
53
-
54
-
55
-
56
-
57
-
58
-
59
-
60
-
61
-
62
-
63
-
64
-
65
-
66
-
67
-
68
-
69
-
70
-
71
-
72
-
73
-
74
-
75
-
76
-
77
-
78
-
79
-
80
-
81
-
82
-
83
-
84
-
85
-
86
-
87
-
88
-
89
-
90
-
91
-
92
-
93
-
94
-
95
-
96
-
97
-
98
-
99
-
100
-
101
-
102
-
103
-
104
-
105
-
106
-
107
-
108
-
109
-
110
-
111
-
112
-
113
-
114
-
115
-
116
-
117
-
118
-
119
-
120
-
121
-
122
-
123
-
124
-
125
-
126
-
127
-
128
-
129
-
130
-
131
-
132
-
133
-
134
-
135
-
136
-
137
-
138
-
139
-
140
-
141
-
142
-
143
-
144
-
145
-
146
-
147
-
148
-
149
-
150
-
151
-
152
-
153
-
154
-
155
-
156
-
157
-
158
-
159
-
160
-
161
-
162
-
163
-
164
-
165
-
166
-
167
-
168
-
169
-
170
-
171
-
172
-
173
-
174
-
175
-
176
-
177
-
178
-
179
-
180
-
181
-
182
-
183
-
184
-
185
-
186
-
187
-
188
-
189
-
190
-
191
-
192
-
193
-
194
-
195
-
196
-
197
-
198
-
199
-
200
-
201
-
202
-
203
-
204
-
205
-
206
-
207
-
208
-
209
-
210
-
211
-
212
-
213
-
214
-
215
-
216
-
217
-
218
-
219
-
220
-
221
-
222
-
223
-
224
-
225
-
226
-
227
-
228
 |
 |
