Pioneer VSX-823-K Owner's Manual - Page 42
The Network Setup menu - reset
 |
View all Pioneer VSX-823-K manuals
Add to My Manuals
Save this manual to your list of manuals |
Page 42 highlights
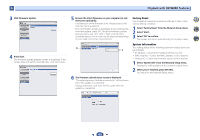
6 Playback with NETWORK features Playing back audio files stored on components on the network This unit allows you to play music on media servers connected on an identical Local Area Network (LAN) as the receiver. This unit allows for the playing of files stored on the following devices: • PCs running Microsoft Windows Vista or XP with Windows Media Player 11 installed • PCs running Microsoft Windows 7 with Windows Media Player 12 installed • DLNA-compatible digital media servers (on PCs or other components) Playing back your favorite songs Up to 64 favorite tracks on the media server and/or Internet radio stations can be registered in the Favorites folder. Note that only the audio files stored on components on the network can be registered. Registering and deleting audio files and Internet radio stations in and from the Favorites folder 1 Press NETWORK to switch the remote control to the M.SERVER or NETRADIO operation mode. 2 With the track or Internet radio station you want to register selected, press +Favorite. The selected song or Internet radio station is then registered in the Favorite. Note • To delete a registered song, select the Favorites folder, select the song you want to delete from the folder, and press CLEAR. The selected song is then deleted from the Favorites folder. The Network Setup menu Setting up the network to listen to Internet radio on this receiver. 1 Press NETWORK. 2 Press HOME MENU. Network Setup menu appears on your TV. Use and ENTER on the remote control to navigate through the screens and select menu items. Press RETURN to exit the current menu. • Press HOME MENU at any time to exit the Network Setup menu. 3 Select the setting you want to adjust. • Network Configuration - IP Address, Proxy - Sets up the IP address/Proxy of this receiver (see below). - Friendly Name - The name of the receiver displayed on a computer or other device connected to the network can be changed (see below). - Parental Lock - Restricts usage of network functions (page 43). • Language - Language can be set the NETWORK function OSD screen (page 43). • Firmware Update - Use to update the receiver's firmware and check the version (page 43). • Factory Reset - Use to reset all network connection settings to their initial, factory-setting condition (page 45). • System Info - You can check the network settings of this receiver (page 45). Network Configuration IP address/Proxy setting In case the router connected to the LAN terminal on this receiver is a broadband router (with a built-in DHCP server function), simply turn on the DHCP server function, and you will not need to set up the network manually. You must set up the network as described below only when you have connected this receiver to a broadband router without a DHCP server function. Before you set up the network, consult with your ISP or the network manager for the required settings. It is advised that you also refer to the operation manual supplied with your network component. • IP Address The IP address to be entered must be defined within the following ranges. If the IP address defined is beyond the following ranges, you cannot play back audio files stored on components on the network or listen to Internet radio stations. Class A: 10.0.0.1 to 10.255.255.254 Class B: 172.16.0.1 to 172.31.255.254 Class C: 192.168.0.1 to 192.168.255.254 • Subnet Mask In case an xDSL modem or a terminal adapter is directly connected to this receiver, enter the subnet mask provided by your ISP on paper. In most cases, enter 255.255.255.0. • Default Gateway In case a gateway (router) is connected to this receiver, enter the corresponding IP address. • Primary DNS Server/Secondary DNS Server In case there is only one DNS server address provided by your ISP on paper, enter it in the "Primary DNS Server" field. In case there are more than two DNS server addresses, enter "Secondary DNS Server" in the other DNS server address field. • Proxy Hostname/Proxy Port This setting is required when you connect this receiver to the Internet via a proxy server. Enter the IP address of your proxy server in the "Proxy Hostname" field. Also, enter the port number of your proxy server in the "Proxy Port" field. 4 7 62 42
-
 1
1 -
2
-
3
-
4
-
5
-
6
-
7
-
8
-
9
-
10
-
11
-
12
-
13
-
14
-
15
-
16
-
17
-
18
-
19
-
20
-
21
-
22
-
23
-
24
-
25
-
26
-
27
-
28
-
29
-
30
-
31
-
32
-
33
-
34
-
35
-
36
-
 37
37 -
 38
38 -
 39
39 -
 40
40 -
 41
41 -
 42
42 -
 43
43 -
 44
44 -
 45
45 -
 46
46 -
 47
47 -
48
-
49
-
50
-
51
-
52
-
53
-
54
-
55
-
56
-
57
-
58
-
59
-
60
-
61
-
62
-
63
-
64
-
65
-
66
-
67
-
68
 |
 |