Pioneer VSX-921-K Owner's Manual - Page 36
Making an audio or a video recording - operating manual
 |
UPC - 884938133159
View all Pioneer VSX-921-K manuals
Add to My Manuals
Save this manual to your list of manuals |
Page 36 highlights
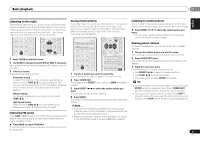
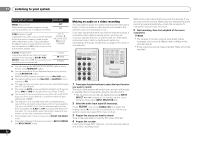
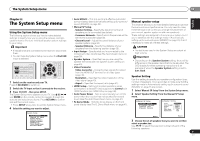
05 Listening to your system Setting/What it does Option(s) PNRM. (Panorama)i OFF Extends the front stereo image to include ON surround speakers for a 'wraparound' effect. C.IMG (Center Image)j 0 to 10 (Applicable only when using a center speaker) Default: 3 Adjust the center image to create a wider (NEO:6 MUSIC), stereo effect with vocals. Adjust the effect 10 (NEO:6 from 0 (all center channel sent to front right CINEMA) and left speakers) to 10 (center channel sent to the center speaker only). H.GAIN (Height Gain) Adjusts the output from the front height speaker when listening in DOLBY PLIIz HEIGHT mode. If set to H, the sound from the top will be more emphasized. L (Low) M (Mid) H (High) a. You can change the MIDNIGHT/LOUDNESS options at any time by using MIDNIGHT button. b. You can change the Sound Retriever feature at any time by using S.RETRIEVER button. c. WMA and MP3 playback available only via iPod USB input. d. The default setting when the iPod USB or ADAPTER input is selected is ON. e. This setting works only with dual mono encoded Dolby Digital and DTS soundtracks. f. The initial set AUTO is only available for Dolby TrueHD signals. Select MAX or MID for signals other than Dolby TrueHD. g. You shouldn't have any problems using this with most SACD discs, but if the sound distorts, it is best to switch the gain setting back to 0 dB. h. This feature is only available when the connected display supports the automatic audio/video synchronizing capability ('lip-sync') for HDMI. If you find the automatically set delay time unsuitable, set A.DLY to OFF and adjust the delay time manually. For more details about the lip-sync feature of your display, contact the manufacturer directly. i. Only available with 2-channel sources in DOLBY PLII MUSIC mode. j. Only when listening to 2-channel sources in NEO:6 CINEMA and NEO:6 MUSIC mode. 36 En Making an audio or a video recording You can make an audio or a video recording from the built-in tuner, or from an audio or video source connected to the receiver (such as a CD player or TV). Only video signals that were input to this receiver through a composite video cable or analog audio inputs can be recorded. Signals that were input through an HDMI cable, component video cable or digital audio cable (see Connecting other audio components on page 19 for more on connections). RECEIVER SLEEP TV SOURCE CONTROL RECEIVER INPUT SELECT BD DVD TV INPUT DVR/BDR CD CD-R CH HDD 1 DVD 2 VCR 3 DISP S.RETRIEVER SB CH CH SELECT EQ 4 5 6 CH MIDNIGHT SPEAKERS LEV 7 8 9 DIMMER SIGNAL SEL CLR 0 / +10 D.ACCESS LEV ENTER PHASE CH SHIFT ADAPTER iPod USB VIDEO 1 VIDEO 2 TUNER SIRIUS VOL RECEIVER 1 Press input function buttons to select the input function you want to record. The input of the receiver will switch over, and you will be able to operate other components using the remote control. • The input source can also be selected by using INPUT SELECT buttons on the remote control, or by using the front panel INPUT SELECTOR dial. 2 Select the audio input signal (if necessary). Press RECEIVER then press SIGNAL SEL and select the analog inputs (A) for the source component of which you want to record (see page 25 for more on this). 3 Prepare the source you want to record. Tune to the radio station, load the CD, video, DVD etc. 4 Prepare the recorder. Insert a blank tape, MD, video etc. into the recording device and set the recording levels. Refer to the instructions that came with the recorder if you are unsure how to do this. Most video recorders set the audio recording level automatically-check the component's instruction manual if you're unsure. 5 Start recording, then start playback of the source component. Note • The receiver's volume, balance, tone (bass, treble, loudness), and surround effects have no effect on the recorded signal. • Some video sources are copy-protected. These cannot be recorded.
-
 1
1 -
2
-
3
-
4
-
5
-
6
-
7
-
8
-
9
-
10
-
11
-
12
-
13
-
14
-
15
-
16
-
17
-
18
-
19
-
20
-
21
-
22
-
23
-
24
-
25
-
26
-
27
-
28
-
29
-
30
-
 31
31 -
 32
32 -
 33
33 -
 34
34 -
 35
35 -
 36
36 -
 37
37 -
 38
38 -
 39
39 -
 40
40 -
 41
41 -
42
-
43
-
44
-
45
-
46
-
47
-
48
-
49
-
50
-
51
-
52
-
53
-
54
-
55
-
56
-
57
-
58
-
59
-
60
-
61
-
62
-
63
-
64
-
65
-
66
-
67
-
68
-
69
-
70
-
71
-
72
-
73
-
74
-
75
-
76
-
77
-
78
-
79
-
80
-
81
-
82
-
83
-
84
-
85
-
86
-
87
-
88
-
89
-
90
-
91
-
92
-
93
-
94
-
95
-
96
-
97
-
98
-
99
-
100
-
101
-
102
-
103
-
104
 |
 |