Pioneer VSX-D509S Owner's Manual - Page 29
Programming a Different Component into a MULTI, CONTROL button VSX-D509S, Checking Preset Codes VSX-
 |
View all Pioneer VSX-D509S manuals
Add to My Manuals
Save this manual to your list of manuals |
Page 29 highlights
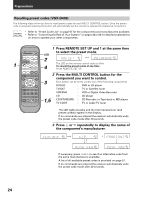
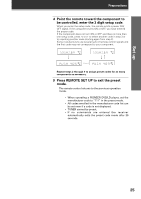
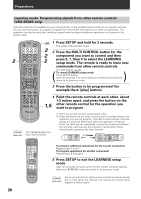
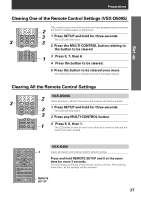
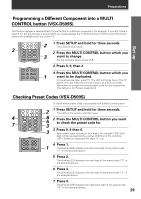
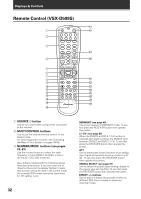
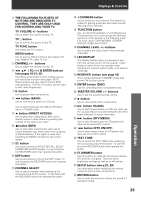
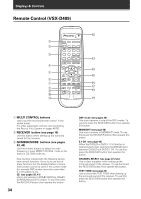
Preparations Set up Programming a Different Component into a MULTI CONTROL button (VSX-D509S) This feature changes a selected Multi Control button to a different component. For example, if you don't have a second TV, but you do have a second VCR, you could reassign the TV Multi Control to VCR so that VCR control buttons are available when you select TV. DVD RCV TV VCR MULTI CONTROL CD TUN CD-R TVC 2 1 Press SETUP and hold for three seconds. The LED will blink twice. 3 1 2 3 MIDNIGHT 5.1CH ATT 4 5 6 2 Press the MULTI CONTROL button which you SIGNAL SELECT 7 +10 EFFECT 8 9 DISC 0 ENTER 3 want to change. For the example above, press VCR. TV CONTROL TV 7 4 ¢ 3 Press 9, 9, then 2. 2 DSP TEST TONE CH SELECT CH LEVEL FL DIMMER 4 Press the MULTI CONTROL button which you LOUDNESS FUNCTION MUTING SETUP 1 want to be duplicated. Î In the above example, press TV. The LED will blinks twice. The TV button will now make the remote function as a VCR controller. Remember to assign the correct preset code for your equipment (the default is for Pioneer equipment). Checking Preset Codes (VSX-D509S) 4 7 DVD RCV TV VCR MULTI CONTROL CD TUN CD-R TVC 1 2 3 MIDNIGHT 5.1CH ATT 4 5 6 SIGNAL SELECT 7 EFFECT 8 9 +10 DISC 0 ENTER TV CONTROL TV 7 4 ¢ 2 DSP TEST TONE CH SELECT CH LEVEL FL DIMMER LOUDNESS FUNCTION MUTING SETUP Î To check which preset code is associated with a Multi Control button: 2 1 Press SETUP and hold for three seconds. The LED on the remote will blink twice. 6 2 Press the MULTI CONTROL button you want 5 to check the preset code for. 3 3 3 Press 9, 9 then 0. Each preset code consists of four digits, for example 1329. Each digit will be represented by a series of blinks on the remote's LED-3 blinks to represent the digit "3", etc. 4 Press 1. 1 The blinking LED indicates the left-most digit of the preset code ("1" in the example above). 5 Press 2. The blinking LED indicates the next digit of the preset code ("3" in the example above). 6 Press 3. The blinking LED indicates the next digit of the preset code ("2" in the example above). 7 Press 4. The blinking LED indicates the right-most digit of the preset code ("9" in the example above). 29
-
 1
1 -
2
-
3
-
4
-
5
-
6
-
7
-
8
-
9
-
10
-
11
-
12
-
13
-
14
-
15
-
16
-
17
-
18
-
19
-
20
-
21
-
22
-
23
-
 24
24 -
 25
25 -
 26
26 -
 27
27 -
 28
28 -
 29
29 -
 30
30 -
 31
31 -
 32
32 -
 33
33 -
 34
34 -
35
-
36
-
37
-
38
-
39
-
40
-
41
-
42
-
43
-
44
-
45
-
46
-
47
-
48
-
49
-
50
-
51
-
52
-
53
-
54
-
55
-
56
-
57
-
58
-
59
-
60
 |
 |
