Pioneer VSX-D509S Owner's Manual - Page 32
Remote Control VSX-D509S
 |
View all Pioneer VSX-D509S manuals
Add to My Manuals
Save this manual to your list of manuals |
Page 32 highlights
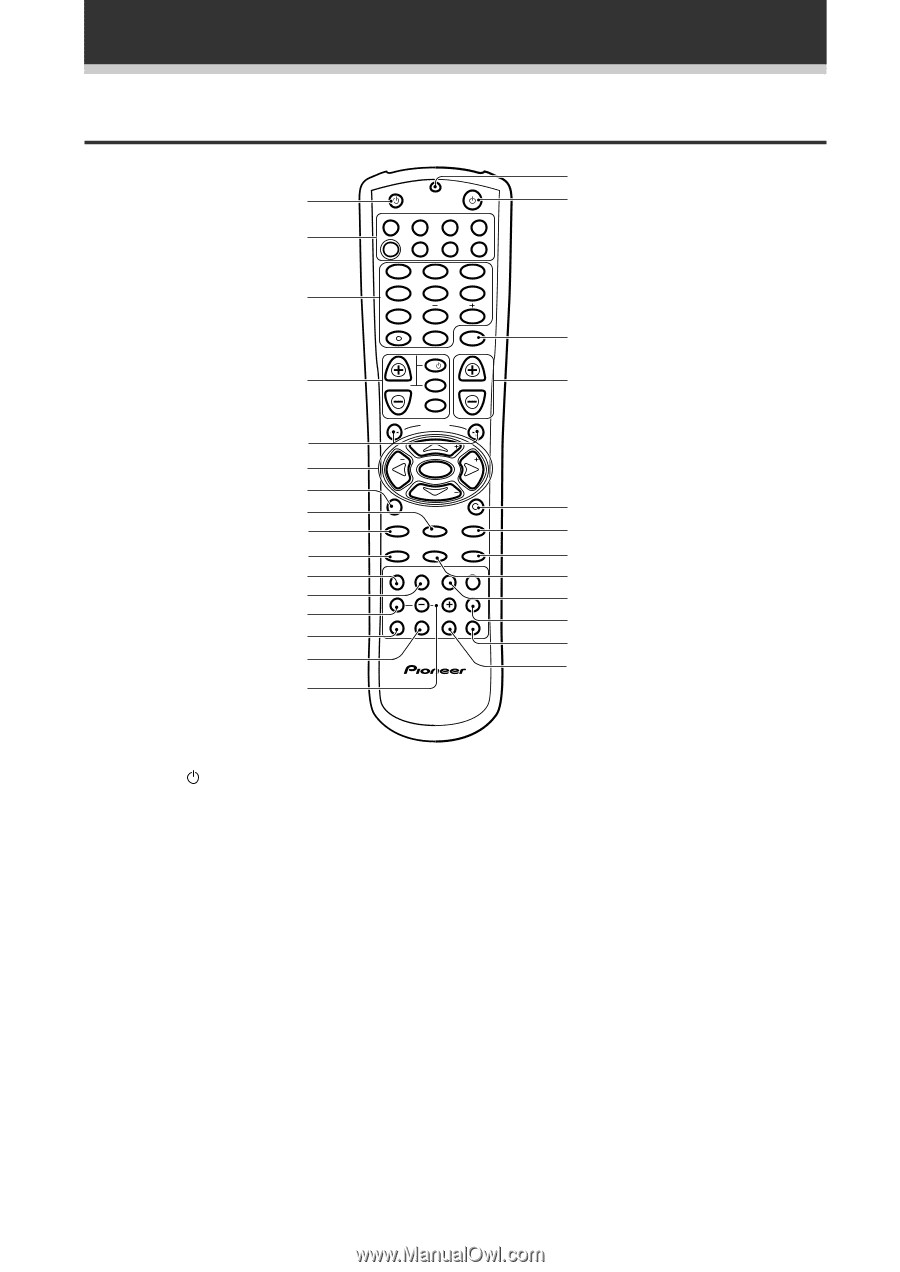
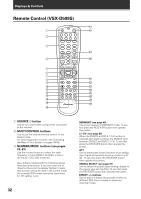
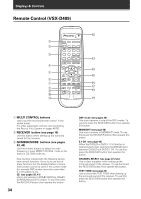
Displays & Controls Remote Control (VSX-D509S) 1 2 3 4 5 6 7 8 9 0 = ~ ! @ # SOURCE RECEIVER DVD RCV TV VCR MULTI CONTROL CD TUN CD-R TVC 1 2 3 MIDNIGHT 5.1CH ATT 4 5 6 SIGNAL SELECT 7 EFFECT 8 9 +10 DISC 0 ENTER TV CONTROL TV TV VOL TVFUNC MASTERVOLUME MENU CHANNEL FQ ST ST ENTER FQ 8 D.ACCESS 3 BAND 1 CLASS ¡ MPX DTV ON / OFF DTV MENU 7 4 ¢ 2 DSP TEST TONE CH SELECT CH LEVEL FL DIMMER LOUDNESS FUNCTION MUTING SETUP Î AV PRE-PROGRAMMED AND LEARNING REMOTE CONTROL UNIT $ % ^ & 1 SOURCE button Use to turn on/off other components coneccted to the receiver. 2 MULTI CONTROL buttons Use to put the receiver/remote control in the stated mode. For other equipment controls, see Controlling the Rest of Your System on pages 46-50. 3 NUMBER/MODE buttons (see pages 23, 43) Use the number buttons to select the radio frequency in tuner DIRECT ACCESS mode or the tracks in CD, DVD mode etc. Also, buttons marked with the following names have special functions. If you try to use one of these functions but the display flashes it means that function cannot be used in the current mode (for example DSP modes cannot be used when 5.1 CH setting is on). 32 MIDNIGHT (see page 40) Use to put receiver in MIDNIGHT mode. To use first press the RECEIVER button then operate this button. 5.1 CH (see page 39) When the DVD/LD or DVD 5.1 CH function is selected each press switches the DVD/LD input between DVD/LD and DVD 5.1 CH. To use first press the RECEIVER button then operate this button. ATT Use to attenunate (lower) the level of an analog input signal and prevent distortion (refer to p.31 =). To use first press the RECEIVER button then operate this button. SIGNAL SELECT (see page 37) Use to select the proper signal (analog, digital) for the source your are inputting. To use first press the RECEIVER button then operate this button. EFFECT +/- buttons Use to add or subtract the amount of effect in different DSP sound modes or advanced listening modes.
-
 1
1 -
2
-
3
-
4
-
5
-
6
-
7
-
8
-
9
-
10
-
11
-
12
-
13
-
14
-
15
-
16
-
17
-
18
-
19
-
20
-
21
-
22
-
23
-
24
-
25
-
26
-
 27
27 -
 28
28 -
 29
29 -
 30
30 -
 31
31 -
 32
32 -
 33
33 -
 34
34 -
 35
35 -
 36
36 -
 37
37 -
38
-
39
-
40
-
41
-
42
-
43
-
44
-
45
-
46
-
47
-
48
-
49
-
50
-
51
-
52
-
53
-
54
-
55
-
56
-
57
-
58
-
59
-
60
 |
 |