Pioneer XW-NAV1-K Operating Instructions
Pioneer XW-NAV1-K Manual
 |
View all Pioneer XW-NAV1-K manuals
Add to My Manuals
Save this manual to your list of manuals |
Pioneer XW-NAV1-K manual content summary:
- Pioneer XW-NAV1-K | Operating Instructions - Page 1
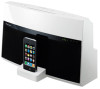
XW-NAV1-K XW-NAV1K-K DVD Speaker system for iPod Discover the benefits of registering your product online at http://www.pioneer.co.uk (or http://www.pioneer.eu). Operating Instructions - Pioneer XW-NAV1-K | Operating Instructions - Page 2
PERSONNEL. The exclamation point within an equilateral triangle is intended to alert the user to the presence of important operating and maintenance (servicing) instructions in the literature accompanying the appliance. D3-4-2-1-1_A1_En CAUTION This product is a class 1 laser product classified - Pioneer XW-NAV1-K | Operating Instructions - Page 3
while. When you find it damaged, ask your nearest PIONEER authorized service center or your dealer for a replacement. S002*_A1_En unit. D3-4-2-2-4_B1_En Information for users on collection and disposal of old municipality, your waste disposal service or the point of sale where you purchased the - Pioneer XW-NAV1-K | Operating Instructions - Page 4
supply cord of this unit should be performed only by qualified service personnel. IMPORTANT: THE MOULDED PLUG This appliance is supplied with connected to the terminal which is marked with the letter N or coloured BLACK. The wire which is coloured BROWN must be connected to the terminal which - Pioneer XW-NAV1-K | Operating Instructions - Page 5
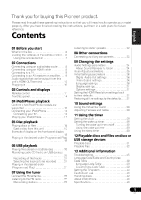
27 27 27 Español 03 Controls and displays Remote control ...11 Front/top panel ...14 04 iPod/iPhone playback Confirm what iPod/iPhone models are supported ...15 Connecting your iPod/iPhone ...16 Connecting your TV ...16 Playing your iPod/iPhone...17 10 Sound settings Using the Virtual Surround - Pioneer XW-NAV1-K | Operating Instructions - Page 6
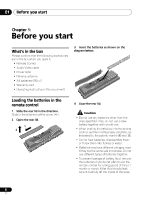
box Please confirm that the following accessories are in the box when you open it. • Remote Control • Audio/Video cable • Power cord • FM wire antenna • AA batteries (R6) x 2 • Warranty card • Operating instructions (this document) 3 Insert the batteries as shown on the diagram below. Loading the - Pioneer XW-NAV1-K | Operating Instructions - Page 7
to leak, overheat, explode or catch fire. It can also reduce the life or performance of batteries. • Remote controllers for different devices can interfere with each other. Avoid using remotes for other equipment located close to this unit. • Replace the batteries when you notice a fall off in the - Pioneer XW-NAV1-K | Operating Instructions - Page 8
TV's operating instructions. Connecting using an audio/video cable This unit specification. • When an HDMI-compatible device is connected, the resolution is displayed on the front panel display. • The resolution of the video signals output from this unit's HDMI OUT terminal is changed manually - Pioneer XW-NAV1-K | Operating Instructions - Page 9
direction of the plug to the terminal and insert straight. To HDMI input terminal TV AV receiver or amplifier To HDMI input terminal From HDMI output terminal • If you connect this unit to your television with the HDMI cable, sound can not be transferred from your television to this unit. To - Pioneer XW-NAV1-K | Operating Instructions - Page 10
signals that can be output from this unit's HDMI OUT terminal • 44.1 kHz to 96 kHz, 16-bit/ 20-bit/ 24-bit 2channel linear PCM audio (including 2channel downmixing) • Dolby Digital 5.1-channel audio • DTS 5.1-channel audio • MPEG audio Plugging in After you've finished making all connections, plug - Pioneer XW-NAV1-K | Operating Instructions - Page 11
preset when using the tuner, etc. AUDIO* For discs or files including multiple audio streams/ channels, the audio stream/ channel can be switched during playback. For files stored in iPod/iPhone, this button is not available. SUBTITLE* On DVD-Video or DivX discs containing subtitles in multiple - Pioneer XW-NAV1-K | Operating Instructions - Page 12
HOME MENU When selecting a DVD or USB storage device input, press to display/ hide the HOME MENU. When selecting the other input, this button is not available. HOME MENU DVD Audio Settings Video for some discs or files. For files stored in iPod/iPhone, this function is not available. 8 PLAY Press - Pioneer XW-NAV1-K | Operating Instructions - Page 13
iPod/iPhone, DVD/CD, USB, TUNER and external input (AUX). 15 SHIFT Press to access the 'boxed' commands (above the buttons) on the remote • For iPod/iPhone, this button is not available. Ex.: DVD-Video Disc Navigator specified tracks or change the bitrate, press HOME MENU and select the CD ->USB Rec - Pioneer XW-NAV1-K | Operating Instructions - Page 14
the TUNER input is selected, this indicator lights. 13 Speaker units 14 iPod/iPhone connector ports 1 STANDBY/ON Switches the unit between . 2 FUNCTION Use to select an input source. Press repeatedly to switch between iPod/iPhone, DVD/CD, USB, TUNER and external input (AUX). 3 PLAY/PAUSE Press - Pioneer XW-NAV1-K | Operating Instructions - Page 15
what iPod/iPhone models are supported The iPod/iPhone playable on this unit are shown below.1 iPod/iPhone iPod nano 1/2G iPod nano 3/4/5G iPod classic 2007 iPod classic 2008 iPod classic 2009 iPod touch 1G iPod touch 2G iPod touch 2G 2009 iPhone iPhone 3G/3GS Audio Video Note 1 • Pioneer does - Pioneer XW-NAV1-K | Operating Instructions - Page 16
cable. For details, see Connecting using an audio/video cable on page 8. • When an iPod/iPhone is connected to this unit, the iPod/iPhone's TV output setting is automatically set to ON.2 MENU iPod nano/ iPod classic/ iPod touch/ iPhone Caution • Before making or changing the connections - Pioneer XW-NAV1-K | Operating Instructions - Page 17
If this unit can not play the iPod/iPhone or 'Err' is displayed, perform the following troubleshooting checks: • Check whether the iPod/iPhone was supported by this unit. Note 1 For detailed instructions on using the iPod/iPhone, please refer to the manual supplied with the iPod/iPhone. 17 En - Pioneer XW-NAV1-K | Operating Instructions - Page 18
By using the number buttons (0 to 9), you can specify and play the title, chapter, track or file you want to view/ listen to. • When playing a DVD-Video or DivX discs, turn the TV's power on and switch the TV's input before starting. • This unit's screen display language can be changed (OSD Language - Pioneer XW-NAV1-K | Operating Instructions - Page 19
screen when inputting it, the settings you have programmed are cleared. Español Playing in the desired order (Programmed Play) 6 1 Press HOME MENU. The HOME MENU is displayed. 2 Use / to select 'Play Mode', then press ENTER. The Play Mode screen is displayed. 3 Use / to select 'Program - Pioneer XW-NAV1-K | Operating Instructions - Page 20
details, see When a USB device is connected on page 36. • Pioneer does not support that all files recorded on all USB devices will play or that power the other input's sound. • It may not be possible to record tracks of audio CDs on a USB device. For details, see When a USB device is connected - Pioneer XW-NAV1-K | Operating Instructions - Page 21
, confirm this unit's settings on the TV screen. • The audio signals are converted into MP3 format for output. • 'CD -> USB Rec' can only be selected when the audio CD is stopped. • When recording is completed, a folder named "PIONEER" is automatically created on the USB device. The recorded tracks - Pioneer XW-NAV1-K | Operating Instructions - Page 22
, and lets you memorize your favorite stations so you don't have to manually tune in every time you want to listen. 1 Press FUNCTION to switch always have easy access to your favorite stations without having to tune in manually each time.2 Note 1 To ensure optimum reception, make sure the FM antenna - Pioneer XW-NAV1-K | Operating Instructions - Page 23
AUX IN mini-plug jack to your auxiliary playback component. • This method can be used to play music on this unit from iPod/iPhones that do not support use of an iPod Dock. • Press FUNCTION to switch to AUX input mode. When the AUX input is selected, ' ' is displayed on the front panel display. 23 - Pioneer XW-NAV1-K | Operating Instructions - Page 24
iPod/iPhone, tuner, external input (AUX). • In the USB mode, you can only change the Play Mode and Audio Settings on the HOME MENU screen. Audio depends on the volume of the connected TV, AV receiver or amplifier, speakers, etc. Try different settings, and choose the one providing the strongest - Pioneer XW-NAV1-K | Operating Instructions - Page 25
or USB storage device content. These are not available for iPod/iPhone, tuner, external input (AUX). • In the USB mode, you can only change the Play Mode and Audio Settings on the HOME MENU screen. Français Video Adjust parameters Settings What it does Sharpness Adjusts the picture's sharpness - Pioneer XW-NAV1-K | Operating Instructions - Page 26
for iPod/iPhone, tuner, external input (AUX). • In the USB mode, you can only change the Play Mode and Audio Settings on the HOME MENU screen video signals output from the HDMI OUT terminal (Full range RGB/RGB/Component ). HDMI Color Language settings Settings Audio Language Subtitle Language DVD - Pioneer XW-NAV1-K | Operating Instructions - Page 27
iPod/iPhone, tuner, external input (AUX). • In the USB mode, you can only change the Play Mode and Audio Settings on the HOME Español Options settings Settings Parental Lock DivX VOD What it does Restrict DVD-Video viewing (Password/Level Change/Country Code). See Country/Area Code Table on page - Pioneer XW-NAV1-K | Operating Instructions - Page 28
10 Sound settings Chapter 10: Sound settings Using the Virtual Surround You can add exciting effects to audio sources. • Default setting: ON 1 Press SHIFT and SOUND to select 'SURROUND'. 2 Use / to select ' ' or ' '. The newly set value displays for 5 seconds, and then the - Pioneer XW-NAV1-K | Operating Instructions - Page 29
Using the timer 11 Chapter 11: English Using the timer Setting the clock Setting the clock allows you to use the timer.1 • Default setting: 1 With the power turned ON, press TIMER/CLOCK. The current time is displayed on the front panel display. 2 Press TIMER/CLOCK again. ' ' is displayed on the - Pioneer XW-NAV1-K | Operating Instructions - Page 30
the sleep timer is set, the remaining time will be displayed.1 Using the wake-up timer 1 Set the wake-up timer to on, and connect iPod/iPhone or USB storage device or slot a disc. 2 Press FUNCTION to select the input function that this unit plays when the wakeup timer works. 3 Press STANDBY - Pioneer XW-NAV1-K | Operating Instructions - Page 31
8 cm CDs cannot be used when you play a 8 cm CD/DVD. Español Note • For detailed instructions on files that iPod/ iPhone can play, refer to the manual supplied with the iPod/iPhone. • This unit does not support multisession discs or multiborder recording. • Multisession/ multiborder recording is - Pioneer XW-NAV1-K | Operating Instructions - Page 32
DVD content - video, audio, etc. - while the other side contains non-DVD content such as digital audio material. • The DVD side of a DualDisc can be played on this unit (excluding any DVD-Audio content). • The non-DVD, audio side of the disc is not compatible with this unit. Supported video - Pioneer XW-NAV1-K | Operating Instructions - Page 33
: .avi and .divx (these must be used for this unit to recognize DivX video files). Note that all files with the .avi extension supports baseline JPEG. • This unit supports Exif Ver.2.2. • This unit does not support progressive JPEG. Supported audio file formats • This unit does not support - Pioneer XW-NAV1-K | Operating Instructions - Page 34
Playable discs and files on discs or USB storage devices Windows MediaTM Audio (WMA) Sampling frequencies: 32 kHz, 44.1 kHz and 48 kHz Bit rate: Up to 192 kbps File extensions: .wma and .WMA • This unit supports files encoded using Windows Media Player Ver. 7/ 7.1, Windows Media Player for Windows - Pioneer XW-NAV1-K | Operating Instructions - Page 35
input source and recording format. This is not a problem with this Difference in volume between DVDs, CDs, MP3, unit. WMA, iPod/iPhone and Tuner. This unit cannot be operated with the remote control. Are you operating from far away? Is the remote control sensor exposed to direct sunlight or strong - Pioneer XW-NAV1-K | Operating Instructions - Page 36
USB mass storage class devices. This unit supports portable flash memory and digital audio playback devices. Only the FAT16 and FAT32 file systems are supported. Other file systems (ex. FAT, NTFS, etc.) are not supported. This is not a problem with this unit. File cannot be played. Is the file - Pioneer XW-NAV1-K | Operating Instructions - Page 37
the AC adapter connected. Français Español Audio CD tracks cannot be Is there enough free 99 PIONEER folders on the USB device. When connected to an HDMI-compatible device Problem Picture all the way in). With some cables, 1080p video signals will not be output. Set HDMI Out to LPCM (2CH) or Auto - Pioneer XW-NAV1-K | Operating Instructions - Page 38
information When an iPod/iPhone is connected Problem Can't operate the iPod/ iPhone by the remote control. Can't operate the iPod/ iPhone. Remedy Make sure the iPod/iPhone is connected correctly (refer to Connecting your iPod/iPhone on page 16). Make sure the iPod/iPhone is connected correctly - Pioneer XW-NAV1-K | Operating Instructions - Page 39
Turkmen (tk), 2011 Tagalog (tl), 2012 Setswana (tn), 2014 Tonga (to), 2015 Turkish (tr), 2018 Tsonga (ts), 2019 Tatar (tt), 2020 Twi (tw), 2023 Ukrainian (uk), 2111 Urdu (ur), 2118 Uzbek (uz), 2126 Vietnamese (vi), 2209 Volapük (vo), 2215 Wolof (wo), 2315 Xhosa (xh), 2408 Yoruba (yo), 2515 Zulu (zu - Pioneer XW-NAV1-K | Operating Instructions - Page 40
+. Use the buttons on the unit's top panel. The power turns on and the TV system switches as shown below. • AUTO NTSC • NTSC PAL • PAL AUTO no disc loaded and disconnect the iPod/ iPhone. Then press STANDBY/ON on this unit (or STANDBY/ON on the remote control), wait for the OFF indicator - Pioneer XW-NAV1-K | Operating Instructions - Page 41
to avoid the heat given off by the amplifier or other audio component, place it on a shelf below the amplifier. • Turn to dust or dirt, consult your nearest Pioneer authorized service center. Although lens cleaners for players are , and is intended for home and other limited viewing uses - Pioneer XW-NAV1-K | Operating Instructions - Page 42
13 Additional information Handling discs Storing • Always place discs in their cases and store them vertically, avoiding hot, humid places, places exposed to direct sunlight and extremely cold places. • Be sure to read the cautions included with the disc. them, and the label's glue may have oozed - Pioneer XW-NAV1-K | Operating Instructions - Page 43
1 1 1 Remote control ...AA batteries (R6) ...Power cord ...Audio/Video cable...FM wire antenna...Warranty card ...Operating instructions (This document) Note • Specifications and the design are subject to possible modifications without notice, due to improvements. Published by Pioneer Corporation - Pioneer XW-NAV1-K | Operating Instructions - Page 44
http://www.pioneer.co.uk http://www.pioneer.eu J2M71001A SH10/06 K Published by Pioneer Corporation. Copyright © 2010 Pioneer Corporation. All rights reserved. PIONEER CORPORATION 1-1, Shin-ogura, Saiwai-ku, Kawasaki-shi, Kanagawa 212-0031, Japan PIONEER ELECTRONICS (USA) INC. P.O. BOX 1540,
-
 1
1 -
 2
2 -
 3
3 -
 4
4 -
 5
5 -
 6
6 -
 7
7 -
8
-
9
-
10
-
11
-
12
-
13
-
14
-
15
-
16
-
17
-
18
-
19
-
20
-
21
-
22
-
23
-
24
-
25
-
26
-
27
-
28
-
29
-
30
-
31
-
32
-
33
-
34
-
35
-
36
-
37
-
38
-
39
-
40
-
41
-
42
-
43
-
44
 |
 |

XW-NAV1
-K
XW-NAV1K
-K
DVD Speaker system for iPod
Operating Instructions
Discover the benefits of registering your product online at
(or
).