Polaroid PMP85BL Quick Start Guide
Polaroid PMP85BL Manual
 |
View all Polaroid PMP85BL manuals
Add to My Manuals
Save this manual to your list of manuals |
Polaroid PMP85BL manual content summary:
- Polaroid PMP85BL | Quick Start Guide - Page 1
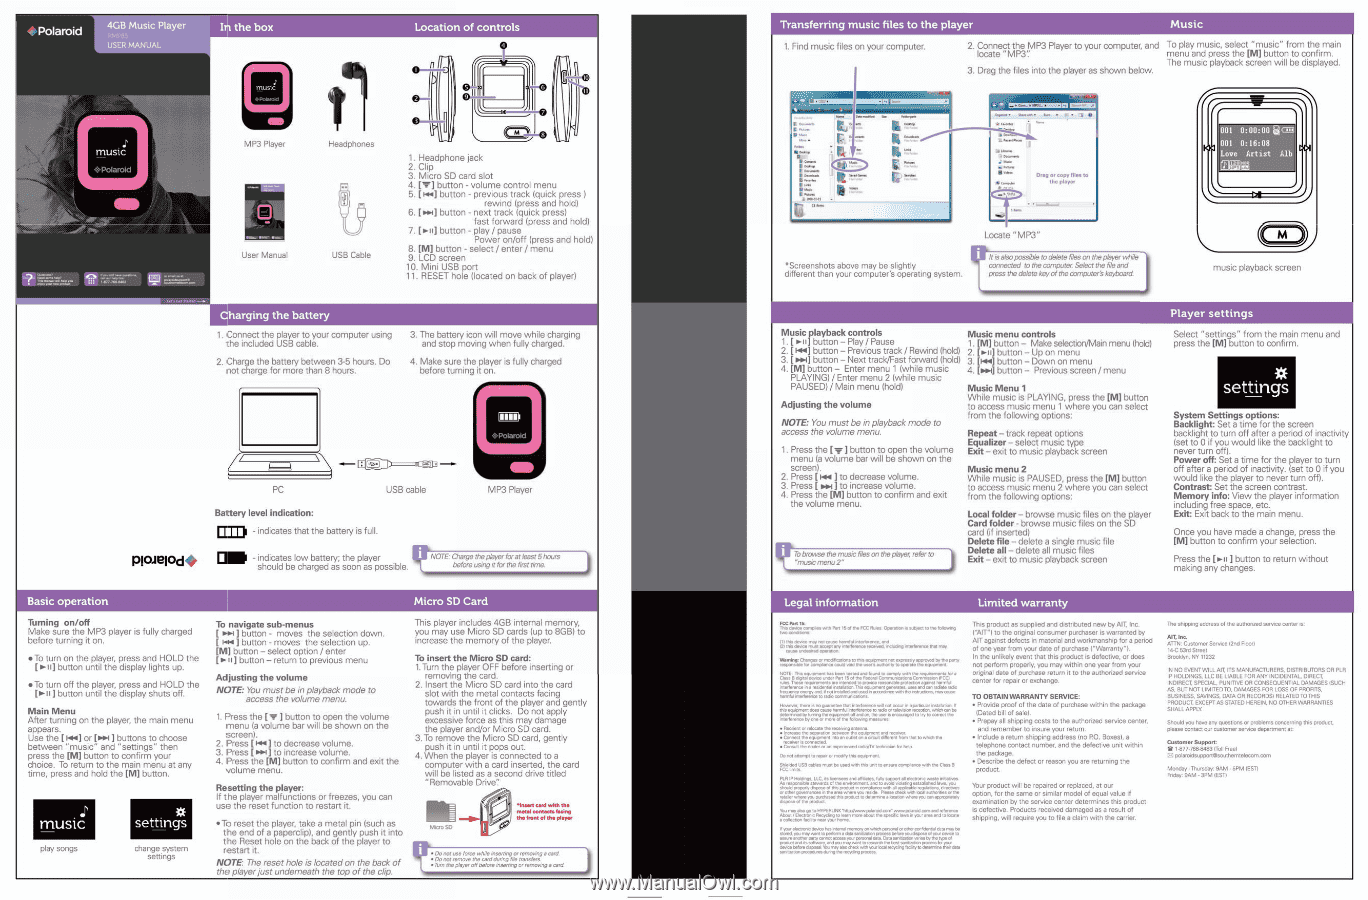
Polaroid MUSIC •Polarokl Location of controls I 0 music sialsOleekl MP3 Player User Manual Headphones USB Cable 1. Headphone jack 2. Clip 3. Micro SD card slot any questions or problems concerning this prod. • please contact our customer service department at: Customer Support: 1.877.768-8483
-
 1
1
 |
 |
Polaroid
Location
of
controls
I
Transferring
music
fi
les
to
the
player
Music
MUSIC
•Polarokl
ppielod
music
sialsOleekl
MP3
Player
Headphones
User
Manual
USB
Cable
0
1.
Headphone
jack
2.
Clip
3.
Micro
SD
card
slot
4.
[r]
button
-
volume
control
menu
5.
[
f..]
button
-
previous
track
(quick
press
)
rewind
(press
and
hold)
6.
[Pm]
button
-
next
track
(quick
press)
fast
forward
(press
and
hold)
7.
[b
-ii]
button
-
play
/
pause
Power
on/off
(press
and
hold
,
8.
[IVI]
button
-
select
/
enter
/
menu
9.
LCD
screen
10.
Mini
USB
port
11.
RESET
hole
(located
on
back
of
played
Charging
the
battery
1.
Connect
the
player
to
your
computer
using
the
included
USB
cable.
2.
Charge
the
battery
between
3-5
hours.
Do
not
charge
for
more
than
8
hours.
3.
The
battery
icon
will
move
while
charging
and
stop
moving
when
fully
charged.
4.
Make
sure
the
player
is
fully
charged
before
turning
it
on.
PC
USB
cable
Battery
level
indication:
-
indicates
that
the
battery
is
full.
•Polaroid
MP3
Player
-
indicates
low
battery;
the
player
NOTE:
Charge
the
pbyer
for
at
least
5
hours
should
be
charged
as
soon
as
possible.
before
using
it
for
the
first
time.
J
Basic
operation
Micro
SD
Card
Turning
on/off
Make
sure
the
MP3
player
is
fully
charged
before
turning
it
on.
•
To
turn
on
the
player,
press
and
HOLD
the
[r.ii]
button
until
the
display
lights
up.
•
To
turn
off
the
player,
press
and
HOLD
the
button
until
the
display
shuts
off.
Main
Menu
After
turning
on
the
player,
the
main
menu
appears.
Use
the
[
Hei]
or
[NH
buttons
to
choose
between
"music"
and
"settings"
then
press
the
[MI
button
to
confirm
your
choice.
To
return
to
the
main
menu
at
any
time,
press
and
hold
the
[M]
button.
MUSIC
play
songs
settings
change
system
settings
To
navigate
sub
-menus
[
button
-
moves
the
selection
down.
144
button
-
moves
the
selection
up.
[M]
button
—
select
option
/
enter
[•-ii]
button
—
return
to
previous
menu
Adjusting
the
volume
NOTE:
You
must
be
in
playback
mode
to
access
the
volume
menu.
1.
Press
the
Iv
I
button
to
open
the
volume
menu
(a
volume
bar
will
be
shown
on
the
screen).
2.
Press
[144]
to
decrease
volume.
3.
Press
[004]
to
increase
volume.
4.
Press
the
[M]
button
to
confirm
and
exit
the
volume
menu.
Resetting
the
player:
If
the
player
malfunctions
or
freezes,
you
can
use
the
reset
function
to
restart
it.
•To
reset
the
player,
take
a
metal
pin
(such
as
the
end
of
a
paperclip),
and
gently
push
it
into
the
Reset
hole
on
the
back
of
the
player
to
restart
it.
NOTE:
The
reset
hole
is
located
on
the
back
of
the
player
just
underneath
the
top
of
the
clip.
This
player
includes
4GB
internal
memory,
you
may
use
Micro
SD
cards
(up
to
8GB)
to
increase
the
memory
of
the
player.
To
insert
the
Micro
SD
card:
1.
Turn
the
player
OFF
before
inserting
or
removing
the
card.
2.
Insert
the
Micro
SD
card
into
the
card
slot
with
the
metal
contacts
facing
towards
the
front
of
the
player
and
gently
push
it
in
until
it
clicks.
Do
not
apply
excessive
force
as
this
may
damage
the
player
and/or
Micro
SD
card.
3.To
remove
the
Micro
SD
card,
gently
push
it
in
until
it
pops
out.
4.
When
the
player
is
connected
to
a
computer
with
a
card
inserted,
the
card
will
be
listed
as
a
second
drive
titled
"Removable
Drive":
insert
metal
cont
the
front
of
th,
•
rte
not
use
force
while
inserting
or
removing
a
card.
•
Do
not
remove
the
card
during
file
transfers.
•
Turn
the
player
off
before
inserting
or
removing
a
card
1.
Find
music
files
on
your
computer.
ei
•
•
y
•••••••
••••
•
0•••••
Ett
r.
ill
2.
Connect
the
MP3
Player
to
your
computer,
and
To
play
music,
select
"music"
from
the
main
locate
"MP3":
menu
and
press
the
[M]
button
to
confirm.
The
music
playback
screen
will
be
displayed
3.
Drag
the
files
into
the
player
as
shown
below.
C•eryor•
tem..
•
Nee
.0.1.
eiVaheeih
n.
Leaver.
uew,
aftwee
4
Kee
••
Nor.
el
hie.
•
•
tem
E
•
al
•
Drag
or
copy
files
to
the
player
Locate
"MP3"
0:00:00
a
0:16:08
Artist
*Screenshots
above
may
be
slightly
different
than
your
computer's
operating
system.
ft
is
also
possible
to
delete
fi
les
on
the
player
while
connected
to
the
computer.
Select
the
fi
le
and
press
the
delete
key
of
the
computer's
keyboard.
music
playback
screen
Player
settings
Music
playback
controls
Music
menu
controls
Select
"settings"
from
the
main
menu
and
1.
[
P
-ii]
button
-
Play
/
Pause
1.
[MI
button
—
Make
selection/Main
menu
(hold)
press
the
[M]
button
to
confirm.
2.
[
km]
button
-
Previous
track
/
Rewind
(hold)
2.
button
—
Up
on
menu
3.
[1.o.i]
button
—
Next
track/Fast
forward
(hold)
3.
[I.04]
button
-
Down
on
menu
4.
[MI
button
—
Enter
menu
1
(while
music
PLAYING)
/
Enter
menu
2
(while
music
4.
[NH]
button
-
Previous
screen
/
menu
O
-
PAUSED)
/
Main
menu
(hold)
Music
Menu
1
settings
Adjusting
the
volume
While
music
is
PLAYING,
press
the
[NI]
button
to
access
music
menu
1
where
you
can
select
options:
from
the
following
options:
System
Settings
NOTE:
You
must
be
in
playback
mode
to
Backlight:
Set
a
time
for
the
screen
access
the
volume
menu.
Repeat
—
track
repeat
options
backlight
to
turn
off
after
a
period
of
inactivity
1.
Press
the
[
y
]
button
to
open
the
volume
Equalizer
-
select
music
type
Exit
—
exit
to
music
playback
screen
(set
to
0
if
you
would
like
the
backlight
to
never
turn
off).
menu
(a
volume
bar
will
be
shown
on
the
Power
off:
Set
a
time
for
the
player
to
turn
screen).
Music
menu
2
off
after
a
period
of
inactivity.
(set
to
0
if
you
2.
Press
[
i44
]
to
decrease
volume.
While
music
is
PAUSED,
press
the
[M]
button
would
like
the
player
to
never
turn
off).
3.
Press
[
to
increase
volume.
to
access
music
menu
2
where
you
can
select
Contrast:
Set
the
screen
contrast.
4.
Press
the
[M]
button
to
confirm
and
exit
from
the
following
options:
Memory
info:
View
the
player
information
the
volume
menu.
including
free
space,
etc.
Local
folder
-
browse
music
files
on
the
player
Exit:
Exit
back
to
the
main
menu.
Card
folder
-
browse
music
files
on
the
SD
card
(if
inserted)
Once
you
have
made
a
change,
press
the
Delete
fi
le
-
delete
a
single
music
file
[M]
button
to
confirm
your
selection.
Delete
all
-
delete
all
music
files
Exit
-
exit
to
music
playback
screen
Press
the
I
button
to
return
without
making
any
changes.
I!
'
To
browse
the
music
files
on
the
player,
refer
to
"music
menu
2"
Legal
information
Limited
warranty
FCC
Pen
15:
The
delle•
aerobes
wrath
Pan
15
or/
Pe
FCC
Rules
Oporto,
a
weed
to
the
following
two
corcleorm
DI
thief:ewe
tray
not
cases
herniful
interleave
and
mis
device
must
accopt
pry
knesterencie
recove4
includasig
emigrants
net
Rey
muse
examined
cowmen
Weseinsp
Chew
or
rnoilifoenons
to
Pie
equOTOIlt
not
eagnesty
wormed
by
the
piety
responeble
it.
onnfience
could
veld
die
tees
authcoly
to
operate
the
Detriment
NOTE.
The
equrpoleint
ha
been
toned
end
found
to
comply
with
the
regumments
ton
a
Class
El
*nal
demo
under
Part
1501
th
e
Fades,
Communcinlons
Commission
IFCC)
rules.
These
recherernents
ere
intended
to
VOA&
rcesonsble
protector,
against
harmful
intelerenoa
in
•
reeidentei
installauce
The
equerries
generates.
~endear,
rule*
wk.
'regency
energy
and
d
not
healed
and
used
n
accordance
wen
th
e
emotions.
nay
come
reorde
imerfarence
radio
cornmunicetions.
limper.
Mere
I.
no
guarantee
th
at
interference
will
not
occur
in
a
wearer
estatation.
the
equipment
does
come
IemnM
interference
to
radios,
television
risceptice.
Wee
cm
be
determine
by
traero
the
egumment
off
end
on
Me
user
is
encouraged
to
try
Somme
the
interference
by
on•
or
more
of
the
Wowing
measures:
•
Reorient
or
reasons
the
mooning
antenna.
•
moves*
the
see:eaten
between
the
OChtbeherh
end
mere.
•
Connect
the
smeenent
into
an
outlet
on
a
breed
ddlerent
horn
11181
tO
WWI
the
receiver
is
connected.
•
Consult
the
dealer
or
an
experienced
redidIV
tedreoan
for
help.
Do
not
attempt
to
raper
or
molly
this
equipment.
Welded
USB
cables
must
be
used
with
the
unit
to
ensure
compere*
with
the
Cess
B
FCC
limits
PLR
IP
Redoes.
U.C.
a
Ibteeee$
and
effaces.
hey
supext
al
electronic
waste
rdetryes
Az
responsible
stewards
of
the
erneonment.
and
to
reed
0010509
established
Sera,
wski
shade
property
depose
of
this
prockm
e
in
carpets".
hen
epplebibie
regulations
deaconm
or
ns
other
ladel
=rn
ys
a
z.u
nces
Ma
ne
pudsaaed
e
where
Perna
.
chedrwrth
IlthOttori
11
IOOndetMeareWu
4
dispose
of
the
product.
ere
may
Mao
go
to
HYPERLINK
Tittpi/wwwoolarced
cony
wwwpolarodccrn
end
refiner.
About
/Electronic
Recycling
to
learn
mote
about
the
specific
lave
in
your
area
and
to
locate
•
selectee
feolity
new
your
home
vcar
electronic
[ewe
has
Iraernel
memory
an
when
remorse
or
oder
conbentel
data
may
be
Obod
you
miry
want
to
pcilomi
a
data
sencomon
peons
before
you
do
om
ed
yew
deice
te
assure
soother
poly
carrot
mess
yea
peacoat
date
Data
Serstelsben
Wein
by
the
typed
product
and
as
software.
and
Neu
mei
went
os
rested+
the
best
uneaten
process
for
wiLe
de
before
deposal
1bu
may
Yap
deck
wehyccrIccal
recydre
tacky
to
detewirwt
ercies
senitastion
proced.res
during
the
recyring
This
product
as
supplied
and
distributed
new
by
AIT,
Inc.
(AIT")
to
the
original
consumer
purchaser
is
warranted
by
AIT
against
defects
in
material
and
workmanship
for
a
period
of
one
year
from
your
date
of
purchase
("Warranty").
In
the
unlikely
event
that
this
product
is
defective,
or
does
not
perform
properly,
you
may
within
one
year
from
your
original
date
of
purchase
return
it
to
the
authorized
service
center
for
repair
or
exchange.
TO
OBTAIN
WARRANTY
SERVICE:
•
Provide
proof
of
the
date
of
purchase
within
the
package
(Dated
bill
of
sale).
•
Prepay
all
shipping
costs
to
the
authorized
service
center.
and
remember
to
insure
your
return.
•
Include
a
return
shipping
address
(no
P.O.
Boxes),
a
telephone
contact
number,
and
the
defective
unit
within
the
package.
•
Describe
the
defect
or
reason
you
are
returning
the
product.
Your
product
will
be
repaired
or
replaced,
at
our
option,
for
the
same
or
similar
model
of
equal
value
if
examination
by
the
service
center
determines
this
product
is
defective.
Products
received
damaged
as
a
result
of
shipping,
will
require
you
to
file
a
claim
with
the
carrier.
The
shipping
address
of
the
authorized
service
center
is:
AIT,
ATTN:
Customer
Service
(2nd
Floor)
14-C
53rd
Street
Brooklyn,
NY
11232
IN
NO
EVENT
WILL
Alt
RS
MANUFACTURERS,
DISTRIBUTORS
OR
PLF
IP
HOLDINGS.
LLC
BE
LIABLE
FOR
ANY
INCIDENTAL.
DIRECT.
INDIRECT.
SPECIAL
PUNITIVE
OR
CONSEOUENTIAL
DAMAGES
ISUCI
AS,
BUT
NOT
LIMITED
TO,
DAMAGES
FOR
LOSS
OF
PROFITS,
BUSINESS,
SAVINGS.
DATA
OR
RECORDS)
RELATED
TO
THIS
PRODUCT.
EXCEPT
AS
STATED
HEREIN.
NO
OTHER
WARRANTS
SHALL
APPLY.
Should
you
have
any
questions
or
problems concerning
this
prod.
•
please
contact
our
customer
service
department
at:
Customer
Support:
1.877.768-8483
(Toll
Free)
polaroidsupportesouthemtelecom.com
Monday
-Thursday:
9AM
-
5PM
ZEST)
Friday:
SAM
•
3PM
(EST)