ProForm 360 P Treadmill User Manual
ProForm 360 P Treadmill Manual
 |
View all ProForm 360 P Treadmill manuals
Add to My Manuals
Save this manual to your list of manuals |
ProForm 360 P Treadmill manual content summary:
- ProForm 360 P Treadmill | User Manual - Page 1
, Ltd. Customer Service Department Unit 4 Revie Road Industrial Estate Revie Road Beeston Leeds, LS118JG UK email: [email protected] CAUTION Read all precautions and instructions in this manual before using this equipment. Save this manual for future reference. USER'S MANUAL Visit our website - ProForm 360 P Treadmill | User Manual - Page 2
AND ADJUSTMENT 9 HOW TO FOLD AND MOVE THE TREADMILL 13 TROUBLESHOOTING 15 CONDITIONING GUIDELINES 17 ORDERING REPLACEMENT PARTS Back Cover Note: An EXPLODED DRAWING and a PART LIST are attached in the centre of this manual. PROFORM is a registered trademark of ICON Health & Fitness, Inc - ProForm 360 P Treadmill | User Manual - Page 3
treadmill by placing objects under the treadmill. 14. Keep the power cord away from heated surfaces. 15. Never move the walking belt whilst the power is turned off. Do not operate the treadmill general. 19. Never leave the treadmill unattended whilst it is running. Always remove the key, unplug the - ProForm 360 P Treadmill | User Manual - Page 4
adjustment procedures described in this manual. Never remove the motor hood unless instructed to do so by an authorised service representative. Servicing other than the procedures in this manual should be performed by an authorised service representative only. 24. The treadmill is intended for in - ProForm 360 P Treadmill | User Manual - Page 5
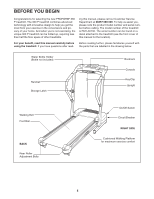
and privacy of your home. And when you're not exercising, the unique 360 P treadmill can be folded up, requiring less than half the floor space of other treadmills. ing this manual, please call our Customer Service Department at 08457 089 009. To help us assist you, please note the product - ProForm 360 P Treadmill | User Manual - Page 6
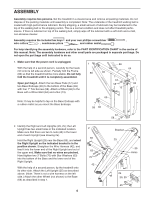
of the treadmill walking belt is coated manual. Note: The assembly hardware and other small parts are packaged in separate part bags. Do not open the part bags until instructed to do so. 1. Make sure that the power cord is unplugged. With the help of a second person, carefully tip the treadmill - ProForm 360 P Treadmill | User Manual - Page 7
person, raise the Uprights (25, 3 29) to the vertical position. Open part bag B. Set the Crossbar (40) on the brackets on the Uprights (25 the Bolts yet. 42 Large Hole Bracket 72 37 38 38 37 29 76 37 5. Open part bag C. Attach the end of the ground wire to 5 the small hole in the side of - ProForm 360 P Treadmill | User Manual - Page 8
bottom of the Console Base (47) to prevent the Wire Harness from slipping. Then, cut off the ends of the nylon ties. Route the Wire 48 2 8. Make sure that all parts are properly tightened before you use the treadmill. Note: Extra hardware may be included. Keep the included hex keys in a secure - ProForm 360 P Treadmill | User Manual - Page 9
OPERATION AND ADJUSTMENT THE PERFORMANT LUBETM WALKING BELT Your treadmill features a walking belt coated with PERFORMANT LUBETM, a high-performance lubricant. IMPORTANT: Never apply silicone spray or other substances to the walking belt or the walking platform. Such substances will deteriorate - ProForm 360 P Treadmill | User Manual - Page 10
stand on the walking belt when turning on the power. • Always wear the clip (see the drawing above) whilst operating the treadmill. • Adjust the speed in small increments in order to avoid sudden jumps in speed. • To reduce the possibility of electric shock, keep the - ProForm 360 P Treadmill | User Manual - Page 11
To stop the walking belt, press the Stop button. The Time/Incline display will begin to flash. To restart the walking belt, press the Start button or the Speed + button. Note: During the first few minutes that the treadmill is used, observe the alignment of the walking belt, and align it if - ProForm 360 P Treadmill | User Manual - Page 12
, remove the key. Step onto the foot rails, press the Stop button, and adjust the incline of the treadmill to the lowest level. The incline must be at the lowest level when the treadmill is raised to the storage position or the treadmill will be damaged. Next, remove the key from the console and - ProForm 360 P Treadmill | User Manual - Page 13
is securely held by the latch pin. To protect the floor or carpet from damage, place a mat under the treadmill. Keep the treadmill out of direct sunlight. Do not leave the treadmill in the storage position in temperatures above 30° C (85° F). Frame Latch Knob Latch Pin Engaged HOW TO MOVE THE - ProForm 360 P Treadmill | User Manual - Page 14
until the frame is past the latch pin. Slowly release the latch knob. 2. Hold the treadmill firmly with both hands, and lower the treadmill to the floor. Do not drop the treadmill frame to the floor. To decrease the possibility of injury, bend your legs and keep your back straight. Latch Knob 14 - ProForm 360 P Treadmill | User Manual - Page 15
the console. d. Make sure that the on/off switch is in the on position (see d. above). e. If the treadmill still will not run, please call our Customer Service Department. PROBLEM: The displays of the console do not function properly SOLUTION: a. Remove the key from the console and UNPLUG THE - ProForm 360 P Treadmill | User Manual - Page 16
the key, and run the treadmill for a few minutes. Repeat until the walking belt is properly tightened. b 8-10 cm Rear Roller Adjustment Bolts c. If the walking belt still slows when walked on, call our Customer Service Department. PROBLEM: The walking belt is off-centre or slips when walked on - ProForm 360 P Treadmill | User Manual - Page 17
problems. The pulse sensors are not medical devices. Various factors, including the user your heart rate as a guide. The chart below shows and incline of the treadmill until your heart rate include the following three parts: A Warm-up- your exercise program, do not keep your pulse in your training - ProForm 360 P Treadmill | User Manual - Page 18
. Stretches: Hamstrings, lower back and groin. 3. Calf/Achilles Stretch With one leg in front of the other, reach forward and place your hands against a wall. Keep your back leg straight and your back foot flat on the floor. Bend your front leg, lean forward and move your hips toward the wall - ProForm 360 P Treadmill | User Manual - Page 19
NOTES 19 - ProForm 360 P Treadmill | User Manual - Page 20
: • The MODEL NUMBER of the product (PETL30130) • The NAME of the product (PROFORM® 360 P treadmill) • The SERIAL NUMBER of the product (see the front cover of this manual) • The KEY NUMBER and DESCRIPTION of the desired part(s) (see the PART LIST and the EXPLODED DRAW- ING in the centre of this - ProForm 360 P Treadmill | User Manual - Page 21
IDENTIFICATION CHART Remove this chart and use it to identify small parts during assembly. Save this chart and the EXPLODED DRAWING/PART LIST for future reference. 1" Tek Screw (58)-4 Crossbar Screw (39)-2 Silver Ground Screw (75)-1 3/4" Screw (2)-8 1" Bolt (37)-6 2" Bolt (64)-2 1/2" Silver - ProForm 360 P Treadmill | User Manual - Page 22
Belly Pan Screw Circuit Breaker Small Bolt Receptical Belly Pan Belt Guide Belt Guide Screw Plastic Fastener Isolator Cushion Frame Releasable Tie Incline Motor 8" White Wire, 2F 8" Green Wire, 2 Ring 8" Green Wire, F/Ring 6 " Red Wire, M/F User's Manual *Includes all parts shown in the box #These - ProForm 360 P Treadmill | User Manual - Page 23
EXPLODED DRAWING-Model No. PETL30130 R0803A EXPLODED DRAWING-Model No. PETL30130 2 2 73 71 76 98 37 85 97 11 15 96 95 102 38 92 102 93 99 38 92 94 102 100 102 91 2 74 14 15 82 84 83 15 86 26 90 3 2 1 2 9* 106 104 122 79 10 26 115 2 12 28 105 24 4 5 6 115 7 103 20 8 26
-
 1
1 -
 2
2 -
 3
3 -
 4
4 -
 5
5 -
 6
6 -
 7
7 -
8
-
9
-
10
-
11
-
12
-
13
-
14
-
15
-
16
-
17
-
18
-
19
-
20
-
21
-
22
-
23
 |
 |

Serial
Number
Decal
Model No. PETL30130
Serial No.
CAUTION
Read all precautions and instruc-
tions in this manual before using
this equipment. Save this manual
for future reference.
USER'S MANUAL
Class H Fitness Product
QUESTIONS?
As a manufacturer, we are com-
mitted to providing complete
customer satisfaction. If you
have questions, or if there are
missing or damaged parts,
please call:
or write:
ICON Health & Fitness, Ltd.
Customer Service Department
Unit 4
Revie Road Industrial Estate
Revie Road
Beeston
Leeds, LS118JG
UK
email: [email protected]
08457 089 009
www.iconeurope.com
Visit our website at