ProForm 385 English Manual
ProForm 385 Manual
 |
View all ProForm 385 manuals
Add to My Manuals
Save this manual to your list of manuals |
ProForm 385 manual content summary:
- ProForm 385 | English Manual - Page 1
customer satisfaction. If you have questions, or if there are missing or damaged parts, we will guarantee complete satisfaction through direct assistance from our factory. TO AVOID p.m. MST ?f8 . ea A:J.i .1p94:Ar1...)01t:,..,.„,,, *imp 4; 11100 are: is manual ure.:fe eteti •i* USER'S MANUAL - ProForm 385 | English Manual - Page 2
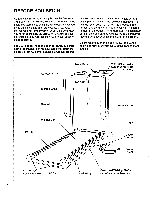
HOW TO FOLD AND MOVE THE TREADMILL MAINTENANCE AND TROUBLE-SHOOTING CONDITIONING GUIDELINES ORDERING REPLACEMENT PARTS LIMITED WARRANTY 2 4 5 7 10 12 14 Back Cover Back Cover Note: An EXPLODED DRAWING and a PART LIST are attached to the center of this manual. Please save them for future reference - ProForm 385 | English Manual - Page 3
manual. Never remove the motor hood:unless instructed to do so by an authorized service representative. Servicing other than the procedures in this manual should be performed by:an auhorized service representative only 2 This treadmill' is intended for in-home use only. Do not use this treadmill - ProForm 385 | English Manual - Page 4
you're not exercising, the unique PROFORM 385 can be folded up, requiring less than half the floor space of other treadmills. For your benefit, read this manual carefully before using the treadmill. If you have additional questions, please call our Customer Service Department toll-free at 1-800-999 - ProForm 385 | English Manual - Page 5
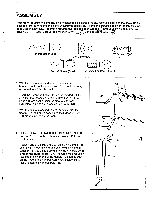
treadmill in a cleared area and remove all packing materials. Do not dispose of the packing materials until assembly is completed. Refer to the 1rawings below to identify the small parts used LOWER THE TREADMILL FOR USE on page 11. Follow the instructions on page 11 to lower the treadmill. Position - ProForm 385 | English Manual - Page 6
Clip onto the base of the Uprights (14) in the indicated location. Press the Allen Wrench (73) into the Adhesive Clip. 7. Make sure that all parts are tightened before you use the treadmill. Note: To protect the floor or carpet, 6 place a mat under the - ProForm 385 | English Manual - Page 7
cord having an equipment-grounding conductor and a Your treadmill features a walking belt coated with grounding plug. Plug the power cord into plug provided with the product-if ..it wil The temporary adapter should be used only until a properly grounded outlet (drawing 1) can be installed by a - ProForm 385 | English Manual - Page 8
Use:1 Manua: ., War varnirep eve el:eating Ireuvetiers. • keep norm eA elecieenic cavole. Speed Control Clip Key Before operating t e;rea e folloWing Precaution o not stan onthe walking belt onto the foot rails of the treadmill. Find the clip attached to the key (see the drawing above), and - ProForm 385 | English Manual - Page 9
conserve the batteries. HOW TO CHANGE THE INCLINE OF THE TREADMILL The incline of the treadmill can be changed by raising or lowering the back end. Before changing the incline, remove the key and unplug the power cord. To stop the walking belt, step onto the foot rails and slide the speed control - ProForm 385 | English Manual - Page 10
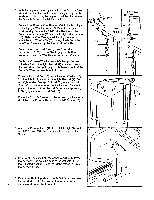
, or the base pads may come off. To reduce the risk of injury, use extreme caution while moving the treadmill. Do not move the treadmill over an uneven surface. 3. Place one foot on the base, and carefully lower the treadmill until it is resting in the storage position. 10 Storage Latch. Engaged - ProForm 385 | English Manual - Page 11
with your right hand as shown. Using your left thumb, press the storage latch and hold it. Pivot the treadmill until the frame and foot rail are past the storage latch. Storage Latch • Unlatched 2. Hold the treadmill firmly with both hands, and lower the treadmill to the floor. To decrease the - ProForm 385 | English Manual - Page 12
TROUBLE-SHOOTING Most treadmill problems can be solved by following the steps below. Find the symptom that applies, and follow the steps listed. If further assistance is needed, please call our Customer Service TO PLUG IN THE POWER CORD on page 7.) Use only a UL-listed surge protector, rated at 15 - ProForm 385 | English Manual - Page 13
insert the key and run the treadmill for a few minutes. Repeat until the walking belt is properly tightened. b 2"-3" Rear Roller Adjustment Bolts c. If the walking belt still slows when walked on, please call our toll-free Customer Service Department. 5. SYMPTOM: THE WALKING BELT IS OFF-CENTER - ProForm 385 | English Manual - Page 14
health problems. The key to achieving the desired results is to exercise with the proper intensity. The proper intensity level can be found by using your heart rate as a guide treadmill accordingly. WORKOUT GUIDELINES Fat Burning A well-rounded workout includes the following three important parts - ProForm 385 | English Manual - Page 15
flexibility of your muscles and will help to prevent post-exercise problems. Exercise Frequency To maintain or improve your condition, complete three workouts each week if desired. The key to success is to make exercise a regular and enjoyable part of your everyday life. SUGGESTED STRETCHES The - ProForm 385 | English Manual - Page 16
• The NAME OF THE PRODUCT (PROFORM°' 385 treadmill). • The SERIAL NUMBER OF THE PRODUCT (see the front cover of this manual). • The KEY NUMBER OF THE PART(S) (see the EXPLODED DRAWING and PART LIST attached to the center of this manual). • The DESCRIPTION OF THE PART(S) (see the EXPLODED DRAWING and - ProForm 385 | English Manual - Page 17
REMOVE THIS EXPLODED DRAWING AND PART LIST FROM THE MANUAL Save this EXPLODED DRAWING and PART LIST for future reference. N Note: Specifications are subject to change without notice. For information about ordering replacement parts, see the back cover of the User's Manual. - ProForm 385 | English Manual - Page 18
45 2 46 4 47 14 48 1 Key/Clip Handrail Cage Nut Ratchet Screw Rear Isolator Screw Motor Locknut 50 2 Belt Guide 51 1 Belly Pan 52 1 Releasable Tie 53 1 Cable Tie Clamp 54 1 Motor 1 Walking Platform 80 1 Walking. Belt 81 User's Manual * Includes all parts shown in the box # These - ProForm 385 | English Manual - Page 19
EXPLODED DRAWING-Model No. PFTL38572 7 8 R1297A 11' 88 14 J' .. 12 13 15 16 10 17 55 30 '2 ' 1 .....-- .,..-.....-- 26 18 19' 15 -16 0 21 74 72 16 71 71 13 90 90 90 77 6 3 3 5 22 75 62 5 89 76 62 31 47-h 64 63 67 47 66 3969 9 27 16 :r" 68 66 65 41 I . 25 7 45 3:7:
-
 1
1 -
 2
2 -
 3
3 -
 4
4 -
 5
5 -
 6
6 -
 7
7 -
8
-
9
-
10
-
11
-
12
-
13
-
14
-
15
-
16
-
17
-
18
-
19
 |
 |

ED
b.
,
tO
0
in
<(>0
CJ
DEC
1
6
s
6
3'
6
k*
-4
7A,
've
/PAG
-C\
PROARawilnk:Mannian.P7
degoofiRet'
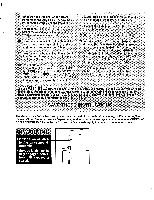
Model
No.
PFTL38572
Serial
No.
Serial
Number
Decal
QUESTIONS?
As
a
manufacturer,
we
are
com-
mitted
to
providing
complete
customer
satisfaction.
If
you
have
questions,
or
if
there
are
missing
or
damaged
parts,
we
will
guarantee
complete
satis-
faction
through
direct
assis-
tance
from
our
factory.
TO
AVOID
UNNECESSARY
DELAYS,
PLEASE
CALL
DIRECT
TO
OUR
TOLL
-FREE
CUSTOMER
HOT
LINE.
The
trained
technicians
on
our
Customer
Hot
Line
will
provide
immediate
assistance,
free
of
charge
to
you.
CUSTOMER
HOT
LINE:
1-800-999-3756
Mon.
—Fri.,
6
a.m.-6
p.m.
MST
?f8
.
ea
A:J.i
4;
11100
ure.:fe
eteti
.1p94:Ar1...)01t
:,..,.„,,,
*imp
is
manual
are:
•i*
PERFORMANCE
TREADMI
LLS
USER'S
MANUAL