ProForm 390 E Elliptical Canadian English Manual
ProForm 390 E Elliptical Manual
 |
View all ProForm 390 E Elliptical manuals
Add to My Manuals
Save this manual to your list of manuals |
ProForm 390 E Elliptical manual content summary:
- ProForm 390 E Elliptical | Canadian English Manual - Page 1
, or if parts are damaged or missing, PLEASE CONTACT OUR CUSTOMER SERVICE DEPARTMENT DIRECTLY. CALL TOLL-FREE: 1-888-936-4266 Mon.-Fri., 7:30 until 16:30 ET (excluding holidays) OR E-MAIL US: [email protected] CAUTION Read all precautions and instructions in this manual before using this - ProForm 390 E Elliptical | Canadian English Manual - Page 2
ELLIPTICAL 15 MAINTENANCE AND TROUBLESHOOTING 20 EXERCISE GUIDELINES 22 PART LIST 24 EXPLODED DRAWING 26 ORDERING REPLACEMENT PARTS Back Cover LIMITED manual and request a free replacement decal. Apply the decal in the location shown. Note: The decal(s) may not be shown at actual size. PROFORM - ProForm 390 E Elliptical | Canadian English Manual - Page 3
all important precautions and instructions in this manual and all warnings on your elliptical before using your elliptical. ICON assumes no all parts regularly. Replace any worn parts immediately. 8. Keep children under age 12 and pets away from the elliptical at all times. 15. Over exercising may - ProForm 390 E Elliptical | Canadian English Manual - Page 4
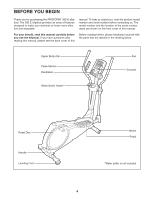
BEFORE YOU BEGIN Thank you for purchasing the PROFORM® 390 E elliptical. The 390 E elliptical provides an array of features designed to make your workouts at home more effective and enjoyable. manual. To help us assist you, note the product model number and serial number before contacting us. The - ProForm 390 E Elliptical | Canadian English Manual - Page 5
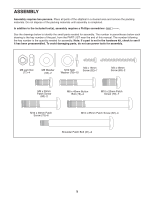
requires two persons. Place all parts of the elliptical in a cleared area and remove manual. The number following the key number is the quantity needed for assembly. Note: If a part is not in the hardware kit, check to see if it has been preassembled. To avoid damaging parts, do not use power - ProForm 390 E Elliptical | Canadian English Manual - Page 6
1. To make assembly easier, read the 1 information on page 5 before you begin. While a second person lifts the rear of the Frame (1), attach the Rear Stabilizer (70) to the Frame with two M10 x 85mm Patch Screws (82). 70 82 2. Orient the Front Stabilizer (73) so that the 2 "Front" sticker is - ProForm 390 E Elliptical | Canadian English Manual - Page 7
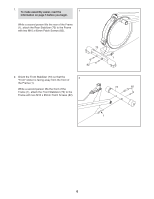
3. Orient the Upright (2) and the Top Shield Cover (37) as shown. Slide the Top Shield Cover 3 upward onto the Upright. Have a second person hold the Upright (2) near the Frame (1). See the inset drawing. Locate the wire tie in the Upright (2). Tie the lower end of the wire tie to the Wire - ProForm 390 E Elliptical | Canadian English Manual - Page 8
. Then, reattach the battery covers. To purchase an optional power adapter, call the telephone number on the cover of this manual. To avoid damaging the console, use only a manufacturer-supplied power adapter. Plug one end of the power adapter into the receptacle on the console; plug the other end - ProForm 390 E Elliptical | Canadian English Manual - Page 9
the left and right sides of the Handlebar (39) and pull them upward out of the Upright (2). While a second person holds the Console (4) near the Upright (2), connect wires on the Console to the Wire Harness (42) and to the Pulse Wires (28). Insert the excess wires into the Upright (2). Tip: Avoid - ProForm 390 E Elliptical | Canadian English Manual - Page 10
9. Identify the Left and Right Upper Body Arms (8, 9), which are marked with "Left" and "Right" stickers. Orient the Left Upper Body Arm (8) and an Upper Body Leg (6) as shown. Make sure that the hexagonal holes are in the indicated location. Insert the Left Upper Body Arm (8) into the Upper Body - ProForm 390 E Elliptical | Canadian English Manual - Page 11
10. Apply a generous amount of the included grease to the axles on the Upright (2). Orient the Left and Right Upper Body Arms (8, 9) as shown, and slide them onto the left and right sides of the Upright (2). Attach each Upper Body Arm (8, 9) with an M8 x 20mm Patch Screw (80) and an M8 Washer (33). - ProForm 390 E Elliptical | Canadian English Manual - Page 12
tabs. Press a Pivot Cover A (19) and a Pivot Cover B (22) together around the Right Upper Body Arm (9). Repeat this step for the other side of the elliptical. Tip: Make sure that the Pivot Covers (19, 22) are positioned as shown. 12 Tabs 22 8 19 9 22 Hooks 22 19 19 Hooks 13. Attach - ProForm 390 E Elliptical | Canadian English Manual - Page 13
Leg Cover (20) and a Rear Leg Cover (21) together around the right Upper 14 Body Leg (6). Repeat this step for the other side of the elliptical. 6 20 21 15. Identify the Right Pedal (13), which is marked with a "Right" sticker. 15 Attach the Right Pedal (13) to the Right Pedal Arm - ProForm 390 E Elliptical | Canadian English Manual - Page 14
16. Press the Rear Shield Cover (59) onto the Left and Right Shields (44, 45). 16 59 44 45 17. Make sure that all parts of the elliptical are properly tightened. Note: Some hardware may be left over after assembly is completed. To protect the floor or carpet from damage, place a mat under - ProForm 390 E Elliptical | Canadian English Manual - Page 15
HOW TO USE THE ELLIPTICAL HOW TO MOVE THE ELLIPTICAL HOW TO EXERCISE ON THE ELLIPTICAL Due to the size and weight of the elliptical, moving it requires two persons. Stand in front of the elliptical, hold the upright, and place one foot against one of the front wheels. Pull on the upright and have - ProForm 390 E Elliptical | Canadian English Manual - Page 16
preset workout automatically changes the resistance of the pedals as it guides you through an effective workout. You can even connect your MP3 player or CD player to the console sound system and listen to your favorite music or audio books while you exercise. To use the manual mode, see page 17. To - ProForm 390 E Elliptical | Canadian English Manual - Page 17
console, the manual mode will be selected. If you have selected a workout, reselect the manual mode by pressing the Weight Loss Workouts or the Performance Workouts button repeatedly until zeros appear in the displays. Track 3. Begin pedaling and change the resistance As you exercise, indicators - ProForm 390 E Elliptical | Canadian English Manual - Page 18
turn off the fan. Note: If the pedals do not move for about thirty seconds, the fan will turn off automatically. 7. When you are finished exercising, the console will turn off automatically. If the pedals do not move for several seconds, a series of tones will sound, the - ProForm 390 E Elliptical | Canadian English Manual - Page 19
flash in the display for a few seconds to alert you. The resistance of the pedals will then change. To play music or audio books through the console sound system while you exercise, plug the audio cable into the jack on the console and into the jack on your MP3 player or CD player; make - ProForm 390 E Elliptical | Canadian English Manual - Page 20
become dim, replace all the batteries at the same time; most console problems are the result of low batteries. See assembly step 6 on page 8 for replacement instructions. 92 92 92 If the handgrip pulse sensor does not function properly, see step 5 on page 18. HOW TO ADJUST THE DRIVE BELT If you - ProForm 390 E Elliptical | Canadian English Manual - Page 21
toward or away from the Magnet. Then, retighten the M4 x 16mm Screw (92). Rotate the Crank Assembly (24) for a moment. Repeat these actions until the console displays correct feedback. When the reed switch is correctly adjusted, reattach the right pedal disc and the right disc cover. 21 - ProForm 390 E Elliptical | Canadian English Manual - Page 22
exercise, adjust the intensity of your exercise until your heart rate is near the highest number in your training zone. EXERCISE exercising at the proper intensity is the key to achieving results. You can use your heart rate as a guide and helps to prevent post-exercise problems. To find the proper - ProForm 390 E Elliptical | Canadian English Manual - Page 23
SUGGESTED STRETCHES The correct form for several basic stretches is shown at the right. Move slowly as you stretch-never bounce. 1. Toe Touch Stretch Stand with your knees bent slightly - ProForm 390 E Elliptical | Canadian English Manual - Page 24
PART LIST Key No. Qty. 1 1 2 1 3 1 4 1 5 1 6 2 7 1 8 1 9 1 10 2 11 2 12 1 Cap Shoulder Patch Bolt Console Cover M8 Washer Adjustment Block M5 Washer Small Snap Arm Screw Resistance Motor Bolt Rear Stabilizer Motor Bracket Screw Drive Belt Adjustment Screw Front Stabilizer - ProForm 390 E Elliptical | Canadian English Manual - Page 25
x 10mm Screw 99 4 M8 x 15mm Screw * - Userʼs Manual * - Assembly Tool * - Grease Packet * - Wire Tie Note: Specifications are subject to change without notice. For information about ordering replacement parts, see the back cover of this manual. *These parts are not illustrated. 25 - ProForm 390 E Elliptical | Canadian English Manual - Page 26
26 11 95 10 8 33 80 17 22 19 17 12 76 6 31 21 30 33 29 85 15 84 23 84 14 78 78 78 29 75 5 77 3 92 20 79 78 79 78 23 4 92 93 79 92 28 39 2 79 78 10 79 11 16 32 9 79 89 22 79 17 19 77 33 80 17 76 6 13 20 21 15 29 84 29 33 30 78 78 85 75 84 23 31 78 49 23 - ProForm 390 E Elliptical | Canadian English Manual - Page 27
27 92 81 92 81 92 92 18 18 92 92 44 46 51 37 63 26 99 99 24 96 48 92 47 97 70 94 87 7 42 86 41 56 83 35 34 36 54 69 77 71 91 55 98 71 40 66 88 52 43 98 92 72 38 53 74 1 64 41 57 90 38 65 77 40 58 25 92 67 68 60 48 59 82 61 43 62 92 47 92 27 50 73 45 92 82 - ProForm 390 E Elliptical | Canadian English Manual - Page 28
number and description of the replacement part(s) (see the PART LIST and the EXPLODED DRAWING near the end of this manual) LIMITED WARRANTY ICON of Canada, Inc. (ICON) warrants this product to be free from defects in workmanship and material, under normal use and service conditions. The frame is
-
 1
1 -
 2
2 -
 3
3 -
 4
4 -
 5
5 -
 6
6 -
 7
7 -
8
-
9
-
10
-
11
-
12
-
13
-
14
-
15
-
16
-
17
-
18
-
19
-
20
-
21
-
22
-
23
-
24
-
25
-
26
-
27
-
28
 |
 |
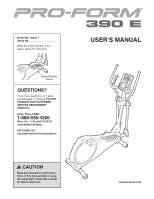
Serial Number
Decal
CAUTION
Read all precautions and instruc-
tions in this manual before using
this equipment. Keep this manual
for future reference.
Model No. 30331.1
Serial No.
Write the serial number in the
space above for reference.
USERʼS MANUAL
QUESTIONS?
If you have questions, or if parts
are damaged or missing,
PLEASE
CONTACT OUR CUSTOMER
SERVICE DEPARTMENT
DIRECTLY.
CALL TOLL-FREE:
1-888-936-4266
Mon.–Fri., 7:30 until 16:30 ET
(excluding holidays)
OR E-MAIL US:
www.proform.com