ProForm 390 Spx Instruction Manual
ProForm 390 Spx Manual
 |
View all ProForm 390 Spx manuals
Add to My Manuals
Save this manual to your list of manuals |
ProForm 390 Spx manual content summary:
- ProForm 390 Spx | Instruction Manual - Page 1
: Visit www.iconsupport.eu Write: ICON Health & Fitness, Ltd. c/o HI Group PLC, Express Way Whitwood, West Yorkshire WF10 5QJ UK CAUTION Read all precautions and instructions in this manual before using this equipment. Keep this manual for future reference. USERʼS MANUAL www.iconeurope.com - ProForm 390 Spx | Instruction Manual - Page 2
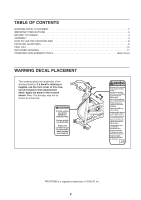
Cover WARNING DECAL PLACEMENT This drawing shows the location(s) of the warning decal(s). If a decal is missing or illegible, see the front cover of this manual and request a free replacement decal. Apply the decal in the location shown. Note: The decal(s) may not be shown at actual size - ProForm 390 Spx | Instruction Manual - Page 3
risk of serious injury, read all important precautions and instructions in this manual and all warnings on your exercise bike before using your important for persons over age 35 or persons with pre-existing health problems. 8. Wear appropriate clothes while exercising; do not wear loose clothes - ProForm 390 Spx | Instruction Manual - Page 4
PROFORM® 390 SPX exercise bike. Cycling is an effective exercise for increasing cardiovascular fitness, building endurance, and toning the body. The 390 SPX the serial number decal are shown on the front cover of this manual. Before reading further, please familiarize yourself with the parts that are - ProForm 390 Spx | Instruction Manual - Page 5
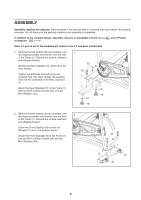
ASSEMBLY Assembly requires two persons. Place all parts of the exercise bike in a cleared area and remove the packing materials. Do not dispose of the packing materials until assembly is completed. In addition to the included tool(s), assembly requires an adjustable wrench screwdriver . and a - ProForm 390 Spx | Instruction Manual - Page 6
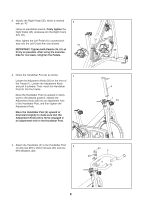
3. Identify the Right Pedal (35), which is marked with an "R." 3 Using an adjustable wrench, firmly tighten the Right Pedal (35) clockwise into the Right Crank Arm (31). Next, tighten the Left Pedal (61) counterclock- 31 wise into the Left Crank Arm (not shown). 61 IMPORTANT: Tighten both - ProForm 390 Spx | Instruction Manual - Page 7
6. Orient the Seat Post (2) as shown. 6 Locate the Adjustment Knob (23) on the rear of the Frame (1). Loosen the Adjustment Knob and pull it outward. Then, insert the Seat Post (2) into the Frame. Move the Seat Post (2) upward or downward to the desired position, release the Adjustment Knob (23 - ProForm 390 Spx | Instruction Manual - Page 8
Horizontal seal post (31) with Multifunctional wrench. Then tighten the Horizontal seal post (31) on the Saddle supporting tube (6) with Flat washer(19),Nut V (20). Last, insert the Saddle supporting tube (6) to the Main frame (1) and tightly with Knob bolt (28) . Note: 1. You can control the - ProForm 390 Spx | Instruction Manual - Page 9
also allows you to personalize settings, select a system of measurement, and enter user information before you begin exercising. To personalize console settings, see the instructions at the right. To set the clock, see page 11. To use the console, see page 11. Before using the console, make sure - ProForm 390 Spx | Instruction Manual - Page 10
4. Enter your gender if desired. A gender symbol will flash in the lower display. Press the Right button repeatedly to select the symbol that represents your gender. Press the Left button to advance to the next setting. 6. Select a unit of measurement if desired. The console can display speed, - ProForm 390 Spx | Instruction Manual - Page 11
HOW TO SET THE CLOCK HOW TO USE THE CONSOLE 1. Turn on the console. 1. Turn on the console. Press any button to turn on the console. Press any button to turn on the console. 2. Enter the clock mode. 2. Follow your progress with the displays. First, press the Left button repeatedly until the - ProForm 390 Spx | Instruction Manual - Page 12
The lower display-This display can show the button until following workout information: zeros appear in the displays. Speed (SPEED)- This display shows your pedaling speed in miles per hour (ML/H) or kilometers per hour (KM/H). Note: When you stop pedaling, this display shows the average pedaling - ProForm 390 Spx | Instruction Manual - Page 13
HOW TO USE THE EXERCISE BIKE HOW TO ADJUST THE ANGLE OF THE SEAT You can adjust the angle of the seat to the position HOW TO ADJUST THE HORIZONTAL POSITION OF THE HANDLEBAR that is most comfortable. You can also slide the seat forward or backward to increase your comfort or to adjust the distance - ProForm 390 Spx | Instruction Manual - Page 14
HOW TO ADJUST THE PEDAL STRAPS HOW TO LEVEL THE EXERCISE BIKE To tighten the pedal straps (see the drawing on page 4), simply pull the ends of the pedal straps. To loosen the pedal straps, press and hold the tabs on the buckles, adjust the pedal straps to the desired position, and then release the - ProForm 390 Spx | Instruction Manual - Page 15
for persons over the age of 35 or persons with pre-existing health problems. The pulse sensor is not a medical device. Various factors may affect the the key to achieving results. You can use your heart rate as a guide to find the proper intensity level. The chart below shows recommended heart rates - ProForm 390 Spx | Instruction Manual - Page 16
SUGGESTED STRETCHES The correct form for several basic stretches is shown at the right. Move slowly as you stretch- never bounce. 1. Toe Touch Stretch 1 Stand with your knees bent slightly and slowly bend forward from your hips. Allow your back and shoulders to relax as you reach down toward - ProForm 390 Spx | Instruction Manual - Page 17
MAINTENANCE AND TROUBLESHOOTING Inspect and tighten all parts of the exercise bike regularly. Replace any worn parts immediately. To clean the exercise bike, use a damp cloth and a small - ProForm 390 Spx | Instruction Manual - Page 18
EXPLODED DRAWING-Model No. PFEVEX74712.0 66 17 66 22 34 3 23 19 33 33 5 2 7 18 19 17 18 34 49 33 11 43 9 10 50 50 23 62 52 42 63 58 60 49 16 16 27 15 26 51 41 64 65 35 31 35 54 6 45 30 48 28 27 39 29 55 38 40 44 44 32 53 47 36 35 38 37 55 57 13 13 6 29 - ProForm 390 Spx | Instruction Manual - Page 19
1 65 Brake Pad Mount 2 32 Crank Cap 2 66 M8 Hex Nut 2 33 M10 Washer 6 67 Handlebar Post Bushing 1 34 M10 x 25mm Screw 6 * - Assembly Tool * - Userʼs Manual 19 - ProForm 390 Spx | Instruction Manual - Page 20
) • the key number and description of the replacement part(s) (see the PART LIST and the EXPLODED DRAWING near the end of this manual) IMPORTANT RECYCLING INFORMATION FOR E. U. CUSTOMERS This electronic product must not be disposed of in municipal waste. To preserve the environment, this product
-
 1
1 -
 2
2 -
 3
3 -
 4
4 -
 5
5 -
 6
6 -
 7
7 -
8
-
9
-
10
-
11
-
12
-
13
-
14
-
15
-
16
-
17
-
18
-
19
-
20
 |
 |

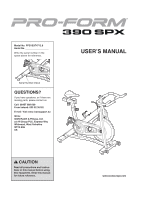
USER
ʼ
S MANUAL
Serial Number Decal
CAUTION
Read all precautions and instruc-
tions in this manual before using
this equipment. Keep this manual
for future reference.
Model No. PFEVEX74712.0
Serial No.
Write the serial number in the
space above for reference.
QUESTIONS?
If you have questions, or if there are
missing parts, please contact us:
Call: 08457 089 009
From Ireland: 053 92 36102
E-mail: Visit www.iconsupport.eu
Write:
ICON Health & Fitness, Ltd.
c/o HI Group PLC, Express Way
Whitwood, West Yorkshire
WF10 5QJ
UK
www.iconeurope.com