ProForm 540 Treadmill English Manual
ProForm 540 Treadmill Manual
 |
View all ProForm 540 Treadmill manuals
Add to My Manuals
Save this manual to your list of manuals |
ProForm 540 Treadmill manual content summary:
- ProForm 540 Treadmill | English Manual - Page 1
or if parts are damaged or missing, PLEASE CONTACT OUR CUSTOMER SERVICE DEPARTMENT DIRECTLY. CALL TOLL-FREE: 1-888-533-1333 Mon.-Fri. 6 a.m.-6 p.m. MST Sat. 8 a.m.-5 p.m. MST ON THE WEB: www.proformservice.com USER'S MANUAL CAUTION Read all precautions and instructions in this manual before using - ProForm 540 Treadmill | English Manual - Page 2
ASSEMBLY 6 OPERATION AND ADJUSTMENT 12 HOW TO FOLD AND MOVE THE TREADMILL 18 MAINTENANCE AND TROUBLESHOOTING 20 CONDITIONING GUIDELINES 22 PART LIST 23 EXPLODED DRAWING 24 ORDERING REPLACEMENT PARTS Back Cover LIMITED WARRANTY Back Cover PROFORM is a registered trademark of ICON IP, Inc. 2 - ProForm 540 Treadmill | English Manual - Page 3
a mat under the treadmill. this manual and order part number 146148, or see your local electronics store. 12. Failure to use a properly functioning surge suppressor could result in damage to the control system of the treadmill. If the control system is damaged, the walking belt may change speed - ProForm 540 Treadmill | English Manual - Page 4
and properly tighten all parts of the treadmill regularly. the treadmill, and before performing the maintenance and adjustment procedures described in this manual. Never remove the motor hood unless instructed to do so by an authorized service representative. Servicing other than the procedures - ProForm 540 Treadmill | English Manual - Page 5
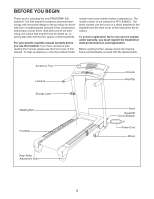
under warranty, you must register the treadmill at www.proformservice.com/registration. Before reading further, please review the drawing below and familiarize yourself with the labeled parts. Accessory Tray Handrail Storage Latch Console Key/Clip Walking Belt Foot Rail Hood Reset/Off Circuit - ProForm 540 Treadmill | English Manual - Page 6
or the shipping carton. This does not affect treadmill performance. If there is lubricant on top of the walking belt, simply wipe off the lubricant with a soft cloth and a mild, non-abrasive cleaner. In addition to the included hex keys , assembly requires a phillips screwdriver , an adjustable - ProForm 540 Treadmill | English Manual - Page 7
Bolts (2) with two Upright Washers (14) into the base of the Left Upright. Attach the Left Upright to the Base (52) with the Upright Bolts, two Upright Star 32 52 4. Position the Base (52) as close to the front of the treadmill as possible, as shown. See drawing 4a. Locate the strap in the lower - ProForm 540 Treadmill | English Manual - Page 8
outer side of the remaining Frame Spacer (11). Hold the Frame Spacer (11) between the Left Upright (53) and the Lift Frame (23), with the outer side of the Frame Spacer facing the Left Upright. Attach the Left Upright to the Lift Frame with a Colored Patch Frame Bolt (1), an Upright Washer (14), and - ProForm 540 Treadmill | English Manual - Page 9
Star Washer (7) into the Right Handrail, and then start two Console Screws (10) into the Right Handrail. Tighten the Crossbar Screw and then tighten the two Console Screws; do not overtighten the Screws. Attach the Left Handrail (not shown) to the Console (91) in the same way. Note: There are - ProForm 540 Treadmill | English Manual - Page 10
not to 65 overtighten the Belly Pan Screws. 20 66 20 12. See the lower drawing. Position the Uprights 12 (53, 54) so that the treadmill Frame (51) is cen- tered between the Uprights. See steps 2, 5, and 6. Firmly tighten the two Colored Patch Frame Bolts (1) and the four Upright Bolts - ProForm 540 Treadmill | English Manual - Page 11
Latch Housing (48) to the Left Upright (53) with two Latch Screws (10); start both Latch Screws and then tighten Make sure that all parts are properly tightened before you use the treadmill. Keep the included hex key in a secure place. The hex key is used to adjust the walking belt (see page 21). - ProForm 540 Treadmill | English Manual - Page 12
being damaged, always use a surge suppressor with your treadmill (see drawing 1 at the right). To purchase a surge suppressor, see your local PROFORM dealer or call the toll-free telephone number on the front cover of this manual and order part number 146148, or see your local electronics store - ProForm 540 Treadmill | English Manual - Page 13
. The first time the treadmill is used, observe the alignment of the walking belt, and center the walking belt if necessary (see page 21). The console also offers six preset programs that automatically control the speed and incline of the treadmill while guiding you through an effective workout - ProForm 540 Treadmill | English Manual - Page 14
the key is in- serted, the manual mode will be Track selected. If a program has been selected, reselect the manual mode by pressing the Certified Personal Trainer Programs button repeatedly until a track appears in the dis- play. 3 Start the walking belt. To start the walking belt, press - ProForm 540 Treadmill | English Manual - Page 15
If the fan is on when the walking belt stops, the fan will automatically turn off after a few minutes. 8 When you are finished exercising, remove the key from the console. Step onto the foot rails, press the Stop button, and adjust the incline of the treadmill to the lowest setting. The incline must - ProForm 540 Treadmill | English Manual - Page 16
time will begin to flash in the display. To restart the program, press the Start button. The walking belt will begin to move at 1 mph. When the next segment of the program begins, the treadmill will automatically adjust to the speed and incline settings for that segment. The program will continue - ProForm 540 Treadmill | English Manual - Page 17
button, insert the key into the console, and then release the Stop button. When the information mode is selected, the following information will appear in the display: The center of the display will show the total number of miles or kilometers that the walking belt has moved. The lower right part - ProForm 540 Treadmill | English Manual - Page 18
the frame about halfway to the vertical position. Frame 2. Move your right hand to the position shown and hold the treadmill firmly. Using your left hand, pull the latch knob to the left and hold it. Raise the frame until the catch is past the latch pin. Then, slowly release the latch knob - ProForm 540 Treadmill | English Manual - Page 19
USE 1. Hold the upper end of the treadmill with your right hand as shown. Using your left hand, pull the latch knob to the left and hold it. Next, lower the frame until it is past the latch pin. Then, release the latch knob. 2. Hold the frame firmly with both - ProForm 540 Treadmill | English Manual - Page 20
in. c. Remove the key from the console. Reinsert the key into the console. d. If the treadmill still will not run, please see the front cover of this manual. PROBLEM: The displays of the console do not function properly SOLUTION: a. Remove the key from the console and UNPLUG THE a POWER - ProForm 540 Treadmill | English Manual - Page 21
, please see the front cover of this manual. PROBLEM: The walking belt is off-center or slips when walked on SOLUTION: a. If the walking belt has shifted to the left, first re- move the key and UNPLUG THE POWER CORD. a Using the hex key, turn the left rear roller bolt clock- wise 1/2 of a turn - ProForm 540 Treadmill | English Manual - Page 22
the key to treadmill until your heart rate is near the highest number in your training zone. WORKOUT GUIDELINES Each workout should include the following three parts: A Warm-up-Start each workout with 5 to 10 minutes of stretching and light on the console. Fat Burning exercise problems. EXERCISE - ProForm 540 Treadmill | English Manual - Page 23
Grommet 90 1 Power Cord 50 2 Isolator Fastener 91 1 Console 51 1 Frame 92 1 Incline Motor 52 1 Base Nut, Lower 53 1 Left Upright 93 2 Belt Guide 54 1 Right Upright 94 1 5 mm Hex Key 55 1 Rear Roller 95 2 Controller Screw 56 1 Motor Belt 96 1 Releasable Tie 57 1 Electronics Bracket 97 - ProForm 540 Treadmill | English Manual - Page 24
EXPLODED DRAWING A-Model No. PFTL54806.0 R0407A 24 75 27 21 42 60 36 29 25 25 67 44 25 10 64 93 50 78 6 4 25 19 75 27 19 44 21 42 89 104 46 83 16 11 41 19 62 101 41 31 56 25 28 71 19 41 25 68 101 41 76 86 51 10 28 50 78 11 44 16 93 74 55 36 95 61 44 10 29 81 - ProForm 540 Treadmill | English Manual - Page 25
EXPLODED DRAWING B-Model No. PFTL54806.0 R0407A 47 47 47 65 58 82 2 72 100 40 23 92 30 34 79 98 2 38 44 38 59 34 21 42 42 21 21 95 57 20 66 20 37 20 21 99 87 90 49 25 - ProForm 540 Treadmill | English Manual - Page 26
EXPLODED DRAWING C-Model No. PFTL54806.0 77 77 88 R0407A 10 10 10 33 10 7 85 102 22 10 10 102 10 5 8 8 10 7 85 102 39 77 5 8 5 77 5 8 24 48 10 21 4 80 53 54 1 11 9 13 32 32 43 43 35 14 2 14 103 2 14 52 11 49 9 63 16 26 39 63 69 45 70 16 69 63 63 84 26 - ProForm 540 Treadmill | English Manual - Page 27
EXPLODED DRAWING D-Model No. PFTL54806.0 R0407A 91 15 3 12 4 4 4 4 4 4 4 73 4 4 4 27 - ProForm 540 Treadmill | English Manual - Page 28
PROFORM 540 treadmill) • the SERIAL NUMBER of the product (see the front cover of this manual) • the KEY NUMBER and DESCRIPTION of the desired part(s) (see the PART misuse, improper or abnormal usage or repairs not provided by an ICON authorized service center; products used for commercial or rental
-
 1
1 -
 2
2 -
 3
3 -
 4
4 -
 5
5 -
 6
6 -
 7
7 -
8
-
9
-
10
-
11
-
12
-
13
-
14
-
15
-
16
-
17
-
18
-
19
-
20
-
21
-
22
-
23
-
24
-
25
-
26
-
27
-
28
 |
 |
USER'S MANUAL
Model No. PFTL54806.0
Serial No.
CAUTION
Read all precautions and instruc-
tions in this manual before using
this equipment. Save this manual
for future reference.
Visit our website at
www.proform.com
new products, prizes,
fitness tips, and much more!
QUESTIONS?
As a manufacturer, we are com-
mitted to providing complete
customer satisfaction. If you
have questions, or if parts are
damaged or missing, PLEASE
CONTACT OUR CUSTOMER
SERVICE DEPARTMENT
DIRECTLY.
CALL TOLL-FREE:
1-888-533-1333
Mon.–Fri. 6 a.m.–6 p.m. MST
Sat. 8 a.m.–5 p.m. MST
ON THE WEB:
www.proformservice.com
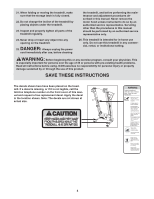
Serial Number
Decal