ProForm 585 Treadmill English Manual
ProForm 585 Treadmill Manual
 |
View all ProForm 585 Treadmill manuals
Add to My Manuals
Save this manual to your list of manuals |
ProForm 585 Treadmill manual content summary:
- ProForm 585 Treadmill | English Manual - Page 1
.297671 Serial No. Write the serial number in the space above for future reference. Serial Number Decal CAUTION Read all precautions and instructions in this manual before using this equipment. Save this manual for future reference. USER'S MANUAL SEARS, ROEBUCK AND CO., HOFFMAN ESTATES, IL 60179 - ProForm 585 Treadmill | English Manual - Page 2
5 OPERATION AND ADJUSTMENT 7 HOW TO FOLD AND MOVE THE TREADMILL 10 MAINTENANCE AND TROUBLE-SHOOTING 12 CONDITIONING GUIDELINES 14 PART LIST 15 ORDERING REPLACEMENT PARTS Back Cover FULL 90 DAY WARRANTY Back Cover Note: An EXPLODED DRAWING is attached in the center of this manual. Please save - ProForm 585 Treadmill | English Manual - Page 3
tighten all parts of the treadmill every three months. 22. Never insert any object into any opening. 23. Always unplug the power cord before performing the maintenance and adjustment procedures described in this manual. Never remove the motor hood unless instructed to do so by an authorized service - ProForm 585 Treadmill | English Manual - Page 4
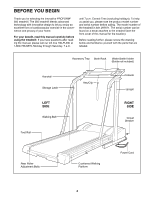
yourself with the parts that are labeled. Accessory Tray Book Rack Water Bottle Holder (Bottle not included) Handrail Storage Latch Key/Clip Console Upright LEFT SIDE Walking Belt Foot Rail RIGHT SIDE Circuit Breaker Rear Roller Adjustment Bolts Cushioned Walking Platform Power Cord 4 - ProForm 585 Treadmill | English Manual - Page 5
treadmill in a cleared area and remove the packing materials. Do not dispose of the packing materials until assembly is completed. Assembly requires the included allen wrench , and your own adjustable will not slide smoothly. After the parts are attached, remove any visible tape. Note: The inset - ProForm 585 Treadmill | English Manual - Page 6
the instructions on page 11 to lower the treadmill. 10 Align the hole in the lower end of the right Handrail Arm (10) with the hole in the frame tab as shown. Attach the Handrail Arm with a Handrail Bolt (7) and a Handrail Nut (8). Repeat this step on the left side. 8 7 Frame Tab 5. Remove - ProForm 585 Treadmill | English Manual - Page 7
ADJUSTMENT THE PERFORMANT LUBETM WALKING BELT Your treadmill features a walking belt coated with PERFORMANT LUBETM, a high-performance lubricant. IMPORTANT: Never apply silicone spray or other substances to the walking belt or the walking platform. Such substances will deteriorate the walking belt - ProForm 585 Treadmill | English Manual - Page 8
stand on the walking belt when turning on the power. ¥ Always wear the clip (see the drawing above) while using the treadmill. When the key is removed from the console, the walking belt will stop. ¥ Adjust the speed in small increments. ¥ The settings marked above the speed control (warm-up/cool - ProForm 585 Treadmill | English Manual - Page 9
CALS/FAT CALS/ KPH indicator beside the SPEED display is lit, the PULSE display distance of fat calories is ing the treadmill, adjust the in- shown. Note: This walking belt and remove the key. Step onto the foot rails, stop the walking belt, and remove the key from the console. Store the key - ProForm 585 Treadmill | English Manual - Page 10
HOW TO FOLD AND MOVE THE TREADMILL HOW TO FOLD THE TREADMILL FOR STORAGE Before folding the treadmill, adjust the incline to the lowest position. If the incline is not at the lowest position, the treadmill will be permanently damaged. Next, unplug the power cord. Caution: You must be able to - ProForm 585 Treadmill | English Manual - Page 11
as shown. Using your left thumb, slide open the storage latch and hold it open. Pivot the treadmill until all parts of the treadmill are past the storage latch. 2. Hold the treadmill firmly with both hands, and lower the treadmill to the floor. Caution: To avoid pinching your hands, do not hold the - ProForm 585 Treadmill | English Manual - Page 12
MAINTENANCE AND TROUBLE-SHOOTING For your convenience, a maintenance kit is included with this treadmill. Read and follow the instructions included with the maintenance kit to keep your treadmill in top condition. Most treadmill problems can be solved by following the simple steps below. If - ProForm 585 Treadmill | English Manual - Page 13
the walking belt. Plug in the power cord, insert the key and run the treadmill for a few minutes. Repeat until the walking belt is centered. c. If the walking belt slips when walked on, first remove the key and UNPLUG THE POWER CORD. c Using the allen wrench, turn both rear roller adjust- ment - ProForm 585 Treadmill | English Manual - Page 14
and aerobic exercise. (The chart is also found on the treadmill console.) adjust the speed and incline of the treadmill until your heart rate is near one of the lower two numbers in your training zone. It may also be helpful to set the speed control on the console to FAT BURN to help you maintain - ProForm 585 Treadmill | English Manual - Page 15
ÑModel No. 831.297671 R0798A To identify the parts listed below, refer to the EXPLODED DRAWING attached in the center of this manual. Key No. Qty. Description Key No. Qty. Description Key No. Qty. Description 1 1 Frame 2 2 Rear Isolator 3 4 Rear Platform Screw 4 32 Screw 5 1 Catch 6 4 Isolator - ProForm 585 Treadmill | English Manual - Page 16
EXPLODED DRAWINGÑModel No. 831.297671 R0798A 58* 49 77 56 6 5 4 3 2 1 90 47 55 36 18 53 56 4 9 7 17 4 104 49 10 6 8 3 51 15 14 115 26 25 24 22 22 4 105 4 4 27 28 4 11 17 4 13 12 37 20 19 22 40 41 42 16 59 10 43 11 17 45 46 110 29 98 25 22 106* 61 36 39 12 22 8 17 11 - ProForm 585 Treadmill | English Manual - Page 17
EXPLODED DRAWINGÑModel No. 831.297671 R0798A 79 78* 80 81 65 52 62 63 64 109 60 66 108 68 69 21 103 102 112 101 113 70 93 111 99 109 83 57 7 88 10 87 36 89 4 100 23 36 111 89 99 4 23 36 89 4 73 36 72 74 36 88 107 63 74 107 52 64 62 83 7 75 109 76 109 18 4 - ProForm 585 Treadmill | English Manual - Page 18
: ¥ The NAME OF THE PRODUCT (PROFORM¨ 585 treadmill) ¥ The MODEL NUMBER OF THE PRODUCT (831.297671) ¥ The KEY NUMBER AND DESCRIPTION OF THE PART (see the PART LIST on page 15 and the EXPLODED DRAWING attached in the center of this manual) REPLACEMENT PARTS If parts become worn and need to be
-
 1
1 -
 2
2 -
 3
3 -
 4
4 -
 5
5 -
 6
6 -
 7
7 -
8
-
9
-
10
-
11
-
12
-
13
-
14
-
15
-
16
-
17
-
18
 |
 |

USER’S MANUAL
SEARS, ROEBUCK AND CO., HOFFMAN ESTATES, IL 60179
CAUTION
Read all precautions and in-
structions in this manual before
using this equipment. Save this
manual for future reference.
Write the serial number in the space
above for future reference.
Model No. 831.297671
Serial No.
Serial Number Decal