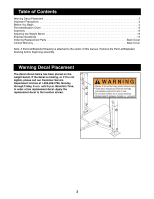
ProForm 630 Weight Bench User Manual
ProForm 630 Weight Bench Manual
 |
View all ProForm 630 Weight Bench manuals
Add to My Manuals
Save this manual to your list of manuals |
ProForm 630 Weight Bench manual content summary:
- ProForm 630 Weight Bench | User Manual - Page 1
questions, or find that there are missing or damaged parts, we will guarantee you complete satisfaction through direct assistance from instructions in this manual before using this equipment. Save this manual for future reference. ¨ USERÕS MANUAL Patent Pending Visit our website at www.proform. - ProForm 630 Weight Bench | User Manual - Page 2
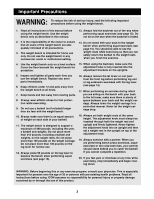
attached to the center of this manual. Remove the Part List/Exploded Drawing before beginning assembly. Warning Decal Placement The decal shown below has been placed on the weight bench. If the decal is missing, or if it is not legible, please call our Customer Service Department toll-free at 1-800 - ProForm 630 Weight Bench | User Manual - Page 3
reduce the risk of serious injury, read the following important precautions before using the weight bench. 1. Read all instructions in this manual before using the weight bench. Use the weight bench only as described in this manual. 13. Always fold the backrest out of the way when performing squat - ProForm 630 Weight Bench | User Manual - Page 4
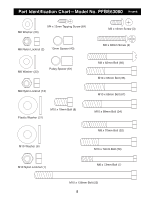
benefit, read this manual carefully before using the PROFORM¨ 630 Weight Bench. If you have additional questions, please call our Customer Service Department toll-free at 1-800-999-3756, Before reading further, please review the drawing below and familiarize yourself with the parts that are labeled - ProForm 630 Weight Bench | User Manual - Page 5
Part Identification ChartÑModel No. PFBE63080 R1099A M6 Washer (50) M4 x 12mm Tapping Screw (64) M6 Nylon Locknut (2) 13mm Spacer (43) M8 Washer (23) Pulley Spacer ( - ProForm 630 Weight Bench | User Manual - Page 6
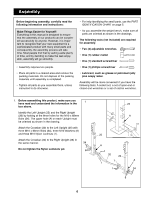
and instructions: Make Things Easier for Yourself! Everything in this manual is designed parts as you assemble them, unless instructed to do otherwise. ¥ For help identifying the small parts, use the PART IDENTIFICATION CHART on page 5. ¥ As you assemble the weight bench, make sure all parts - ProForm 630 Weight Bench | User Manual - Page 7
is cut at an angle, and the pointed edge must be on the top (see the inset drawing). 11 Pointed Edge on Top 3. Attach the Bench Frame (5) to the bracket (B) on the Front Leg (19) with two M10 x 63mm Bolts (33) and two M10 Nylon Locknuts (1). Make sure you tighten the - ProForm 630 Weight Bench | User Manual - Page 8
adjustment brackets. 25 29 Pin Pin C 24 26 7. Align the adjustment holes in the Right Weight Rest 7 (28) with the adjustment hole in the Right Upright (26). Insert the Adjustment Knob (36) drawing and place one on each side of the Bench Frame (5). D 16 58 50 5 58 4 3 57 57 53 57 8 - ProForm 630 Weight Bench | User Manual - Page 9
) through the Washer and the ÒUÓBracket. Slide a Plastic Washer (21) onto the M10 x 136mm Bolt (22). Refer to the inset drawing and make sure all parts are in the right sequence. 22 6 53 21 16 21 53 6 1 E 10. Slide the indicated hole in the right Backrest Tube (53) onto the M10 - ProForm 630 Weight Bench | User Manual - Page 10
12. Press a 2Ó Square Inner Cap (17) into each end of the Leg lever (18). Insert the Weight Tube (39) into the indicated hole in the Leg Lever (18). Attach the Weight Tube to the Leg Lever with the M8 x 62mm Bolt (66), the 13mm Spacer (43), two M8 Washers (23) and an M8 - ProForm 630 Weight Bench | User Manual - Page 11
M10 x 65mm Bolts (67), four M10 Washers (6), and two M10 Nylon Locknuts (1). 17 6 67 6 1 6 60 9 37 18. Use the included socket tools to attach two Weight 18 Carriage Stops (38) to the Lat Tower (9) with the M6 x 73mm Bolt (7), two M6 Washers (50), and an M6 Nylon Locknut (2). Make sure the - ProForm 630 Weight Bench | User Manual - Page 12
20. Attach the Curl Pad (44) to the Curl Post (42) with 20 two M6 x 16mm Screws (3). 44 3 42 21. Make sure all parts are properly tightened before you use the weight bench. The use of all remaining parts will be explained in ADJUSTING THE WEIGHT BENCH starting on the next page. 12 - ProForm 630 Weight Bench | User Manual - Page 13
exercise program. Also, refer to the accompanying exercise poster to see the correct form for each exercise. Inspect and tighten all parts each time you use the weight bench. Replace any worn parts immediately. The weight bench can be cleaned with a damp cloth and a mild, non-abrasive detergent. Do - ProForm 630 Weight Bench | User Manual - Page 14
with the Adjustment Knob (36). Make sure that you fully tighten the Adjustment Knob. For other exercises, the Lat Tower (9) must be attached to the weight bench. Insert the Lat Tower (9) into the indicated hole in the Front Leg (19). Align the holes in the Front Leg and the Lat Tower. Secure - ProForm 630 Weight Bench | User Manual - Page 15
place 50 pounds on the leg lever when performing squat exercises to balance the bench. WARNING: Do not stand with your back to the weight bench when performing squat exercises. You should be able to see the weight rests while exercising so that you can safely return the barbell when you finish - ProForm 630 Weight Bench | User Manual - Page 16
the Lat Tower (9), attach the Lat Bar (51) to the Cable (45) with a Cable Clip (40). 9 ATTACHING WEIGHTS TO THE LEG LEVER To use the Leg Lever, slide the desired amount of weight onto the Weight Tube (39). WARNING: Do not place more than 130 pounds on the leg lever. 18 39 ATTACHING - ProForm 630 Weight Bench | User Manual - Page 17
maintaining proper form. This requires moving through the full range of motion for each exercise and moving only the appropriate parts of the weight training workouts on Monday, feeling exhausted. On the exercise poster accompanying this manual, you will find photographs showing the correct form - ProForm 630 Weight Bench | User Manual - Page 18
one minute after each set for a toning workout ¥ Rest 30 seconds after each set for a weight loss workout Plan to spend the first couple of weeks familiarizing yourself with the equipment and learning the proper form for each exercise. COOLING DOWN End each workout with 5 to 10 minutes of stretching - ProForm 630 Weight Bench | User Manual - Page 19
MONDAY Date: / / EXERCISE WEIGHT SETS REPS TUESDAY Date: / / WEDNESDAY Date: / / AEROBIC EXERCISE EXERCISE WEIGHT SETS REPS THURSDAY Date: / / FRIDAY Date: / / AEROBIC EXERCISE EXERCISE WEIGHT SETS REPS Make photocopies of this page for scheduling and recording your workouts. 19 - ProForm 630 Weight Bench | User Manual - Page 20
Locknut M6 Nylon Locknut M6 x 16mm Screw M6 x 38mm Screw Bench Frame M10 Washer M6 x 73mm Bolt M10 x 19mm Bolt Lat Tower Weight Stop ÒLÓ Pin M4 x 12mm Tapping Screw 7mm Lock Spacer M8 x 62mm Bolt M10 x 65mm Bolt Socket Tool UserÕs Manual Exercise Guide Note: Ò#Ó indicates a non-illustrated part - ProForm 630 Weight Bench | User Manual - Page 21
Exploded DrawingÑModel No. PFBE63080 R1099A 33 6 41 61 33 6 61 60 35 45 40 35 61 61 6 1 51 44 1 6 6 6 1 67 41 45 42 56 9 50 7 38 10 54 2 38 50 62 1 10 12 54 48 54 10 17 8 37 56 36 48 54 17 10 23 13 43 62 39 12 17 1 19 23 13 18 49 59 65 10 23 66 46 54 - ProForm 630 Weight Bench | User Manual - Page 22
PROFORM¨ 630 Weight Bench) 3. The SERIAL NUMBER of the product (see the front cover of this manual) 4. The KEY NUMBER and DESCRIPTION of the desired part(s) (see the PART abnormal usage or repairs not provided by an ICON authorized service center, products used for commercial or rental purposes, or
-
 1
1 -
 2
2 -
 3
3 -
 4
4 -
 5
5 -
 6
6 -
 7
7 -
8
-
9
-
10
-
11
-
12
-
13
-
14
-
15
-
16
-
17
-
18
-
19
-
20
-
21
-
22
 |
 |

QUESTIONS?
As a manufacturer, we are com-
mitted to providing complete
customer satisfaction. If you have
questions, or find that there are
missing or damaged parts, we
will guarantee you complete sat-
isfaction through direct assis-
tance from our factory.
TO AVOID UNNECESSARY
DELAYS, PLEASE CALL DIRECT
TO OUR TOLL-FREE CUSTOMER
HOT LINE. The trained techni-
cians on our customer hot line
will provide immediate assis-
tance, free of charge to you.
CUSTOMER HOT LINE:
1-800-999-3756
Mon.—Fri., 6 a.m.—6 p.m. MST
Model No. PFBE63080
Serial No.
Write the serial number in the space
above for reference.
CAUTION
Read all precautions and instruc-
tions in this manual before using
this equipment. Save this manual
for future reference.
Serial Number Decal (under seat)
USER°S MANUAL
Patent Pending
¤
Visit our website at
www.proform.com
new products, prizes,
fitness tips, and much more!