ProForm J4i English Manual
ProForm J4i Manual
 |
View all ProForm J4i manuals
Add to My Manuals
Save this manual to your list of manuals |
ProForm J4i manual content summary:
- ProForm J4i | English Manual - Page 1
shown below. Write the serial number in the space above for future reference. Serial Number Decal USER'S MANUAL CAUTION Read all precautions and instructions in this manual before using this equipment. Save this manual for future reference. SEARS, ROEBUCK AND CO., HOFFMAN ESTATES, IL 60179 - ProForm J4i | English Manual - Page 2
FOLD AND MOVE THE TREADMILL 10 TROUBLE-SHOOTING 12 CONDITIONING GUIDELINES 14 ORDERING REPLACEMENT PARTS Back Cover FULL 90 DAY WARRANTY Back Cover Note: An EXPLODED DRAWING and a PART LIST are attached in the center of this manual. Save the EXPLODED DRAWING and PART LIST for future reference - ProForm J4i | English Manual - Page 3
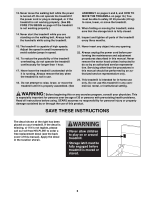
the treadmill until it is properly assembled. (See 21. Never insert any object into any opening. 22. Always unplug the power cord before performing the maintenance and adjustment procedures described in this manual. Never remove the motor hood unless instructed to do so by an authorized service - ProForm J4i | English Manual - Page 4
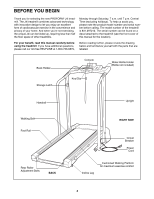
review the drawing below and familiarize yourself with the parts that are labeled. Book Holder Console Water Bottle Holder (Bottle not included) Storage Latch Key/Clip Handrail Upright Walking Belt Foot Rail Rear Roller Adjustment Bolts BACK RIGHT SIDE Circuit Breaker Power Cord Incline - ProForm J4i | English Manual - Page 5
the Extension Leg Screw while tightening it. Attach the other Extension Leg (34) as described above. With the help of a second person, carefully raise the treadmill to the upright position so that both Extension Legs (34) are resting flat on the floor. 1 34 40 34 40 2. Hold the - ProForm J4i | English Manual - Page 6
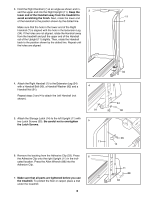
the Right Upright (11). Keep the 3 lower end of the Handrail away from the treadmill to avoid scratching the finish. Next, rotate the lower end 11 of the Handrail to . 7. Make sure that all parts are tightened before you use the treadmill. To protect the floor or carpet, place a mat under the - ProForm J4i | English Manual - Page 7
treadmill features a walking belt coated with PERFORMANT LUBETM, a high-performance lubricant. IMPORTANT: Never apply silicone spray or other substances to the walking belt or the walking platform. Such substances will deteriorate the walking belt and cause excessive wear. HOW TO PLUG IN THE POWER - ProForm J4i | English Manual - Page 8
, read the following precautions. ¥ Do not stand on the walking belt when turning on the power. ¥ Always wear the clip (see the drawing at the lower right) while using the treadmill. When the key is removed from the console, the walking belt will stop. ¥ Adjust the speed in small increments. ¥ The - ProForm J4i | English Manual - Page 9
. Change the speed of the walking belt as desired by sliding the speed control. To stop the walking belt, step onto the foot rails and slide the speed control to the RESET position. 4 Adjust the incline of the treadmill as desired. To change the incline of the treadmill, press the top or bottom - ProForm J4i | English Manual - Page 10
HOW TO FOLD AND MOVE THE TREADMILL HOW TO FOLD THE TREADMILL FOR STORAGE Before folding the treadmill, unplug the power cord. Caution: You must be able to safely lift 45 pounds (20 kg) in order to raise, lower, or move the treadmill. 1. Hold the treadmill with your hands in the locations shown at - ProForm J4i | English Manual - Page 11
as shown. Using your left thumb, press the storage latch and hold it. Pivot the treadmill until the frame and foot rail are past the storage latch. 2. Hold the treadmill firmly with both hands, and lower the treadmill to the floor. To decrease the possibility of injury, bend your legs and keep your - ProForm J4i | English Manual - Page 12
TROUBLE-SHOOTING Most treadmill problems can be solved by following the simple steps below. 450 joules. The surge suppressor must be electrically rated for 120 volts AC and 15 amps. b. After the power cord has been plugged in, make sure that the key is fully inserted into the console. See step 1 - ProForm J4i | English Manual - Page 13
counterclockwise, 1/4 of a turn each. Be careful not to over- tighten the walking belt. Plug in the power cord, insert the key and run the treadmill for a few minutes. Repeat until the walking belt is centered. b. If the walking belt has shifted to the right, first remove the key and UNPLUG THE - ProForm J4i | English Manual - Page 14
existing health problems. The your heart rate as a guide. The chart below shows recommended adjust the speed and incline of the treadmill until your heart treadmill until your heart rate is near one of the lower two numbers in your A well-rounded workout includes the following three important parts - ProForm J4i | English Manual - Page 15
flexibility of your muscles and will help to prevent post-exercise problems. Exercise Frequency To maintain or improve your condition, complete three . The key to success is to make exercise a regular and enjoyable part of your everyday life. SUGGESTED STRETCHES The correct form for several basic - ProForm J4i | English Manual - Page 16
Extension Leg Screw Power Cord Power Cord Grommet Circuit Breaker Frame Pivot Washer Frame Pivot Bolt Roller Guard Motor Belly Pan Cable Tie Clamp Rear Platform Screw Releasable Tie Choke Belt Guide Belly Pan Fastener Walking Belt Walking Platform Belly Pan Incline Leg Bolt Incline Wire Harness Rear - ProForm J4i | English Manual - Page 17
EXPLODED DRAWINGÑModel No. 831.297212 R1098A 16 22 74 1 46 13 2 9 10* 8 15 3 11 12 21 27 20* 61 13 13 13 75 3 76 14 34 35 3 78 18 19 31 31 32 31 38 6 4 13 38 5 71 48 49 39 17 36 48 47 38 37 40 91 25 41 29 28 45 44 38 89 31 30 43 49 73 5 50 48 51 39 81 - ProForm J4i | English Manual - Page 18
the PROFORM J4i treadmill ¥ a part is missing ¥ or you need to schedule repair service call PROFORM¨ J4i treadmill) ¥ The MODEL NUMBER OF THE PRODUCT (831.297212) ¥ The KEY NUMBER AND DESCRIPTION OF THE PART (see the EXPLODED DRAWING and PART LIST included in this manual) REPLACEMENT PARTS If parts
-
 1
1 -
 2
2 -
 3
3 -
 4
4 -
 5
5 -
 6
6 -
 7
7 -
8
-
9
-
10
-
11
-
12
-
13
-
14
-
15
-
16
-
17
-
18
 |
 |

¤
USER’S MANUAL
CAUTION
Read all precautions and instruc-
tions in this manual before using
this equipment. Save this manual
for future reference.
Serial Number
Decal
Model No. 831.297212
Serial No.
The serial number is found in the location
shown below. Write the serial number in
the space above for future reference.
SEARS, ROEBUCK AND CO., HOFFMAN ESTATES, IL 60179