ProForm J6 Treadmill English Manual
ProForm J6 Treadmill Manual
 |
View all ProForm J6 Treadmill manuals
Add to My Manuals
Save this manual to your list of manuals |
ProForm J6 Treadmill manual content summary:
- ProForm J6 Treadmill | English Manual - Page 1
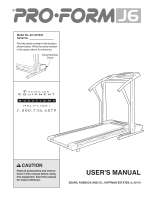
the location shown below. Write the serial number in the space above for reference. Serial Number Decal CAUTION Read all precautions and instructions in this manual before using this equipment. Save this manual for future reference. USER'S MANUAL SEARS, ROEBUCK AND CO., HOFFMAN ESTATES, IL 60179 - ProForm J6 Treadmill | English Manual - Page 2
2 BEFORE YOU BEGIN 4 ASSEMBLY 5 OPERATION AND ADJUSTMENT 7 HOW TO FOLD AND MOVE THE TREADMILL 11 MAINTENANCE AND TROUBLE-SHOOTING 12 CONDITIONING GUIDELINES 14 PART LIST 15 ORDERING REPLACEMENT PARTS Back Cover FULL 90-DAY WARRANTY Back Cover Note: An EXPLODED DRAWING is attached in the - ProForm J6 Treadmill | English Manual - Page 3
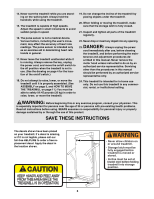
de- scribed in this manual. Never remove the motor hood unless instructed to do so by an authorized service representative. Servicing other than the procedures in this manual should be performed by an authorized service representative only. 24. This treadmill is intended for in-home - ProForm J6 Treadmill | English Manual - Page 4
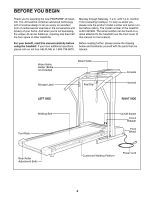
). For your benefit, read this manual carefully before using the treadmill. If you have additional questions, please call our toll-free HELPLINE at 1-800-736-6879, Before reading further, please review the drawing below and familiarize yourself with the parts that are labeled. Water Bottle Holder - ProForm J6 Treadmill | English Manual - Page 5
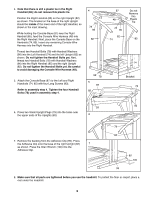
2. Refer to HOW TO LOWER THE TREADMILL FOR USE on page 11. Follow step 2 to lower the treadmill. Next, attach the latch support to the center hole in the left Assembly (77). Be careful to hold the parts together. Inset drawings A and B shows how the parts fits together. Make sure that the tabs on - ProForm J6 Treadmill | English Manual - Page 6
of the right Upright (82) 7 as shown. Press the Allen Wrench (100) into the Adhesive Clip. 79 82 82 100 99 8. Make sure that all parts are tightened before you use the treadmill. To protect the floor or carpet, place a mat under the - ProForm J6 Treadmill | English Manual - Page 7
BELT Your treadmill features a walking belt coated with PERFORMANT LUBETM, a high-performance lubricant. IMPORTANT: Never apply silicone spray or other substances to the walking belt suppressor into an appropriate outlet that is properly installed and grounded in accordance with all local codes - ProForm J6 Treadmill | English Manual - Page 8
the face of the console, remove it. Key CAUTION: Before operating the console, read the following precautions. ¥ Do not stand on the walking belt when turning on the power. ¥ Always wear the clip (see the drawing above) while operating the treadmill. ¥ Adjust the speed in small increments. Follow - ProForm J6 Treadmill | English Manual - Page 9
are pressed, it will take a moment for the treadmill to reach the selected incline setting. 4 Follow your displayÑThis display shows the speed of the walking belt, in miles per hour or kilometers per hour. down the STOP/RESET button while inserting the key into the console. An ÒE,Ó for english miles - ProForm J6 Treadmill | English Manual - Page 10
position. (See the drawing near the bottom of page 8.) The TIME/PACE display will show the total number of hours the treadmill has been used. The SPEED display will show the total number of miles that the walking belt has moved. To exit the information mode, remove the key from the console. 10 - ProForm J6 Treadmill | English Manual - Page 11
, unplug the power cord. CAUTION: You must be able to safely lift 45 pounds (20 kg) in order to raise, lower, or move the treadmill. 1. Hold the treadmill with your hands in the locations shown at the right. CAUTION: To decrease the possibility of injury, bend your legs and keep your back - ProForm J6 Treadmill | English Manual - Page 12
TROUBLE-SHOOTING Most treadmill problems can be solved by following the simple steps below. the switch back in. b. Make sure that the power cord is plugged in. c. Remove the key from the console. Reinsert the key fully into the console. See step 1 on page 8. d. Make sure that the on/off switch - ProForm J6 Treadmill | English Manual - Page 13
each. Be careful not to overtighten the walking belt. Plug in the power cord, insert the key and run the treadmill for a few minutes. Repeat until the walking belt is centered. PROBLEM: The walking belt slips when walked on SOLUTION: a. If the walking belt slips when walked on, first remove the - ProForm J6 Treadmill | English Manual - Page 14
heart rate as a guide. The chart below shows adjust the speed and incline of the treadmill. Fat Burning To burn fat effectively, you will help prevent post-exercise problems. Exercise Frequency To maintain or key to success is to make exercise a regular and enjoyable part of your everyday life. 14 - ProForm J6 Treadmill | English Manual - Page 15
Screw Isolator Isolator Screw Belly Pan Fastener Console Wire Harness Belt Guide Console Cover Front Belly Pan Power Supply Cable Tie Clamp Cable Tie Walking Belt Roller Guard Rear Roller Rear Isolator Rear Foot Rear Foot Screw Ground Wire Key No. Qty. Description 62 1 63 1 64 1 65 2 66 1 67 - ProForm J6 Treadmill | English Manual - Page 16
EXPLODED DRAWINGÑModel No. 831.297693 R0199A 36 65 111 45 1 2 3 39 40 41 32 45 44 46 71 44 4* 69 66 8 5 7 6 3 9 16 10 11 14 10 16 18 76 15 13 19 15 16 101 16 24 52 17 27 16 26 28 29 30 21 22 15 33 39 109 38 43 41 111 23 42 37 44 5 89 15 36 25 15 31 35 16 92 15 - ProForm J6 Treadmill | English Manual - Page 17
EXPLODED DRAWINGÑModel No. 831.297693 R0199A 88 80 79 93 78 96 93 87 108 81 80 81 75 77 74 72 73 75 82 83 102 85 84 86 95 15 34 96 78 79 81 50 96 80 78 20 97 16 98 62 107 84 98 15 103 104 97 98 76 105 34 106 80 20 103 96 78 76 83 86 97 95 99 98 100 104 97 98 81 91 - ProForm J6 Treadmill | English Manual - Page 18
of your PROFORM¨ J6 treadmill are listed on a decal attached to the frame. See the front cover of this manual to find the location of the decal. All replacement parts are available for immediate purchase or special order when you visit your nearest SEARS Service Center. To request service or to
-
 1
1 -
 2
2 -
 3
3 -
 4
4 -
 5
5 -
 6
6 -
 7
7 -
8
-
9
-
10
-
11
-
12
-
13
-
14
-
15
-
16
-
17
-
18
 |
 |

USER’S MANUAL
¤
CAUTION
Read all precautions and instruc-
tions in this manual before using
this equipment. Save this manual
for future reference.
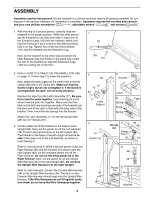
Serial Number
Decal
Model No. 831.297693
Serial No.
Find the serial number in the location
shown below. Write the serial number
in the space above for reference.
SEARS, ROEBUCK AND CO., HOFFMAN ESTATES, IL 60179