ProForm Quick Start 7.0 Treadmill Uk Manual
ProForm Quick Start 7.0 Treadmill Manual
 |
View all ProForm Quick Start 7.0 Treadmill manuals
Add to My Manuals
Save this manual to your list of manuals |
ProForm Quick Start 7.0 Treadmill manual content summary:
- ProForm Quick Start 7.0 Treadmill | Uk Manual - Page 1
committed to providing complete customer satisfaction. If you have questions, or if there are missing parts, please contact us at the numbers or addresses listed below: Call: 08457 089 009 8JG UK CAUTION Read all precautions and instructions in this manual before using this equipment. Save this - ProForm Quick Start 7.0 Treadmill | Uk Manual - Page 2
THE TREADMILL 16 TROUBLESHOOTING 18 EXERCISE GUIDELINES 21 PART LIST 22 EXPLODED DRAWING 24 ORDERING REPLACEMENT PARTS Back Cover cover of this manual and request a free replacement decal. Apply the decal in the location shown. Note: The decals may not be shown at actual size. PROFORM is a - ProForm Quick Start 7.0 Treadmill | Uk Manual - Page 3
, or if the treadmill is not working properly. (See TROUBLESHOOTING on page 18 if the treadmill is not working properly.) 15. Read, understand, and test the emergency stop procedure before using the treadmill (see HOW TO TURN ON THE POWER on page 12). 16. Never start the treadmill while you are - ProForm Quick Start 7.0 Treadmill | Uk Manual - Page 4
procedures described in this manual. Never remove the motor hood un- less instructed to do so by an authorized ser- vice representative. Servicing other than the procedures in this manual should be performed by an authorized service representative only. 25. This treadmill is intended for in - ProForm Quick Start 7.0 Treadmill | Uk Manual - Page 5
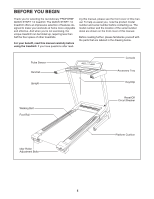
Thank you for selecting the revolutionary PROFORM® QUICK START 7.0 treadmill. The QUICK START 7.0 treadmill offers an impressive selection of features designed to make your workouts at home more enjoyable and effective. And when youʼre not exercising, the unique treadmill can be folded up, requiring - ProForm Quick Start 7.0 Treadmill | Uk Manual - Page 6
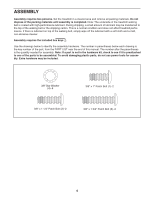
the shipping carton. This is a normal condition and does not affect treadmill performance. If there is lubricant on top of the walking belt, simply wipe the part, from the PART LIST near the end of this manual. The number after the parentheses is the quantity needed for assembly. Note: If a part is - ProForm Quick Start 7.0 Treadmill | Uk Manual - Page 7
1. Make sure that the power cord is unplugged. 1 Raise the Uprights (86) to the vertical position. Tip down the handrail assembly. Have a second person slide the Right Upright Cover (92) up the right Upright (86). Partially tighten a 3/8" x 1" Patch Bolt (1) with a 3/8" Star Washer (4) into the - ProForm Quick Start 7.0 Treadmill | Uk Manual - Page 8
in the locations shown. 4 Attach the handrail assembly to the Uprights (86) with two 3/8" x 1 1/4" Patch Bolts (2) and two 3/8" Star Washers (4). Start both Patch 2 Bolts before tightening either of them. 86 Handrail Assembly 4 2 4. Have a second person hold the Console (103) near the - ProForm Quick Start 7.0 Treadmill | Uk Manual - Page 9
assembly with two 3/8" x 1 3/4" Patch Bolts (3) and two 3/8" Star Washers (4). Start both Patch Bolts before tightening either of them. 103 Handrail Assembly 4 3 4 3 6. Make sure that all parts are properly tightened before you use the treadmill. If there are sheets of clear plastic on the - ProForm Quick Start 7.0 Treadmill | Uk Manual - Page 10
OPERATION AND ADJUSTMENT THE PRE-LUBRICATED WALKING BELT Your treadmill features a walking belt coated with high-performance lubricant. IMPORTANT: Never apply silicone spray or other substances to the walking belt or the walking platform. Such substances will deteriorate the walking belt and - ProForm Quick Start 7.0 Treadmill | Uk Manual - Page 11
of the treadmill as it guides you through an effective exercise session. Note: The console can display speed and distance in either kilometers or miles. To find which unit of measurement is selected, see THE INFORMATION MODE on page 15. For simplicity, all instructions in this manual refer to - ProForm Quick Start 7.0 Treadmill | Uk Manual - Page 12
, designed to be used if the treadmill is displayed in a store. If workout, reselect the manual mode by pressing one of the workout buttons (Interval, Mountain, Preset, or Plateau) repeatedly until a track appears in the displays. 3. Start the walking belt. To start the walking belt, press the Start - ProForm Quick Start 7.0 Treadmill | Uk Manual - Page 13
be shown. For the most accurate heart rate reading, continue to hold the contacts for about 15 seconds. 7. When you are finished exercising, remove the key from the console. Step onto the foot rails, press the Stop button, and adjust the incline of the treadmill to the lowest setting. The incline - ProForm Quick Start 7.0 Treadmill | Uk Manual - Page 14
button to start the workout. A moment after you press the button, the treadmill will automatically adjust to the first speed and incline settings for the workout. Hold the handrails and begin walking. 4. Follow your progress with the displays. See step 5 on page 13. 5. Measure your heart rate if - ProForm Quick Start 7.0 Treadmill | Uk Manual - Page 15
. Press the Speed increase button to change the unit of measurement, if desired. The console features a display demo mode, designed to be used if the treadmill is displayed in a store. While the demo mode is turned on, the console will function normally when you plug in the power cord, switch the - ProForm Quick Start 7.0 Treadmill | Uk Manual - Page 16
the key and unplug the power cord. CAUTION: You must be able to safely lift 45 lbs. (20 kg) to raise, lower, or move the treadmill. 1. Hold the metal frame firmly in the location shown by the arrow at the right. CAUTION: To decrease the possibility of injury, do not lift - ProForm Quick Start 7.0 Treadmill | Uk Manual - Page 17
USE 1. Hold the upper end of the treadmill with your right hand. Pull the latch knob to the left and hold it. It may be necessary to push the frame forward as you - ProForm Quick Start 7.0 Treadmill | Uk Manual - Page 18
TROUBLESHOOTING Most treadmill problems can be solved by following the steps below. Find the symptom that applies, and follow the steps listed. If further assistance is needed, please see the front cover of this manual. PROBLEM: The power does not turn on SOLUTION: a. Make sure that the power - ProForm Quick Start 7.0 Treadmill | Uk Manual - Page 19
PROBLEM: The walking belt slows when walked on SOLUTION: a. If an extension cord is needed, use only a 3-conductor, 14-gauge (1 mm2) cord that is no longer than 5 ft. (1.5 m). b. If the walking belt is overtightened, treadmill performance the key, and run the treadmill for a few minutes. Repeat - ProForm Quick Start 7.0 Treadmill | Uk Manual - Page 20
PROBLEM: The walking belt is off-center or slips when walked on SOLUTION Be careful not to overtighten the walking belt. Then, plug in the power cord, insert the key, and run the treadmill for a few minutes. Repeat until the walk- ing belt is centered. b. If the walking belt slips when walked - ProForm Quick Start 7.0 Treadmill | Uk Manual - Page 21
you must perform aerobic exercise, which is activity that requires large amounts of oxygen for prolonged periods of time. For aerobic exercise, adjust the intensity of your exercise until your heart rate is near the highest number in your training zone. WORKOUT GUIDELINES Warming Up-Start with 5 to - ProForm Quick Start 7.0 Treadmill | Uk Manual - Page 22
LIST-Model No. PETL60708.0 R1208A To locate the parts listed below, see the EXPLODED DRAWING near the end of this manual. Key No. Qty. 1 2 2 2 3 2 4 6 5 5 6 9 Guide Left Front Platform Support Frame Cap Frame Spacer Magnet Drive Roller/Pulley Walking Belt Right Front Platform Support - ProForm Quick Start 7.0 Treadmill | Uk Manual - Page 23
4" Black Wire, 2F 8" Blue Wire, 2F 8" Blue Wire, F/Flag 16" Blue Wire, M/F 8" White Wire, 2F 8" White Wire, F/Flag 12" Red Wire, M/F 10" Black Wire, M/F Userʼs Manual 4" Green/Yellow Wire, M/R Note: Specifications are subject to change without notice. See the back cover of this - ProForm Quick Start 7.0 Treadmill | Uk Manual - Page 24
EXPLODED DRAWING A-Model No. PETL60708.0 R1208A 24 17 37 17 38 37 17 41 39 17 6 60 40 7 10 61 7 29 63 59 58 21 28 62 35 6 21 36 58 29 28 57 7 9 44 45 46 43 42 33 47 20 9 48 33 42 10 7 6 41 20 63 7 55 6 54 37 38 37 17 17 53 17 51 52 31 56 25 15 45 44 7 49 17 50 31 24 - ProForm Quick Start 7.0 Treadmill | Uk Manual - Page 25
EXPLODED DRAWING B-Model No. PETL60708.0 8 34 8 34 8 30 27 30 30 27 34 65 64 27 18 66 R1208A 11 68 67 70 118 72 85 6 84 69 5 5 5 83 115 71 11 116 117 73 16 82 81 16 74 116 5 80 79 78 16 77 75 16 16 76 25 - ProForm Quick Start 7.0 Treadmill | Uk Manual - Page 26
EXPLODED DRAWING C-Model No. PETL60708.0 R1208A 23 4 2 23 88 87 114 4 86 2 12 31 89 13 90 31 91 1 4 26 31 31 14 93 92 94 97 22 19 31 32 96 95 97 22 98 24 32 31 87 93 14 31 1 4 26 97 22 100 95 96 19 97 101 22 99 26 - ProForm Quick Start 7.0 Treadmill | Uk Manual - Page 27
EXPLODED DRAWING D-Model No. PETL60708.0 R1208A 7 7 103 104 105 7 102 113 106 7 7 7 110 7 107 7 108 7 109 7 7 4 31 97 7 3 22 7 7 16 111 7 7 7 112 7 27 7 108 7 7 7 7 4 3 97 22 31 - ProForm Quick Start 7.0 Treadmill | Uk Manual - Page 28
) • the name of the product (see the front cover of this manual) • the key number and description of the replacement part(s) (see the PART LIST and the EXPLODED DRAWING near the end of this manual) RECYCLING INFORMATION This electronic product must not be disposed of in municipal waste. To preserve
-
 1
1 -
 2
2 -
 3
3 -
 4
4 -
 5
5 -
 6
6 -
 7
7 -
8
-
9
-
10
-
11
-
12
-
13
-
14
-
15
-
16
-
17
-
18
-
19
-
20
-
21
-
22
-
23
-
24
-
25
-
26
-
27
-
28
 |
 |

Serial Number
Decal
Model No. PETL60708.0
Serial No.
CAUTION
Read all precautions and instruc-
tions in this manual before using
this equipment. Save this manual
for future reference.
QUESTIONS?
As a manufacturer, we are commit-
ted to providing complete customer
satisfaction. If you have questions,
or if there are missing parts,
please contact us at the numbers
or addresses listed below:
Call: 08457 089 009
Outside UK: 0 (44) 113 3877133
Fax: 0 (44) 113 3877125
E-mail: [email protected]
www.iconsupport.eu
Write:
ICON Health & Fitness, Ltd.
Unit 4
Revie Road Industrial Estate
Revie Road, Beeston
Leeds, LS11 8JG
UK
Write the serial number in the space
above for reference.
USER'S MANUAL