Pyle AZPVNT7U PVNT7U Manual 1
Pyle AZPVNT7U Manual
 |
View all Pyle AZPVNT7U manuals
Add to My Manuals
Save this manual to your list of manuals |
Pyle AZPVNT7U manual content summary:
- Pyle AZPVNT7U | PVNT7U Manual 1 - Page 1
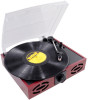
Model: PVNT7U Retro Style Turntable With USB-to-PC Connection 1600 63rd Street Brooklyn, NY 11204 Toll Free: (800) 444-5671 / Tel: (718) 236-8000 / Fax: (718) 236-2400 http://www.pyleaudio.com 1 - Pyle AZPVNT7U | PVNT7U Manual 1 - Page 2
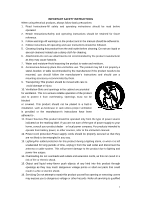
home, consult your product dealer or local power company. For products intended to operate from battery power, or other sources, refer to the instruction manual. parts that could result in a fire or electric shock. 16. Servicing-Do not attempt to repair this product yourself as opening or removing - Pyle AZPVNT7U | PVNT7U Manual 1 - Page 3
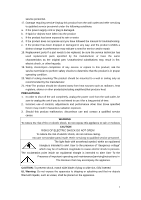
manual for troubleshooting. e. If the product has been dropped or damaged in any way, and the product exhibits a distinct change in performance may indicate a need for service stoves or other products(including amplifiers)that produce heat. PRECAUTIONS and maintenance(servicing)instructions in The - Pyle AZPVNT7U | PVNT7U Manual 1 - Page 4
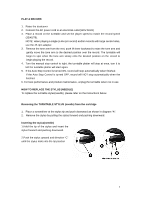
from the wall outlet. 7. Keep this manual for future reference. TURNTABLE PARTS 1. Dust cover 2. 45RPM adapter 3. Lift lever 4. Tone Arm rest 5. Speed selection 6. Auto stop control 7. Tone Arm 8. Platter/Turntable 9. Stylus(Needle )Cartridge 10&12.Built-in speaker 11.Rotary volume control with 13 - Pyle AZPVNT7U | PVNT7U Manual 1 - Page 5
Turn the manual stop control to right, the turntable platter will stop at once, turn it to left the turntable platter turntable when not in use. HOW TO REPLACE THE STYLUS (NEEDLE) To replace the turntable stylus(needle), please refer on the instructions below. Removing the TURNTABLE STYLUS (needle - Pyle AZPVNT7U | PVNT7U Manual 1 - Page 6
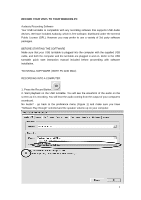
Refer to the USB turntable quick start instruction manual included before proceeding with software installation. TO INSTALL SOFTWARE ( BOTH PC AND MAC) RECORDING INTO A COMPUTER 1. Press the Record Button 2. Start playback on the USB turntable. You will see the waveform of the audio on the screen as - Pyle AZPVNT7U | PVNT7U Manual 1 - Page 7
and file name for the project and click 'Save'. 6. You have completed the recording process. (See Figure 2) Figure 2: Recording Sample Adjusting Your Audio Level (Optional) 1. Select your entire recording by selecting "Edit", then "Select...", then click "All". You can also use Ctrl+A on a PC or - Pyle AZPVNT7U | PVNT7U Manual 1 - Page 8
to have the correct volume on the recording. (See Figure 5) Figure 4: Effect Drop Down List Figure 5: Normalize Cleaning Your Audio (Optional) 1. Drag the cursor over a portion of the audio track which contains noise. We recommend using the beginning or the end of a track where there is no music and - Pyle AZPVNT7U | PVNT7U Manual 1 - Page 9
bring up the "Noise Removal" window. (See Figure 7) 3. Click "Get Noise Profile". The Noise Removal window will now close automatically. 4. Select the entire track of audio you wish to remove noise from. If you wish to clean up the entire recording, use "Select All" under the "Edit Menu" (See Figure - Pyle AZPVNT7U | PVNT7U Manual 1 - Page 10
cover, handle it gently, gripping it either at the centre or at each side. 2. Do not touch the needle tip with your fingers; avoid bumping the needle against the turntable platter or record edge. 3. Frequently clean the needle tip-use a soft brush in a "back-to-front'motion only. 4. If you must use
-
 1
1 -
 2
2 -
 3
3 -
 4
4 -
 5
5 -
 6
6 -
 7
7 -
8
-
9
-
10
 |
 |

1
Model:
PVNT7U
Retro Style Turntable With USB-to-PC Connection
1600 63
rd
Street
Brooklyn, NY 11204
Toll Free: (800) 444-5671 / Tel: (718) 236-8000 / Fax: (718) 236-2400