Pyle PFSHCMR1 User Manual
Pyle PFSHCMR1 Manual
 |
View all Pyle PFSHCMR1 manuals
Add to My Manuals
Save this manual to your list of manuals |
Pyle PFSHCMR1 manual content summary:
- Pyle PFSHCMR1 | User Manual - Page 1
User Manual 1 - Pyle PFSHCMR1 | User Manual - Page 2
read this user manual before use. This user's manual has referred to the latest information during compiling.This user manual has included some screen product base on its actual functions.Provided with two IR LEDs, the camera is featured by an excellent light compensation capability so that you can - Pyle PFSHCMR1 | User Manual - Page 3
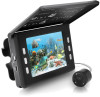
firmly into the main unit, and turn on the power switch, then the images transferred from the camera will be shown on the LCD monitor. Video camera The underwater camera and 3.5-inch monitor are provided as a complete package, and designed to monitor movements of fish stocks under the water. It - Pyle PFSHCMR1 | User Manual - Page 4
Notes Please carefully read these precautions before using the product, in order to operate it in a proper and safety manner, optimize its performance and prolong its life time. Take good care of the product all the times. Prevent water or sand particles from enteringinto the product while using - Pyle PFSHCMR1 | User Manual - Page 5
First insert the plug of the camera firmly into the main unit, and turn on the power switch, then the images transferred from the camera will be shown on the LCD monitor. Make sure to fully charge the battery for 8 hours before first use. Don't disassemble the monitor (main unit) - Pyle PFSHCMR1 | User Manual - Page 6
Appearance and Keypad 1.Camera Neck 2.Camera Housing 3.Central Ring 4.IR LED 5.Lens 6.Light-sensitive diode 6 - Pyle PFSHCMR1 | User Manual - Page 7
1.Snap button 2.Record button 3.Playback 4.M(Menu) 5.+ 6._ 7.wrist strap 8.TF card slot 9.Port for Lens 10.Indicator Light for charging(Red) 11.Sun-shield lid 12.TFT LCD 13.Power switch 14.USB Port 15.Reset 7 - Pyle PFSHCMR1 | User Manual - Page 8
Usage Configured with three IR LEDs, the camera is featured by an excellent light compensation capability so that you can capture dynamic movements of fish stocks in a very dark environment. The fishing line - Pyle PFSHCMR1 | User Manual - Page 9
Accessories USB cable to the computer USB port and host (pictured above),Connect the camera with computer for charging in the shutdown state. The red indicator light for charging is on at this time and will be off after charging. - Pyle PFSHCMR1 | User Manual - Page 10
3. Set the display: 3.1 Set the language: Press the "M" key once after turning on the device to call up the menu on the LCD monitor (see the figure below). Now press the "[+]" or "[-]" key to select a desired language. Language 0 Language 1 10 - Pyle PFSHCMR1 | User Manual - Page 11
3.2 Set the brightness: Press the "M" key twice after turning on the device to call up the menu on the LCD monitor (see the figure below). Now press the "[+]" or "[-]" key to adjust the brightness of the LCD monitor. The adjustment range is from 0 to 12. The LCD monitor will be set to a higher - Pyle PFSHCMR1 | User Manual - Page 12
3.3 Set the contrast: Press the "M" key three times after turning on the device to call up the menu on the LCD monitor (see the figure below). Now press the "[+]" or "[-]" key to adjust the contrast of the LCD monitor. The adjustment range is from 10 to 12. The LCD monitor will be set to a higher - Pyle PFSHCMR1 | User Manual - Page 13
3.4 Set the color: Press the "M" key four times after turning on the device to call up the menu on the LCD monitor (see the figure below). Now press the "[+]" or "[-]" key to adjust the saturation of the LCD monitor. The adjustment range is from 0 to 12. The LCD monitor will be set to a higher - Pyle PFSHCMR1 | User Manual - Page 14
3.5 Reset: Press the "M" key five times after turning on the device to call up the menu on the LCD monitor (see the figure below). Now press the "[+]" key to confirm to restore the factory default parameters. The LCD monitor will then be reset to the factory default parameters. Reset 14 - Pyle PFSHCMR1 | User Manual - Page 15
TF card). Otherwise, press the shutter button will display "NO CARD". 4.2 photos: Connect the camera to the host, and then turn on the it, so that the camera is aligned with the target scene after time you press the camera button to take a photograph. To do zoom operation, press the + or - key to - Pyle PFSHCMR1 | User Manual - Page 16
4.3 Playback: Turn on the host, according to a playback button to enter the playback mode, and will see after once again the photographs or video file, press the + or - button to select another picture or video. Play the video in the playback mode, select the video file, and then press the playback - Pyle PFSHCMR1 | User Manual - Page 17
to your computer through the Windows file manager to browse in the TF card photos or video file.When you unplug the USB cable ,the camera will automatically turn off .finally, the power switch dial to OFF. Tip: 1 Windows 2000 or later operating system can avoid driver. 2 photo file exists in - Pyle PFSHCMR1 | User Manual - Page 18
Technical Data - Camera: Overall dimensions Weight Power supply Sensor Resolution Horizontal angle Working temperature Working depth Length of line Tension Diameter of line 30mmx17.8mm (L x DN) Approx. 10g - Pyle PFSHCMR1 | User Manual - Page 19
Technical Data - Monitor: Overall dimensions: Display Resolution Backlight brightness Power supply Voltage Power consumption Battery capacity (for continuous use) Weight Working temperature 103mmx72mmx17mm(W x H x T) 3.5-inch LCD 320x240 300cd\㎡ Rechargeable lithium battery 3000mA/H 3.7V 2.5W 7 - - Pyle PFSHCMR1 | User Manual - Page 20
fully charge the battery for 8 hours before first use, and insert the plug of the camera firmly into the main unit, and then turn on the power switch. Packing list (standard): 1 User Manual 2 Camera (with cable) 3 Monitor (main unit) 4 Monitor bracket 1PCS 1PCS 1PCS 1PCS 5 Floating Ball 6 Central
-
 1
1 -
 2
2 -
 3
3 -
 4
4 -
 5
5 -
 6
6 -
 7
7 -
8
-
9
-
10
-
11
-
12
-
13
-
14
-
15
-
16
-
17
-
18
-
19
-
20
 |
 |

1
User
Manual