Pyle PHDVR40 PHDVR40 Manual 1
Pyle PHDVR40 Manual
 |
View all Pyle PHDVR40 manuals
Add to My Manuals
Save this manual to your list of manuals |
Pyle PHDVR40 manual content summary:
- Pyle PHDVR40 | PHDVR40 Manual 1 - Page 1
PHDVR40 www.pyleaudio.com Operation Manual-4CH Duplex DVR system TABLE OF CONTENTS 1. INTRODUCTION ...3 2. PHYSICAL UNIT...3 2.1 Front Panels ...3 2.2 Rear Panel...3 2.3 Remote Control ...4 3. GETTING STARTED ...6 4. HARDWARE SETUP...7 4.1 Hard Disk Drive Installation 7 4.2 Monitor - Pyle PHDVR40 | PHDVR40 Manual 1 - Page 2
Operation Manual-4CH Duplex DVR system 8. RECORDING LENGTH ...24 9. PLAYBACK WITH BACK-UP VIDEO DATA ON PC 25 9.1 Install ...25 9.2 Program Interface...25 9.3 Button Function ...26 10. - Pyle PHDVR40 | PHDVR40 Manual 1 - Page 3
Operation Manual-4CH Duplex DVR system 1. INTRODUCTION This system provides total video security solution for 4-channel digital surveillance system supporting duplex (simultaneous playback and record) functionality. Either mouse or remote control unit can operate all DVR menu setting. 2. PHYSICAL - Pyle PHDVR40 | PHDVR40 Manual 1 - Page 4
Operation Manual-4CH Duplex DVR system ① VIDEO OUTPUT Use this port to connect DVR to the monitor. There is one video output. ② VIDEO INPUT Use this BNC - Pyle PHDVR40 | PHDVR40 Manual 1 - Page 5
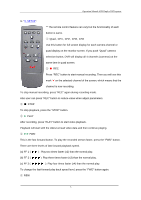
you push "Quad" camera selection button, DVR will display all 4 channels (cameras) at the same time in quad screen. ② ● REC Press "REC" button to start manual recording. Then you will see this mark '●' on the selected channel of the screen, which means that the channel is now recording. To stop - Pyle PHDVR40 | PHDVR40 Manual 1 - Page 6
Operation Manual-4CH Duplex DVR system This is the rewind button. To play the recorded stream backward, press the "REW" button. [NOTE]: The fast forward and reverse - Pyle PHDVR40 | PHDVR40 Manual 1 - Page 7
" Before installing hard drive, set jumper as "Master". The master jumper setting varies depending on the hard drive manufactures. Refer to manufacture's manual for master jumper setting. For example, the model of HDD is Seagate. (B) Connect the ribbon cable (IDE) cable & power cable Back side - Pyle PHDVR40 | PHDVR40 Manual 1 - Page 8
Operation Manual-4CH Duplex DVR system Connect "VIDEO IN" of the monitor to "VIDEO OUT" of the DVR system. 4.3 Camera Connection Connect between "VIDEO IN" of your - Pyle PHDVR40 | PHDVR40 Manual 1 - Page 9
Operation Manual-4CH Duplex DVR system Below is the information of input/output voltage for the power adapter. ² Input: AC 100-240V, 50/60Hz, 1.5A ² Output: DC + - Pyle PHDVR40 | PHDVR40 Manual 1 - Page 10
below on the monitor (Fig (b)). Suggestive window options: Channel 1 view Channel 2 view Channel 3 view All channel view Channel 4 view ● Manual recording or Stop manual recording ► Play record list Channel auto sequence. The iron " " won't display if the order of "auto sequence" is "OFF - Pyle PHDVR40 | PHDVR40 Manual 1 - Page 11
5.1 CAMERA Operation Manual-4CH Duplex DVR system Use this option for video color adjustment for each channel (1,2,3,4). Go to DISPLAY option to enable or disable for screen display - Pyle PHDVR40 | PHDVR40 Manual 1 - Page 12
recording. - Red bar: The time period with a red bar will activate continuous recording mode (Time record) unless there is any manual stopping during recording during that time. - Green bar: The time period with a green bar for built-in motion recording (MD). (See also the following chapter " - Pyle PHDVR40 | PHDVR40 Manual 1 - Page 13
Operation Manual-4CH Duplex DVR system A: [ALARM DURATION] It sets the alarm duration time (in seconds) after alarm is activated. Value at "05、10、15、20、25、 - Pyle PHDVR40 | PHDVR40 Manual 1 - Page 14
Operation Manual-4CH Duplex DVR system Use the keypad button, remote control button, or mouse click to assign the area. The keypad and mouse control instructions are below. [Using remote control button] Press [SEL] once to pitch on the area, press [SEL] twice to cancel the area. QUAD: Select or - Pyle PHDVR40 | PHDVR40 Manual 1 - Page 15
Operation Manual-4CH Duplex DVR system -CH1 for up, CH2 for down, CH3 for left, CH4 for right. Mouse function. Hold a right mouse click button, there will - Pyle PHDVR40 | PHDVR40 Manual 1 - Page 16
Operation Manual-4CH Duplex DVR system he wants to (Please refer to section 5.6.2 for account setup). If user login the system at Operator or Guest level, the - Pyle PHDVR40 | PHDVR40 Manual 1 - Page 17
Operation Manual-4CH Duplex DVR system 5.6.2 ACCOUNT SETUP Only user log in the system at admin level, the Account Setup allows the administrator to add new users, - Pyle PHDVR40 | PHDVR40 Manual 1 - Page 18
Operation Manual-4CH Duplex DVR system - CH1 for up, CH2 for down, CH3 for left, CH4 for right, Press "Shift" for change characters. And the same operation - Pyle PHDVR40 | PHDVR40 Manual 1 - Page 19
Operation Manual-4CH Duplex DVR system to apply the new time set. 5.6.6 EVENT LIST EVENT LIST function enables playback by event. On the Event List menu, it - Pyle PHDVR40 | PHDVR40 Manual 1 - Page 20
Operation Manual-4CH Duplex DVR system 5.7 LANGUAGE Our system supports multi-language OSD. You can choose either Chinese or English for display menu on the screen. You can change it by pushing "SELECT" button on - Pyle PHDVR40 | PHDVR40 Manual 1 - Page 21
-4CH Duplex DVR system 6. PLAYBACK WITH TIME SEARCH FUNCTION This is an enhanced playback option, which enables the user manually to adjust a specific starting time for playback. [Keypad Control]: In order to playback with time search function, press "PLAY" button on remote control first. And - Pyle PHDVR40 | PHDVR40 Manual 1 - Page 22
Operation Manual-4CH Duplex DVR system which will be saved on back-up devices. If you want to setup the end time faster, you can press the - Pyle PHDVR40 | PHDVR40 Manual 1 - Page 23
Operation Manual-4CH Duplex DVR system Take out the USB memory stick and attach it into your PC when it's done. Press "PLAY" button to continue with a system. To view the video image saved on back-up devices on the computer, you need our software provided with this package. 23 - Pyle PHDVR40 | PHDVR40 Manual 1 - Page 24
Operation Manual-4CH Duplex DVR system 8. RECORDING LENGTH Video System is "PAL". Estimate record time basing on 320G Byte HDD. Record Speed REC Quality 50F/Sec 25F/Sec HIGH NORMAL LOW HIGH NORMAL LOW DATA RATE (GB/Hour) 4.4 2.8 2.3 2.4 1.6 1.3 Record Time (Hour) 73 114 139 133 200 246 24 - Pyle PHDVR40 | PHDVR40 Manual 1 - Page 25
Operation Manual-4CH Duplex DVR system 9. PLAYBACK WITH BACK-UP VIDEO DATA ON PC 9.1 Install 1. Put the Driver Program CD in your CD-ROM. 2. Go for installing - Pyle PHDVR40 | PHDVR40 Manual 1 - Page 26
9.3 Button Function Operation Manual-4CH Duplex DVR system 1. Open File 3. Play Reverse 5. Pause 7. Play 9. Still Capture 11. Split 4 13. Mute On/Off 15. Minimize the window 2. Fast Backward 4. Previous - Pyle PHDVR40 | PHDVR40 Manual 1 - Page 27
Operation Manual-4CH Duplex DVR system still capture. Click the left mouse button to select folder that you want to, for example select the folder as "E:\VOC - Pyle PHDVR40 | PHDVR40 Manual 1 - Page 28
Operation Manual-4CH Duplex DVR system 6) Capture If you want to save moiety of VVF file format (*.VVF) on your computer rapidly, you must make sure the - Pyle PHDVR40 | PHDVR40 Manual 1 - Page 29
Max. 25 frames/s (Each Channel) Record Mode Time schedule, Motion detection, Manual record Resolution Display Recording NTSC:640 x 448 PAL:640 x 544 NTSC:640×224 Quality: Low@12K Bytes; Normal@ 15K Bytes; High@20K Bytes HDD Support Over 500G Byte SATA or IDE ATA -100 Interface HDD×1 Search - Pyle PHDVR40 | PHDVR40 Manual 1 - Page 30
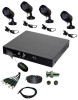
11. APPENDIX 11.1 System Connect Sketch Map 11.2 Fitting Come Along With DVR 1. Power Adapter 1pcs 2. Power Cord 1pcs 3. Remote Control (Optional) 4. User's Manual 1pcs 1pcs 5. USB Drive CD 1pcs 6. Mouse 1pcs 7. Batteries Of Remote Control 1pcs 8. Key Of HDD Box and Bolts 1pcs 30 - Pyle PHDVR40 | PHDVR40 Manual 1 - Page 31
Operation Manual-4CH Duplex DVR system 11.3 Model D31XX series used the compatible USB for some case, it doesn't operate normally. For example, in case of PC, it might not cause any problem under this kind of situation because it is immune to process this kind of exceptional cases. However, in case
-
 1
1 -
 2
2 -
 3
3 -
 4
4 -
 5
5 -
 6
6 -
 7
7 -
8
-
9
-
10
-
11
-
12
-
13
-
14
-
15
-
16
-
17
-
18
-
19
-
20
-
21
-
22
-
23
-
24
-
25
-
26
-
27
-
28
-
29
-
30
-
31
 |
 |

Operation Manual-4CH Duplex DVR system
1
TABLE OF CONTENTS
1. INTRODUCTION
................................................................................................................
3
2. PHYSICAL UNIT
.................................................................................................................
3
2.1 Front Panels
..............................................................................................................
3
2.2 Rear Panel
.................................................................................................................
3
2.3 Remote Control
.........................................................................................................
4
3. GETTING STARTED
..........................................................................................................
6
4. HARDWARE SETUP
..........................................................................................................
7
4.1 Hard Disk Drive Installation
.......................................................................................
7
4.2 Monitor Connection
...................................................................................................
7
4.3 Camera Connection
..................................................................................................
8
4.4 Mouse Connection
....................................................................................................
8
4.5 DVR Power Connection
............................................................................................
8
5. SETUP
................................................................................................................................
9
5.1 CAMERA
..................................................................................................................
11
5.2 RECORD
..................................................................................................................
11
5.3 ALARM
....................................................................................................................
12
5.4 SCREEN
..................................................................................................................
14
5.5 AUDIO
.....................................................................................................................
15
5.6 SYSTEM
..................................................................................................................
15
5.6.1 HARD DISK SETUP
.....................................................................................
16
5.6.2 ACCOUNT SETUP
........................................................................................
17
5.6.3 PASSWORD SETUP
....................................................................................
17
5.6.4 KEYPAD TONE
.............................................................................................
18
5.6.5 TIME SET
......................................................................................................
18
5.6.6 EVENT LIST
..................................................................................................
19
5.6.7 F/W UPGRADE
.............................................................................................
19
5.6.8 USB TEST
.....................................................................................................
19
5.7 LANGUAGE
.............................................................................................................
20
5.8 LOGOUT
.................................................................................................................
20
5.9 EXIT
.........................................................................................................................
20
6. PLAYBACK WITH TIME SEARCH FUNCTION
...............................................................
21
7. BACKUP via USB memory stick
.......................................................................................
21