Pyle PSCHD60SL PSCHD60BK Manual 1
Pyle PSCHD60SL Manual
 |
View all Pyle PSCHD60SL manuals
Add to My Manuals
Save this manual to your list of manuals |
Pyle PSCHD60SL manual content summary:
- Pyle PSCHD60SL | PSCHD60BK Manual 1 - Page 1
PSCHD60 - Pyle PSCHD60SL | PSCHD60BK Manual 1 - Page 2
excellent continuity of dynamic images. It supports H.264 HD video format and can create sharp photos this manual carefully and keep properly for reference in the future. This user's manual has bring its optimum performance into play and extend its service life. Do not expose the video camera to - Pyle PSCHD60SL | PSCHD60BK Manual 1 - Page 3
when it is used on the beach or near water, because water, sand particles, dust or component containing salt may damage the video camera. Keep the video camera contaminated free of dust and chemical materials. Place it in a cool, dry and well ventilated place. Do not place the video camera in a - Pyle PSCHD60SL | PSCHD60BK Manual 1 - Page 4
of precision electronic components. The with fingers or metal materials. 7. The service life of the memory card expires (please replace supports H.264 HD video format. The video mode supports four modes, i.e. VGA (120FPS), HD (60FPS), HD (30FPS) and FHD (1920x1080 30FPS). The photo mode supports - Pyle PSCHD60SL | PSCHD60BK Manual 1 - Page 5
more than 800MHz or other CPU with equivalent performance Internal Memory Larger than 512MB Sound Card and The sound card and video card shall support DirectX8 or higher Display Card version. CD Driver Speed of 4 times or faster Hard Disk Free space of more than 500MB Others One standard - Pyle PSCHD60SL | PSCHD60BK Manual 1 - Page 6
Introduction to Appearance and Keypad Infrared light Camera lens Screen-off light Screen-off light switch 6 Busy light / charging light TFT LC D - Pyle PSCHD60SL | PSCHD60BK Manual 1 - Page 7
Tripod nut MicroSD slot Reset key Microphone Power key Shutter Key HDMI interface USB interface 7 - Pyle PSCHD60SL | PSCHD60BK Manual 1 - Page 8
Usage __ 1. Charge the built-in lithium battery _____ USB Cable To charge the camera, connect it to the computer. Then, the charge indicator light (red) will be on. After the camera is fully charged, the charge indicator light will be off. In general, it can be fully charged after 2-4 hours. 8 - Pyle PSCHD60SL | PSCHD60BK Manual 1 - Page 9
2. Use of Memory Card 1. Push the Micro SD card into the card slot according to the concave lettering beside the slot of memory card till it is completely inserted. 2. To take out the Micro SD card, gently press the end of the memory card inward and it will pop up. Note: No built-in memorizer is - Pyle PSCHD60SL | PSCHD60BK Manual 1 - Page 10
3. Startup/Shutdown 3.1 Startup: Press and hold the POWER button for activated and the camera is turned on. 2 seconds. The screen of the display is 3.2 Shut down: Press the POWER Key once under idle condition, and the camera will be shut down. . 3.3 Auto Screen-off: When the idle time of the - Pyle PSCHD60SL | PSCHD60BK Manual 1 - Page 11
4. Conversion Between Function Modes The camera has three modes: video recording mode, photo mode and playback mode. These modes can be switched over by clicking the icon in the upper left corner of the LCD display after startup. Video recording mode Photo mode Vehicle mode 11 Playback mode - Pyle PSCHD60SL | PSCHD60BK Manual 1 - Page 12
5. Indicator light Busy indicator light (blue): When the camera is working (e.g.: recording videos, shooting pictures, automatic screen-off, etc.), the busy indicator light will blink. Charging indicator light (red): It indicates the camera is being charged when it is on permanently. After the - Pyle PSCHD60SL | PSCHD60BK Manual 1 - Page 13
level, the camera will also automatically stop video recording: 1 Mode icon: indicating currently in the AVI mode. 2 Video size: available in FHD/HD(60FPS)/HD(30FPS). 1 23 3 Recording time: indicating the length of remaining time to be recorded. 4 Icon of setting the time and date 5 Battery - Pyle PSCHD60SL | PSCHD60BK Manual 1 - Page 14
7. Photo mode: After turning on the DV camera, it will directly get to the video recording mode. To switch to the photo mode, click the mode icon in the upper left corner of the LCD display. You can shoot a photo by pressing the shutter button in the preview state. 1 Mode icon: indicating currently - Pyle PSCHD60SL | PSCHD60BK Manual 1 - Page 15
8. Vehicle mode: 1 Mode icon: indicating currently in the vehicle mode. 1 2 Video size: available in FHD/HD(60FPS)/HD(30FPS) 3 Recording time: indicating the length of remaining time to be recorded. 4 Icon of setting time and date. 5 click this icon, the camera can be - Pyle PSCHD60SL | PSCHD60BK Manual 1 - Page 16
9. Playback mode: 9.1 After turning on the camera and enabling the Preview state, press the Playback icon ( right corner of the LCD display to activate the menu ( ). Click the / file list mode. Then you can playback video clips by clicking a file name in the list. ) in the lower to switch to - Pyle PSCHD60SL | PSCHD60BK Manual 1 - Page 17
9.2 Playback movie clips: In the playback mode, click it to fast rewind. Click STOP to pause. After selecting the fast playback function to exit the playback mode to return to the list mode. , click it 9.3 Playback photos: After turning on the camera and enabling the Preview state, press the - Pyle PSCHD60SL | PSCHD60BK Manual 1 - Page 18
9.4 File deletion: After clicking the Delete File icon , the screen will appear as shown in the right figure: Click YES to delete the current file immediately, or click NO to cancel the deletion operation. 18 - Pyle PSCHD60SL | PSCHD60BK Manual 1 - Page 19
the camera to a high-definition TV: Connect the camera to a high-definition TV with a HD cable (as shown below). Then video signals from the camera will be automatically output to the high-definition TV, and you can enjoy HD videos and photos that you have recorded on the high-definition TV. 连接图示 19 - Pyle PSCHD60SL | PSCHD60BK Manual 1 - Page 20
Application on the personal computer___ Connect the camera to a PC ____ The camera is provided with the plug and play function . Connect the device to the computer with USB line under turning-on state, then it will be switched into the movable hard disk mode. Icon of movable disk will appear on t - Pyle PSCHD60SL | PSCHD60BK Manual 1 - Page 21
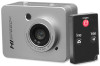
2 Use of remote control: Using the remote control will help you realize video recording, photo snapping and shutting down functions without operating the camera itself.While using the remote control, place its signal transmitter port toward the infrared signal receiver light of the camera. Then you - Pyle PSCHD60SL | PSCHD60BK Manual 1 - Page 22
Shutter LCD display screen Image resolution Video resolution White balance Exposure 5M pixels (CMOS) Video recording, photo, removable disk F3.1 f=2.9mm 4X Electronic shutter 2.4-inch touch screen 12M (4000 × 3000), 10M (3648x2736), 8 M (3264x2448), 5M (2560×1920) VGA: 640x480 (120 frames / sec - Pyle PSCHD60SL | PSCHD60BK Manual 1 - Page 23
File formats Storage medium USB interface Power Supply Dimension (length × width × height) Weight Video AVI Photo JPEG MicroSD card (Supporting up to 32GB),( without build-in flash memory) High-speed USB 2.0 interface Built-in 3.7V rechargeable lithium 74*52*33mm Approx. 72g 23 - Pyle PSCHD60SL | PSCHD60BK Manual 1 - Page 24
-
 1
1 -
 2
2 -
 3
3 -
 4
4 -
 5
5 -
 6
6 -
 7
7 -
8
-
9
-
10
-
11
-
12
-
13
-
14
-
15
-
16
-
17
-
18
-
19
-
20
-
21
-
22
-
23
-
24
 |
 |

PSCHD60