Pyle PWD250 User Guide
Pyle PWD250 Manual
 |
View all Pyle PWD250 manuals
Add to My Manuals
Save this manual to your list of manuals |
Pyle PWD250 manual content summary:
- Pyle PWD250 | User Guide - Page 1
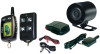
VEHICLE SECURITY SYSTEM Optional Remote Start Module and 2-way Transmitter Instructions Included SYSTEM MANUAL STANDARD FEATURES Some of the system's standard features include: • 4-button remote transmitter • LED Status indicator • Valet switch • Extended Range Receiver • 125dB Multi-tone siren • - Pyle PWD250 | User Guide - Page 2
ARMING OPERATION To arm the system press transmitter button 1: • The siren will chirp once. • The parking lights will flash once.* • The doors will lock.* • The LED will turn solid for 10 seconds then start flashing slowly. After 10 seconds the system is armed. During Arming, if an open hood or - Pyle PWD250 | User Guide - Page 3
TAMPER ALERT If the alarm was triggered while away from the vehicle, the siren will chirp 3 times on disarming for tamper indication. The triggered zone will be shown on the optional 2-way LCD transmitter display. AUTO REARM If the system was armed for at least 10 seconds, the Auto Rearm feature - Pyle PWD250 | User Guide - Page 4
VALET MODE When the system is placed into the Valet Mode the security and remote start features will be disabled. However, the optional keyless entry and trunk release features will still function if installed.The valet mode may be accessed with either the valet switch or a remote transmitter. To - Pyle PWD250 | User Guide - Page 5
To activate anti-carjack protection: 1. Make sure the ignition is on and all doors are closed. 2. Press the valet switch once. If the carjack feature is triggered: • The LED will flash rapidly. • Warn Trigger will activate after 30 seconds. The parking lights will begin flashing and the siren will - Pyle PWD250 | User Guide - Page 6
SURF MODE The Surf Mode allows the system to be armed or disarmed using just the key and override switch. While in surf mode the transmitter may be safely left at home or inside the vehicle's trunk when engaging in an activity that may damage the transmitter such as surfing, swimming, white-water - Pyle PWD250 | User Guide - Page 7
engine and arm/lock doors. The system will be able to remote start as long as the alarm is not disarmed prior to remote starting. Manual Transmission Safe Mode Exit Sequence: With ignition on, press lock button for two seconds (button mode shifts to level 2) the press lock button again. Turn - Pyle PWD250 | User Guide - Page 8
LED AND PARKING LIGHT INDICATIONS STATUS INDICATOR (LED) FUNCTIONS On Solid = Valet Mode Slow Flash = System Armed Rapid Flash = Passive Arming Rapid Flash while Ignition on = Open Zone Warning Rapid Flash while Ignition on and Anti-Carjack Mode Active = Entering Carjack Warning Stage Double Flash - Pyle PWD250 | User Guide - Page 9
OPTIONAL 2-WAY TRANSMITTER WITH LCD DISPLAY OPERATING INSTRUCTIONS REMOTE TRANSMITTER LAYOUT Button 3 Button 4 Button 5 the 2-way transmitter also provides audible and vibration alert in case the display is out of view. And, for - Pyle PWD250 | User Guide - Page 10
OPTIONAL 2-WAY TRANSMITTER INDICATIONS The optional 2-way LCD transmitter displays more than 20 different screens to provide real-time indications for feature activation and system status. the different display indications are shown below for reference. Arm Silent Arm Disarm Door Open Hood Open - Pyle PWD250 | User Guide - Page 11
Ignition Key On Brake Pedal Cold Start Passive / Last Door Arm Immobilize Low Transmitter Battery Range Indicator Button Lock Anti-Carjack Mode 11 - Pyle PWD250 | User Guide - Page 12
This product must be installed by qualified personnel according to these instructions and and observing all safety features. • Check to see if Shock Sensor Mount the shock sensor to an under dash brace or similar support structure using a tiewrap or the supplied double-sided tape. Higher sensitivity - Pyle PWD250 | User Guide - Page 13
ALARM MODULE WIRING 6-Pin Door Lock Harness Plug-in connector port for door lock harness. See Door Lock Wiring Diagrams • BLUE/BLACK WIRE - Lock relay N/C (87a). • BLUE WIRE - Lock relay Common (30). • GREEN WIRE - Unlock relay Common (30). • GREEN/BLACKWIRE - Unlock relay N/C (87a). • BLACK/RED - Pyle PWD250 | User Guide - Page 14
output (+/-) 10A relay. Used for vehicle's with independent left and right parking light circuits; see GREEN/BLACK wire. • YELLOW WIRE - +12V Ignition input. Connect to a main ignition wire at the ignition switch harness.This wire shows +12V when the ignition is on and while cranking. The voltage - Pyle PWD250 | User Guide - Page 15
• BLACK/YELLOW WIRE (small) - not used. • BLACK/YELLOW WIRE (large) - Start output (+). Connect to the vehicle's starter wire. NOTE: If using the supplied starter defeat/antigrind relay socket, the large BLACK/YELLOW wire should be connected to the same point as the solid BLUE wire from the relay - Pyle PWD250 | User Guide - Page 16
SYSTEM PROGRAMMING Entering Programming To enter System Programming 1. Turn on ignition. 2. Within 5 seconds, press valet the proper number of times for the desired mode: 5 presses = Alarm Programming 10 presses = Remote Start Programming • The siren will chirp to indicate programming mode entered: - Pyle PWD250 | User Guide - Page 17
unlocks when ignition is turned off.The system will not lock if any door is open when the ignition is turned on. Brake/On mode- the doors will lock after closing all doors and pressing the brake pedal with ignition on; the doors will unlock when ignition is turned off. On/On mode- the doors will - Pyle PWD250 | User Guide - Page 18
as long as the alarm is not disarmed prior to remote starting. Manual Transmission Safe Mode Exit Sequence: With ignition on, press lock button for minutes 3. Cold Start Timer 1 hour 2 hours 4 hours 4. Manual Transmission Mode Quick set Safe 5. Parking Light w/Start Flashing Continuous Off - Pyle PWD250 | User Guide - Page 19
Accessory 2 operation. In accessory 2 mode the output will not turn on until after engine cranking. 4. Transmission Mode. OFF= automatic transmission. ON= manual transmission. 5. Gas/Diesel Mode. Sets the crank delay after ignition turns on. OFF= gasoline engine. ON= diesel engine. See Orange/Violet - Pyle PWD250 | User Guide - Page 20
BYPASSING FACTORY THEFT DETERRENT SYSTEMS Many newer vehicles are now factory-equipped with anti-theft systems that use either a resistor coded key or a passive transponder that disables the fuel system unless a properly coded key is inserted into the ignition cylinder. To integrate a remote starter - Pyle PWD250 | User Guide - Page 21
STARTER DEFEAT RELAY WIRING DIAGRAMS The Starter Defeat/Anti-Grind relay socket can be wired in either normally closed or normally open configuration. In either configuration, the Starter Defeat relay also provides Anti-Grind protection during remote start control, to prevent accidentally grinding - Pyle PWD250 | User Guide - Page 22
RELAY WIRING DIAGRAMS HORN HONK DIAGRAMS DOME LIGHT DIAGRAMS DEFROSTER DIAGRAMS TRUNK RELEASE DIAGRAM OPTIONAL HEADLIGHT ACTIVATION Program the Auxiliary output for timed operation and the headlights will turn on with Auxiliary for the preset timer duration then automatically turn off. Program - Pyle PWD250 | User Guide - Page 23
DOOR LOCK WIRING DIAGRAMS NEGATIVE PULSE LOCK SYSTEM POSITIVE PULSE LOCK SYSTEM ADDING ACTUATORS VACUUM LOCK SYSTEM REVERSE POLARITY LOCK SYSTEM NOTE: The Black/Red door lock polarity input wire connects to the short Red or short Black wire in the 14pin main harness depending on door lock - Pyle PWD250 | User Guide - Page 24
module side view ALARM MODULE WIRING DIAGRAM 3-Pin Data-Link cable 2-Pin Shock Sensor Blue Black/Red Blue/Black Green Black/Red Green/Black Lock relay common 30 [10A fuse] Lock relay normally open 87 Lock relay normally closed 87a Unlock relay common 30 [10A fuse] Unlock relay normally open 87
-
 1
1 -
 2
2 -
 3
3 -
 4
4 -
 5
5 -
 6
6 -
 7
7 -
8
-
9
-
10
-
11
-
12
-
13
-
14
-
15
-
16
-
17
-
18
-
19
-
20
-
21
-
22
-
23
-
24
 |
 |

1
STANDARD FEATURES
Some of the system’s standard features include:
• 4-button remote transmitter
• LED Status indicator
• Valet switch
• Extended Range Receiver
• 125dB Multi-tone siren
• Dual stage impact detector
• Remote panic
• Remote Valet mode
• Remote chirp delete
• Remote sensor bypass
• Passive or active arming
• Flashing parking lights
• Auto Rearming
OPTIONAL FEATURES
This system has many optional features that
may require additional parts and/or labor.
Please contact your dealer for more details.
• Remote keyless entry (door lock/unlock)
• Illuminated entry
• LCD 2-way Remote
• Hood & trunk protection
• Trunk/hatch release
• Window roll-up
• Additional sensors
• Remote Start (optional plug-in module)
• Stop & Go Feature
• Auto Cold Start
Note: Some features may not be appropriate
for certain vehicles.
REMOTE TRANSMITTER BUTTONS
NOTE: Transmitter cosmetics may differ
between models and between standard 1-way
and LCD 2-way transmitters, but button
functions remain the same as described below.
Each transmitter button has two operating
modes: standard and level shifted.
Pressing a
transmitter button for less than one second
activates the standard function associated with
that button (such as arm or disarm).
Pressing a
button for more than one second changes the
color of the standard transmitter’s LED to
green and activates the level shift feature.
While the LED is green (level shifted), pressing
any transmitter button accesses another level
of commands providing expanded operation.
Transmitter Icons
Button 1
Button 2
Button 3
Button 4
SYSTEM MANUAL
VEHICLE SECURITY SYSTEM
Optional Remote Start Module and 2-way TransmitterInstructions Included