RCA 25424RE1 User Guide - Page 13
Data Port, System Verification - a phone
 |
UPC - 044319703023
View all RCA 25424RE1 manuals
Add to My Manuals
Save this manual to your list of manuals |
Page 13 highlights
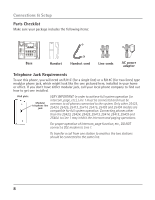
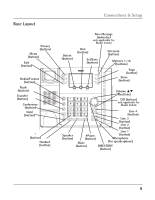
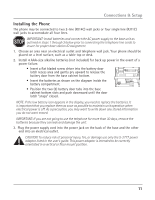
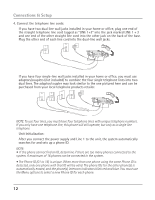
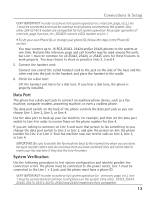
Connections & Setup VERY IMPORTANT: In order to achieve full system operation (i.e. intercom, page, etc.), Line 1 must be connected and must be common to all phones connected to the system. Only other 25413/14/15 models are compatible for full system operation. For proper operation of intercom, page function, etc., DO NOT connect a DSL modem to Line 1. • To set your own Phone ID, or change your phone ID, follow the steps in the Phone ID section. You may connect up to 16 RCA 25423, 25424 and/or 25425 phones to the system at one time. Features like intercom, page and call transfer may be used among the units, but Line 1 must be common for all 25423, 25424, or 25425 units for these features to work properly. You may choose to share or privatize lines 2, 3 and 4. 5. Connect the handset cord: Connect one end of the coiled handset cord to the jack on the side of the base and the other end into the jack in the handset, and place the handset in the cradle. 6. Check for a dial tone: Lift the handset and listen for a dial tone. If you hear a dial tone, the phone is properly installed. Data Port This phone has a data port jack to connect an auxiliary phone device, such as a fax machine, computer modem, answering machine, or even a cordless phone. The data port switch on the back of the phone controls the data port jack so you can choose Line 1, Line 2, Line 3, or Line 4. Use the data port to hook up your fax machine, for example, and then set the data port switch to Line 4 in order to receive faxes on the phone number for Line 4. If you are talking to someone on Line 4 and want that person to fax something to you, change the data port switch to Line 2 or Line 3, and give the person on-line the phone number for Line 2 or Line 3. Your fax machine now can receive calls on Line 2, Line 3, or Line 4. IMPORTANT: Be sure to switch the fax machine back to the normal line when you are done because outside callers who do not know that you have switched lines will not be able to reach your fax machine if they dial the Line 4 number. System Verification Use the following procedures to test system configuration and identify possible line connection errors. The phone must be connected to the power outlet, Line 1 must be connected to the Line 1 + 2 jack, and the phone must have a phone ID. VERY IMPORTANT: In order to achieve full system operation (i.e. intercom, page, etc.), Line 1 must be connected and common to all phones on the system. Only other 25423, 25424, 25425, 25413, 25414, 25415, 25403 and 25404 models are fully compatible. 13
-
 1
1 -
2
-
3
-
4
-
5
-
6
-
7
-
 8
8 -
 9
9 -
 10
10 -
 11
11 -
 12
12 -
 13
13 -
 14
14 -
 15
15 -
 16
16 -
 17
17 -
 18
18 -
19
-
20
-
21
-
22
-
23
-
24
-
25
-
26
-
27
-
28
-
29
-
30
-
31
-
32
-
33
-
34
-
35
-
36
-
37
-
38
-
39
-
40
-
41
-
42
-
43
-
44
 |
 |