RCA 25424RE1 User Guide - Page 16
Delay Ring, Phone ID - a manual
 |
UPC - 044319703023
View all RCA 25424RE1 manuals
Add to My Manuals
Save this manual to your list of manuals |
Page 16 highlights
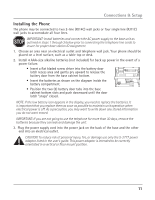
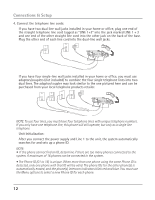
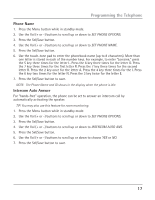
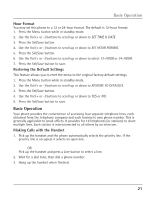
Programming the Telephone Delay Ring Use this setting to delay the Central Office ring. 1. Press the Menu button while in standby mode. 2. Use the Vol (+ or -) buttons to scroll up or down to SET PHONE OPTIONS. 3. Press the Sel/Save button. 4. Use the Vol (+ or -) buttons to scroll up or down to SET DELAY RING. 5. Press the Sel/Save button. 6. Use the Vol (+ or -) buttons to scroll up or down to 0 ring up to 10 rings. 7. Press the Sel/Save button to save. NOTE: The default Delay Ring is 0. If your system has a phone with the auto attendant ON, we suggest that you set the Delay Ring to 2 rings. This allows the auto attendant to pick up the incoming call before it rings in. Phone ID 1. Press the Menu button while in standby mode. 2. Use the Vol (+ or -) buttons to scroll up or down to SET PHONE OPTIONS. 3. Press the Sel/Save button. 4. Use the Vol (+ or -) buttons to scroll up or down to SET PHONE ID. 5. Press the Sel/Save button. 6. Press the Sel/Save button again to automatically set the phone ID, or press any memory button (1-16) to assign a phone ID. NOTE: The Intercom indicator will flash red and blue if the ID is not programmed. NOTE: The Phone ID (01-16) is unique. If you manually select a phone ID that belongs to another unit on the system, NOT AVAILABLE shows in the display. Press Sel/Save or choose another memory button. NOTE: If the phone cannot find an ID, determine if there are too many phones connected to the system. A maximum of 16 phones can be connected in the system at one time. NOTE: You may press the Exit button at any time to exit , except during the ID search. 16
-
 1
1 -
2
-
3
-
4
-
5
-
6
-
7
-
8
-
9
-
10
-
 11
11 -
 12
12 -
 13
13 -
 14
14 -
 15
15 -
 16
16 -
 17
17 -
 18
18 -
 19
19 -
 20
20 -
 21
21 -
22
-
23
-
24
-
25
-
26
-
27
-
28
-
29
-
30
-
31
-
32
-
33
-
34
-
35
-
36
-
37
-
38
-
39
-
40
-
41
-
42
-
43
-
44
 |
 |