RCA CC6151 User Guide - Page 69
Playback, on TV or VCR, Audio/Video, Inputs, continued - owners manual
 |
UPC - 034909720455
View all RCA CC6151 manuals
Add to My Manuals
Save this manual to your list of manuals |
Page 69 highlights
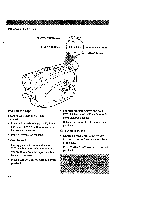
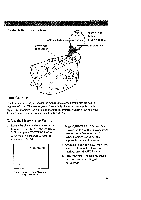
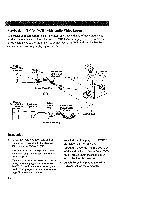
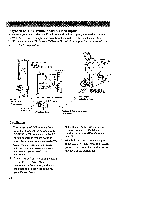
Playback on TV (or VCR) with Audio/Video Inputs (continued) Playback Operation and How to Copy Tapes on the VCR 1. A° Camcorder connected directly to TV: Turn on the TV and tune it to the video input channel. B. Camcorder connected to VCR that is already connected to TV: Turn on VCR and place it in the "line" or "camera mode". (If your VCR does not have a "line" or "camera mode", consult the VCR owner's manual.) Operate the TV as you normally do to see the signal coming from the VCR. . Set the POWER switch to VCR to turn on the camcorder. The power indicator lights. 3. Press PLAY/PAUSE. • During playback, use the playback features on pages 62-63. . To copy what the camcorder is playing, place a blank cassette in the VCR, and press the VCR's RECORD button. Note: Make sure the memory-stop feature is turned off (press COUNTER R/M) or the camcorder enters play-pause when the counter reaches M 0:00:00. 5. Press STOP when you are finished. Viewing What the Camcorder is Seeing (or Recording) l. m. Camcorder connected directly to TV: Turn on the TV, and tune it to the video input channel. B_ Camcorder connected to VCR that is already connected to TV: Turn on VCR and place it in the "line" or "camera mode". (If your VCR does not have a "line" or "camera mode", consult the VCR owner's manual.) Operate the TV as you normally do to see the signal coming from the VCR. 2. Set the POWER switch to CAMERA. Note: Turn the TV's volume down to prevent a high-pitched squeal caused by feedback. o Press the thumb trigger to begin recording. You can watch what the camcorder is seeing (or recording) on the TV screen. 67
-
 1
1 -
2
-
3
-
4
-
5
-
6
-
7
-
8
-
9
-
10
-
11
-
12
-
13
-
14
-
15
-
16
-
17
-
18
-
19
-
20
-
21
-
22
-
23
-
24
-
25
-
26
-
27
-
28
-
29
-
30
-
31
-
32
-
33
-
34
-
35
-
36
-
37
-
38
-
39
-
40
-
41
-
42
-
43
-
44
-
45
-
46
-
47
-
48
-
49
-
50
-
51
-
52
-
53
-
54
-
55
-
56
-
57
-
58
-
59
-
60
-
61
-
62
-
63
-
 64
64 -
 65
65 -
 66
66 -
 67
67 -
 68
68 -
 69
69 -
 70
70 -
 71
71 -
 72
72 -
 73
73 -
 74
74 -
75
-
76
-
77
-
78
-
79
-
80
-
81
-
82
-
83
-
84
-
85
-
86
-
87
-
88
-
89
-
90
-
91
-
92
 |
 |
