RCA EZ2050 Quick Start Guide
RCA EZ2050 Manual
 |
View all RCA EZ2050 manuals
Add to My Manuals
Save this manual to your list of manuals |
RCA EZ2050 manual content summary:
- RCA EZ2050 | Quick Start Guide - Page 1
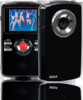
v1.0 (1.0.1.0) (EN/F/E) English QuickStartGuide EZ2050 Series RCA Small Wonder Camcorder Congratulations on purchasing your new RCA Small Wonder Camcorder. Please read these instructions for quick tips on using the product. www.rcaaudiovideo.com The User Manual PDF file can also be found in the
-
 1
1
 |
 |

Connect the camcorder to your PC with the provided USB cable.
To install Memory Manager 3
Windows
: To access the Memory Manager 3 installer, go to
My Computer
(XP users) /go to
Computer
(Vista and 7 users) in the Start menu, find and open the drive letter associated
with the CD rom and then double-click the
MemoryMgr3_Windows_Installer.exe
file to
launch the installer. The RCA Detective application is installed with Memory
Manager 3 and will automatically run the Memory Manager 3 application when your
camcorder is connected to the PC.
Mac:
To access the Memory Manager 3 installer, double-click the CD rom volume.
Double-click the
RCAMacInstallers.dmg
disk image in the CD rom volume. Locate
the
RCAMacInstallers
volume on the desktop and Double-click on it. Double-click the
MemoryMgr3 Mac Installer
file in the
RCAMacInstallers
volume to start the installation.
After the Memory Manager 3 installation has completed, double-click the
RCA Detective
Installer
file in the RCAMacInstallers volume to install the RCA Detective application, which
will automatically run the Memory Manager 3 application when your camcorder is connected
to the Mac.
Lift up the cover
EZ2050
Series
RCA Small Wonder Camcorder
www.rcaaudiovideo.com
Congratulations on purchasing your new RCA Small Wonder Camcorder.
Please read these instructions for quick tips on using the product.
The User Manual PDF file can also be found in the CD ROM under the User Manuals folder.
v1.0 (1.0.1.0) (EN/F/E)
QuickStart
Guide
1. Content of the box
•
Small Wonder Camcorder
•
AAA batteries x 4
•
USB cable
•
AV cable
•
CD-ROM
•
Lanyard
•
Soft pouch
•
Quick Start Guide
2. Battery Installation
11. Learning more about the camcorder
Read the user manual for more information on the followings:
•
Using the
MENU
button to setup the camcorder (including date
and time)
•
Viewing videos on TV
•
Recording videos to VHS tape or DVD
•
Connecting the camcorder to your PC
•
Tips and troubleshooting
•
Safety and warranty information
3. General controls
Lens
Recording indicator
Microphone
SD card slot
Camcorder strap hole
MODE
On/off
switch
Delete recordings
Switch between Video
or Photo mode
AV output
Play/pause
Setup menu
Record
Audio speaker
LCD screen
USB
+
/
–
– Adjust volume
during playback/
zoom during record
and preview
/
– Skip to
previous or next
recording ; fast
rewind or forward
7. Video recording and photo taking
MODE
1
2
3
4
5
Start, stop, resume recording in Video mode; enter Video
mode from other modes
Pause and resume recording
Zoom in during recording
Zoom out during recording
Switch between Video or Photo mode
1
2
3
4
5
3
Actual recording time and capacity will vary depending on type of video content being recorded, system requirements,
and other factors.
Video recording indicator
9. Installing RCA Memory Manager application
8. Playing back or deleting recordings
1
2
3
5
4
1
2
3
4
5
6
7
Enter Playback mode to play the most recent recording;
start or pause playback
Adjust volume during playback
Cue to previous recording
Cue to next recording
Stop playback or enter Video mode from Playback mode
Press to select delete one or all recordings.
When video playback stop, enter Video mode from
Playback mode
6
7
6. Selecting recording quality
Settings
HD
HQ
WebQ
Resolutions (pixel) &
Frame Rates (FPS)
1280 x 720 @ 30fps
720 x 480 @ 30fps
320 x 240 @ 30fps
Approx. recording durations
on a 32 GB memory card
3
4 hours
6 hours
17 hours
5. Turning on the camcorder
The camcorder has three operation modes (Video, Photo
and Playback). It is always in Video mode after switched on.
Refer to the diagram below for switching between modes.
4. Inserting (or removing) memory card
A SD memory card (not included) is recommended for recording.
1. In Video mode, press
MENU
to show the camcorder menu.
2.
Press + or - to select Quality.
3. Press
RECORD
to enter and press + or – to select from HD, HQ and WebQ.
4. Press
RECORD
to save settings.
5. Press
MENU
to exit the camcorder menu. The selected setting (HD, HQ or WebQ) appears on
the display screen during preview.
To insert card:
Push the card in until a click is heard
To remove card:
Push card in until a click is heard,
then slowly release the card. As card is under minimal
tension when locked in memory slot, please use care
when removing.
To ensure that videos can be managed and played on your PC:
•
Make sure to install the included Memory Manager application.
1
2
3
4
Switch on
Press
MODE
Press
MODE
Press
PLAY/PAUSE
Playback mode
When video playback
stop, press
MODE
or
RECORD
(Press
RECORD
to stop video
playback)
Video mode
1
Photo mode
2
1
In Video mode, press
RECORD
to record a video
2
In Photo mode, press
RECORD
to record a photo
Push (to the right) to
unlock.
Observe the polarities.
Slide up to lock.
English
The camcorder can also be powered by USB. Refer to Connecting to a PC section for connecting
details. When the camcorder is connected to a PC, three options will be displayed: USB connect,
Web cam and USB power. Press + or - to select USB power and press
RECORD
to confirm.
MODE
Product registration
Thank you for purchasing an RCA product. We pride ourselves on the quality and
reliability of all our electronic products but if you ever need service or have a question, our
customer service staff
stands ready to help. Contact us at www.rcaaudiovideo.com
PURCHASE REGISTRATION
: Registering On-line will allow us to contact you in the
unlikely event a safety notification is required under the Federal Consumer Safety Act.
Register Online at:
WWW.RCAAUDIOVIDEO.COM
Click on Product Registration and Fill Out the Brief Questionnaire
To use the camcorder as a Web Camera in your PC, a driver file is needed. Please go to
www.rcaaudiovideo.com to download the file.
After downloading the driver file, follow the instructions and complete the installation.
Connect the camcorder to the PC, after the camcorder displays the selection menu, select the
Web Cam option and press
RECORD
. Now the camcorder is connected as Web Camera to the
PC.
10. Using camcorder as Web Camera in PC
Slide and
hold until the
camcorder turns
on or off