RCA HD50LPW165 User Guide & Warranty - Page 48
VPIP Picture-in-Picture Operation
 |
View all RCA HD50LPW165 manuals
Add to My Manuals
Save this manual to your list of manuals |
Page 48 highlights
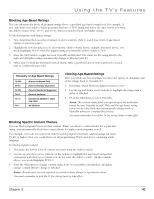
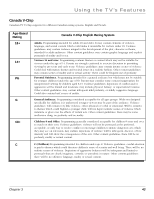
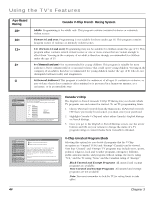
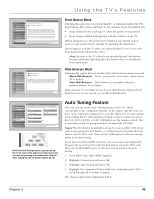
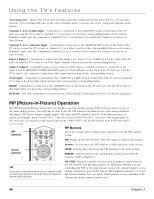
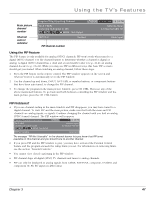
Using the TV's Features Not Connected Choose this if you don't have this particular component connected to the TV, or if you don't want the TV to automatically tune to the correct channel when you press one of the component buttons on the remote. Channel 2, 3 or 4 Cable Input Component is connected to the CABLE INPUT jack on the back of the TV, and you want the TV to tune to channel 2, 3, or 4 when you press the corresponding button on the remote. Reminder: make sure the component's Channel 2/3 or 3/4 switch is set to match the channel you choose in Auto Tuning. Channel 2, 3 or 4 Antenna Input Component is connected to the ANTENNA INPUT jack on the back of the TV, and you want the TV to tune to channel 2, 3, or 4 when you press the corresponding button on the remote. Reminder: make sure the component's Channel 2/3 or 3/4 switch is set to match the channel you choose in Auto Tuning. Input 1, Input 3 Component is connected to the Input 1 or 3 Video (V) or S-VIDEO jack on the back of the TV and you want the TV to tune to the Video Input Channel when you press the corresponding button. Input 2, Input 4 Compatible video source, such as a DVD player or satellite receiver, is connected to the Input 2 or 4 COMPONENT/COMPOSITE INPUT jacks (Y/Video•Pb•Pr) on the back of the TV and you want the TV to tune to the composite/component video input when you press the corresponding button. Front Input Component is connected to the S-VIDEO IN or VIDEO IN jack on the front of the TV and you want the TV to tune to the front Video Input Channel when you press the corresponding button. HDMI Component is connected to the HDMI/DVI jack on the back of the TV and you want the TV to tune to this input when you press the corresponding button. DTVLink DTVLink components connected to the DTVLink jacks on the back of the TV can also be autotuned. PIP (Picture-in-Picture) Operation The PIP (Picture-In-Picture) feature lets you display a second, smaller analog (NTSC format) picture on top of the main analog picture. You will only be able to use the PIP window and main picture with analog channels and inputs; PIP doesn't support digital signals. The main and PIP channels must be from different tuners or inputs; for example, main is from INPUT 1 and PIP is from ANTENNA INPUT. If you are only using tuners for PIP and main, you must have the main picture from CABLE INPUT and the PIP picture from ANTENNA INPUT, or vice-versa. PIP Buttons PIP buttons Arrow buttons PIP SWAP CH. CTRL FREEZE CC PRESETS FAV CC LIGHT FORMAT CLEAR C INFO i MENU M SOUND SKIP There are certain remote buttons that control the way the PIP window works: PIP Brings up the PIP window. Press PIP again to remove the window. Arrows Let you move the PIP window to different areas of the screen. SWAP Switches the video from the PIP window to the main picture. FREEZE Freezes entire screen, including the main picture and PIP window, if PIP is displayed. Tip If you want to go directly to an input or channel in PIP (or main), set up auto tuning and press the component button (VCR, DVD, etc.). CH CTRL (Channel Control) Lets you switch channel control between the PIP window and the main picture. To determine whether you are controlling the PIP or the main picture, look at the channel banner as you change channels or press INFO button. The triangular indicator ( ) beside the channel number lets you know which picture you're controlling with channel up/down, number buttons, etc. 46 Chapter 3
-
 1
1 -
2
-
3
-
4
-
5
-
6
-
7
-
8
-
9
-
10
-
11
-
12
-
13
-
14
-
15
-
16
-
17
-
18
-
19
-
20
-
21
-
22
-
23
-
24
-
25
-
26
-
27
-
28
-
29
-
30
-
31
-
32
-
33
-
34
-
35
-
36
-
37
-
38
-
39
-
40
-
41
-
42
-
 43
43 -
 44
44 -
 45
45 -
 46
46 -
 47
47 -
 48
48 -
 49
49 -
 50
50 -
 51
51 -
 52
52 -
 53
53 -
54
-
55
-
56
-
57
-
58
-
59
-
60
-
61
-
62
-
63
-
64
-
65
-
66
-
67
-
68
-
69
-
70
-
71
-
72
-
73
-
74
-
75
-
76
-
77
-
78
-
79
-
80
-
81
-
82
-
83
-
84
-
85
-
86
-
87
-
88
-
89
-
90
-
91
-
92
-
93
-
94
-
95
-
96
 |
 |